SharePoint Hub Site Announced at Microsoft Ignite


A new SharePoint site, SharePoint Hub Site, was announced at Microsoft Ignite 2017 in Orlando. The purpose of the SharePoint Hub Site is to provide a point of organization for content across SharePoint sites. Hub Sites allow you to associate SharePoint Team Sites and Communication Sites with a parent thereby streamlining and alleviating the issues of locating related content across the organization that appears in other sites. Associating multiple Team Sites and Communication Sites provides the flexibility to model and promote an intranet that reflects the way that your people in your organization organize.  Across associated sites, Hub Sites provide a common navigational structure, look, and feel.  Hub Sites also aggregate news and activities, displaying the roll-up on the Hub Site’s home page. SharePoint Hub Sites can be used to organize content, teams, divisions or resources throughout your business. 

Hub Sites


How do SharePoint Hub Sites work?

Newly created SharePoint Hub Sites propagate the navigation to all the associated sites, creating parent/subsite relationships.  Consistency across sites go from the top down so that all team sites or communication sites inherit common characteristics from the Hub Site. These characteristics include:

1. Navigation: Define top navigation in the hub site that is inherited by associated sites

2. Themes: Define the look and feel of the hub site. This theme remains consistent across all associated sites

3. Logo: The logo is the most important identifier of the site you are visiting.  The logo remains consistent across all associated sites providing the message that says, “You are here, and you have not left”

Hub SiteSharePoint is a tool for collaboration and the sharing of information. Within an organization, there can be numerous project teams working on a variety of projects and it is important to increase awareness, visibility, and discoverability to encompass those who are not part of the core team.  It would be unreasonable to expect your audience to search and drill down for the information, but having access to clear, concise communication that expresses in a broad sense of what is happening with the projects and initiatives would be valuable.  Team sites and communication sites push information and content up to the hub site level with rollup web parts.  These parts can surface content from all your associated sites into one place, allowing the flexibility for you to shift your content and associate it where it makes the most sense, unlike rigid hierarchy.  

Content is pushed up to the hub site level with news aggregation, combined site activities, and scoped search. 

News Aggregation: After creating and publishing a news article on an associated site, the news article will surface on SharePoint home, in the SharePoint mobile apps, and on the hub site’s home page.

Combined Site Activities: Site activities are visible on a team site’s home page as well as on the site’s card on SharePoint home. Site activities will roll up from each associated site, becoming visible on the hub site’s home page. This provides the ability to see what is happening across related sites in one view rather than going site by site.  With this information, you can now prioritize and focus your time.

Scoped Search: Searching content from a hub site will result in content from all associated sites which in turn increases relevance and enhances content discovery.

Creating SharePoint Hub Sites

Hub sites can either be created by Administrators who then associate existing team and communication sites to the newly created Hub Site from SharePoint home in Office 365. You can also create an associated site directly from within the hub site itself.   

The site owner can associate an existing team site or communication site within a hub site by following these steps:

1. Click the gear icon located on the upper right of the site

2. Click Site Information

3. In the Edit Site Information, click Hub Site from the drop-down menu.  Choose the right hub site to join.

It is important to note that team sites and communication sites can only be associated with one Hub Site.

As intranets are dynamic, associations may change as projects come to completion and new projects added. It is easy to un-join a Hub Site as it is to join it, allowing you the flexibility to adapt to the ever-changing landscape of the intranet. 


SharePoint Hub Sites and SharePoint Mobile App

Team collaboration and the sharing of information launched itself off the desktop onto mobile devices and SharePoint Mobile App is being updated to render hub sites, their pages, news, and content with smooth navigation between associated sites and scoped search. SharePoint Mobile App will continue to provide quick access to all your sites, news and team members you work with but now with added, enhanced search for content and people across your organization. 

Hub Site Mobile

The building blocks for your intranet have now expanded from the classic publishing sites and sites for application to include team sites, communication sites, and hub sites.  Sharing, managing, finding content, knowledge, and apps, on any device, is easily accomplished with SharePoint, the solution that connects your workplace with its people.

Big SharePoint, OneDrive and Office 365 Announcements


This year’s Microsoft Ignite unveiled exciting new products and innovations that span across its entire business software and cloud spectrum.  Focusing on empowering the modern workspace, Microsoft has made advancements in management, security, and intelligence as well as recognizing new groups of users. 

Office 365 targets two new groups of users through its two special packages. The first is for education, Microsoft 365 Education, and the second, Microsoft 365 F1, for first-line workers.

Microsoft 365 Education

Microsoft 365 Education provides the tools for students, faculty, and staff to create and work together securely in the classroom.  Office 365 brings its productivity applications and combined with Enterprise Mobility + Security, Minecraft: Education Edition and Windows 10, students and teachers alike have a powerful system to create, learn and grow together in the classroom.  Microsoft 365 Education is offered in three different plans as Microsoft 365 A1, Microsoft 365 A3, and Microsoft 365 A5.  The fourth plan for non-profit organizations is in the works.  There are price point differences between the plans, and the differences between each are compared below.

Microsoft 365

Microsoft 365 F1

Who are first-line workers?  Any staff who has direct contact with a customer while providing a service or care to the customer is a first-line worker. First-line workers account for nearly 2 billion workers worldwide. Microsoft 365 F1 promotes the growth and development of the community and culture amongst first-line staff. It also trains and upskills employees, digitizes business processes, delivers real-time expertise with minimized risk and cost. Many first-line workers work shift work and to help manage their schedules, Microsoft 365 F1 offers a new feature – StaffHub. Combined with Windows 10, front-line staff is now able to stay connected, automate device deployment and manage single-purpose devices. In response to the need for devices for first-line workers, Microsoft is offering through its OEM partners HP, Lenovo, and Acer, streamlined and secure devices loaded with Windows 10S.  Through its OEM partners, the total cost of ownership is reduced, and these select entry-level devices (HP Stream 14 Pro, available in October, and the Lenovo v330, available in February) will provide cloud-based identity and management for the first-line environment.

Microsoft 365 F1


Office 365 continues to evolve, enhancing and supporting employee creativity.  With the emphasis changing from routine tasks to creative problem solving, Office 365 is adapting, providing users the tools to express their ideas effectively and the ability to build upon the work and expertise of others, resulting in the creation of compelling content. 

The Improved Excel

Harnessing the abilities of AI and combining it with Excel has resulted in a powerful, sleek, and fresh Excel that will understand new data types, beyond numbers and texts that are currently recognized, and augment these new data types based on public and enterprise information.  For example, Excel will now recognize that “India” is a country and the acronym “MSFT” is a stock.  Also, releasing in the spring of 2018, Insights, a service reserved for Office Insiders, will derive insights from complex data using AI to find and recommend patterns. 

Searching with Results

Searching capabilities can now be initiated from SharePoint, Office.com, the Windows taskbar as well as Bing for Business.  From so many sources to initiate your search, it becomes simplified to find your information from across your organization and beyond.  Whether you are searching for a person, content or a site, Microsoft Graph powers the engine and provides consistent and personalized results.

Linking in with LinkedIn

From within Office 365, you can now view LinkedIn profiles in Microsoft apps and services.  Currently rolling out to first release customers, this ability provides rich insights about the people who you work with, whether they are within your organization, or external to your organization.

Threats and Protection

With all the new and enhanced features of Office 365, security and protection have been addressed through advanced threat protection, including features that address phishing, impersonation and domain spoofing. Preventative measures including multi-factor authentication, including third-party access, expansion of conditional access capabilities, encryption of emails and documents when using consumer email services such as Outlook.com and Gmail, protection of information (detect, classify, protect and monitor your data wither it is stored or shared), and applying compliance measures as per regulations.  

SharePoint and OneDrive

The biggest announcement at this year’s Ignite: SharePoint 2019 is coming! Productivity applications include Word, Excel, PowerPoint, and new versions of Skype for Business, SharePoint and more!

OneDrive is a powerful feature which provides the ability to securely share files across Office 365 not only with people who are within your organization but also with those who do not have an account and are external to your organization.  Not only can you share content, but you can now see who has viewed the shared files in OneDrive. Web versions of Office now open faster than ever.  Supported in the desktop version of Excel for Office 2016 is co-authoring.  Thumbnails and previews have been improved along with the ability to connect existing sites to Office 365 Groups.  There is also deeper integration with Microsoft Team. 

The Combined Power of SharePoint and OneDrive

SharePoint and OneDrive are now integrated with PowerApps, Microsoft Flow, Power BI, and Microsoft Form, each of these provides the resources and capabilities to create and share custom forms, applications, and workflows that automate processes. 

Within SharePoint, rich forms can be built from blended data, retrieved from lists with over 160 online and on-premises data sources.  Custom forms with Power Apps provide solution‑creators the tools to build these forms within SharePoint.  The Column Formatter allows power users to add rich formatting and interactivity to data in SharePoint lists and libraries. If your lists are becoming large and unwieldy, Predictive Indexing in SharePoint automatically sorts, queries and indexes your information into workable lists and libraries. Simple forms and interactive visualizations can be added to any SharePoint page with Power BI & Forms web parts.  Finally, you can add PowerApps to any SharePoint page with PowerApps web parts. 

Flow for OneDrive provides you the capability to build and launch Flows directly from within OneDrive to automate processes for your personal files.  Triggering the Flow Launch Panel, an inline panel prompts the user to enter information that is used by the flow.  Routing a document for review and feedback is built in Flow, ticketed as Document/Item Review. Finally, custom processes can be built with Flow with the Custom Approval Action, which requires formal approval check-in and approval before content for libraries can be published.  

Microsoft Teams and Skype

As Microsoft Teams begins integrating voice and video capabilities, along with chat, to become the main workplace communications collaboration app, Skype continues to receive an enhanced infrastructure for improved video and voice communications.  Microsoft Teams now has the added calling features of call transfer, calling to and from external phone numbers and voicemail as well as insights from Microsoft Graph.  Teams will evolve as the primary client for communications in Office 365, and over time, will replace Skype for Business.

SharePoint and Yammer

The question of whether Yammer is a product that will stay or be replaced was partially answered at Ignite this year with the announcement of several new updates.  These include new mobile-ready web part for integrating Yammer conversations into SharePoint Sites, SharePoint documents have an enriched preview and editing experience with Yammer, Yammer Groups connected to Office 365 will have default SharePoint file storage and OneNote services, launching video and voice calls directly from Yammer, and the ability to see Presence straight from Yammer.

In addition to all these great features, there is one last improvement that was announced at Ignite.  This important piece of news is the new building block of the intranet – SharePoint Hub Sites, which we discuss in detail in this article.

Adding, Deleting and Customizing Web Parts for an Office 365 Communication Site – The News, Events, Document and Image Gallery Web Parts


In our previous installments, we have been building on the basics of a Communication Site to understanding how a Communication Site is created and shared. In this installment, we continue with adding, deleting and customizing the last four types of web parts.

Types of Web Parts

There are five different types of web parts, each with a specific function.  These web parts include:  News, Events, Document, Image Gallery and Hero, which was explained in Part 4. 

1.  News Web Part

The News web part that can be added to your Communication Site design. With News, you can engage your audience with interesting stories, important announcements, status updates and more with the use of high impact graphics and rich formatting.

Adding the News web part is very simple:

  1. Click Edit – found at the top right of the page;
  2. Above the News web part, hover your mouse until a line with a circle appears:

Plus sign for adding web parts to a page

  1. Click the + sign in the green circle;
  2. Select News web part. 

Now that your News web part has been added, you can now customize the layout for it. There are three possible layouts:

  1. Top Story:  On the left is a large image space, on the right is space for three additional stories;
  2. Side-by-Side: A two-column list of stories and is the default layout for the Communication Site; and
  3. List:  News posts are shown in a single column. 

To change the layout:

  1. Click Edit – found at the top right of the page;
  2. Click Edit button – found on left side of the News web part; and
  3. In the Toolbox, select the layout you want to use. 

Now that you have added and chosen the layout for your News web part, the next step is to populate it with content by creating news posts.

To create News posts on your published or saved page:

  1. In the empty News box, click +Add to start creating your post.;
  2. Add your headline;
  3. Click +Add to add text and graphics on your page;
  4. Click Publish, found at the top right, when you are done creating your page.  Your story will now appear in the News section as the most recent story. 

Sometimes, we create a new post but then for different reasons, need to delete it.  Deleting a news post is as follows:

  1. Click See All;
  2. Click Manage Posts;
  3. Find the page that you would like to remove;
  4. To the right of the page that you would like to remove, click on the three ellipses (…); and
  5. Click Delete

A unique and useful feature with the News web part is the ability to share your new post via email.  The email will include the link to the news post, a thumbnail preview, a description, and the option to provide a message to one or more recipients.

To send your page via email:

  1. Click Send by Email – found at the top of your page;
  2. In the To box, enter the name of the recipients;
  3. Type a message to your recipients if you want to; and
  4. Click Send

3.  Events Web Part

The Events web part is a great way to actively engage your audience.  As it states, it announces events that pertain to the various projects, launches, and celebrations across the organization. It is a great way to share the successes of all the teams in the organization and helps to team build and boosts morale. 

You can add an Events web part to your Communication Site design by:

  1. Click Edit – found at the top right of the page;
  2. Hover your mouse below or above an existing web part, or under the title region. Click on the + sign in the green circle.  Select the Events web part;
  3. In the Title box, add your own title;
  4. Click Edit Web Part – found on the left to set options.  There are three sections that can be completed:


    1. Events List:  an empty Events list automatically created with the default settings of a Calendar list.  If there is more than one event list on the site, you can select the one that you want;
    2. Category:  if your list has categories, you can filter the events you show by choosing one category;
    3. Date Range:  from a drop-down list, you can filter your events based on a date range.  The default is All Upcoming Events and additional options include This Week, Next Two Weeks, This Month, or This Quarter

After adding the Events web part to your page and having published or saved it, you are now ready to add events.  To add an event:

  1. Click Add Event;
  2. At the top of the page, Name your event.  As an option, an image can be added to the title area.  Click the Add Image button located in the upper left;
  3. Add the dates and times in the When section;
  4. Enter the location and address in the Where section. If the address is recognized, you will have the option of including a map;
  5. If this is for an online meeting, you can enter the information in the Link section.  Place the link for the online meeting in the Address box, then add a Display Name.  If this is not for an online meeting, then leave the information blank. This section will not appear in the event; 
  6. If you want an event to show through filters, then choose a Category such as Holiday, Meeting, Business, Work Hours, and so on.  If you want to enter in a customized category, type it in the space rather than choosing one that is offered;
  7. In the About this Event area, provide a useful description; 
  8. If you would like to highlight people such as special guests, guest speaker or contacts, then you can add their names below the event description.  Note that only users within your organization can be added;
  9. Click Save when you are done. If you require to edit the event, click Edit at the top right of the event page. 

4.  Document Web Part

The Document web part allows you to insert a document file that can originate from Word, Excel, Visio or PowerPoint.  The starting page of the document is seen inside a frame by the user, but the user will be able to scroll down and/or download the document. 

To add a Document web part:

  1. Click Edit – found at the top right of the page;
  2. Hover your mouse below or above an existing web part, or under the title region. Click on the + sign in the green circle.  Select the Document web part;
  3. Insert the document you want by choosing a recent document, browsing for one, uploading one or via a link;
  4. Under the web part, you can add a description, but this is optional;
  5. Set the Start Page you want users to see first by clicking Edit Web Part.  Then, under Start Page, type in the page number you want it to start with.  Click Apply and this will now save and apply the new settings.
  6. Once your document is published, users will have options to either Download a Copy, Print to PDF, and Embed Code for sharing purposes. 

5.  Image Gallery

Share collections of images on a page in the Image Gallery. Images can either appear in tile form or in carousel form, which shows one photo at a time with a new photo replacing the previous on a timer. 

To add the Image Gallery web part:

  1. Click Edit – found at the top right of the page;
  2. Hover your mouse below or above an existing web part, or under the title region. Click on the + sign in the green circle.  Select the Image Gallery web part;
  3. Select the location where your images are stored;
  4. From the panel on the left, you have several options to choose the source of your images. The sources can be recent images, browse from a site, a link to insert the images you want, or you can upload from your device.  Choose one of these sources, then click Open to add the images you have selected;
  5. If you click the Edit button on each image, you will have the option of keying in a title, description, and alternative text;
  6. Add additional images by dragging and dropping, or by clicking +Add to select additional images;
  7. To specify the layout (tile or carousel), click Edit Web Part and choose the layout that you prefer. 

You are now able to determine what type of site to create (Team vs. Communication) based on your audience, create a new Office 365 Communication Site, discern between the five different types of web parts, modify your site with the addition of, deletion of and customization of the web parts on your site, and, finally, share your Office 365 Communication Site with those in your organization.  Through your Communication Site, you will be able to keep those in your organization informed of announcements, upcoming events, celebrations, information sessions, people information and so much more!

Editing and Publishing an Office 365 Communication Site – The Hero Web Part


In our previous installments, The Basics of the Office 365 Communication Site, The Components of the Office 365 Communication Site, and Creating an Office 365 Communication Site, we built upon the basics of a Communication Site to understanding how a Communication Site is created and shared. In this installment, we will now look at how to customize the Communication Site through adding, deleting and customizing the building blocks, referred to as web parts, of your page.

Web Parts – Customizing

As discussed in Part 2 of this series, there are three site designs that are made available when creating the Communication Site.  The three are Topic, Showcase, and Blank.  Each web part can be included, excluded and customized to your needs.   There are four web parts that are included, by default, in both the Topic and Showcase site designs.  With the Blank site design, you choose which web parts are to be included. 

Types of Web Parts

There are five different types of web parts, each with a specific function.  These web parts include:  Hero, News, Events, Document and Image Gallery. 

1.  Hero Web Part

The Hero web part in the Topic site design consists of a five-tile layout, but the number of tiles is customizable and can range from one to five.  In addition to this, links, images, and text for each tile can be changed.

The Hero web part in the Showcase site design defaults to a vertical layout with three layers but can range from one to five layers if customization is chosen.  

Changing the Hero Web Part Layout

To change the layout in the Hero web part for the Topic site design:

  1. Click Edit – found at the top right of the page;
  2. Click Edit Web Part – found at the top left of the page.  Select the layout you want.  As the Topic site design was chosen, you can choose the number of tiles to be displayed and the layout is visually presented under the number of tiles.

Changing the Hero Web Part Layout

To change the layout from a grid to vertical layers in the Hero web part for the Showcase site design:

  1. Click Edit – found at the top right of the page;
  2. Click Edit Web Part – found at the top left of the page.  Select the layout you want.  As the Showcase site design was chosen, you can choose the number of layers to be displayed and the layout is visually presented under the number of layers.
     

Changing the Image, Text, and Links for Each Tile or Layer

To change the image, text, and links for each tile for the Topic and Showcase site designs:

  1. Click Edit – found at the top right of the page;
  2. Click Edit Details – found at the bottom right of the tile or layer that you want to change;
  3. Click Change in the toolbox.  Choose a location from where to get your content:


    1. Recent:  listed here will be your recently opened documents, images, and pages;
    2. OneDrive:  obtain a link for a document or image that you have stored on OneDrive;
    3. Site:  obtain a link for a document, image, or page from a Site that you specify;
    4. Upload:  upload an image or document from a personal device;
    5. From a Link:  manually enter the link to a document, image, or your page from OneDrive for Business or SharePoint Online;
  4. Select your image, document, or page.  Click Open;
  5. In the Toolbox and under Image, select Custom Image or Color Only (this option is available only for the Tiles layout).  An image will automatically be selected from the page or document that you are linking to when Auto-Selected is activated;
  6. For the image, enter in Alternative Text;
  7. Click on Options, and if you decide to, you can show a Call to Action Link by switching the toggle to Yes.  Next, add your Call to Action Text.  The Call to Action link is available only for the largest tile in a tiled layout; and
  8. For the layered layout, there is an option to show a Topic heading.  Click on Options and switch the toggle for Topic Heading to Yes. Key in your Topic Heading Text


Reordering Tiles or Layers

Tiles and Layers can be reordered by moving them where you would them to go:

  1. Click Edit – found at the top right of the page; and
  2. Click and hold the Move Item button.  Drag the tile or layer where you want. 

Columnizing the Hero Web Part

The Hero web part is designed to span across the full width of the page.  If you choose to have the Hero web part span partially across the page, then you would add a column to the page and place the Hero web part into that column. 

  1. Click Edit – found at top right of the page;
  2. Above the Hero web part, hover your mouse until a line with a circle appears:

Plus sign for adding web parts to a page

  1. Click on the + sign in the green circle;
  2. Select One Column under the Section Layout; and
  3. Use the Move Web Part button, found on the left side of the web part, to drag the Hero web part into the column you had just added. 

Adding and Empty Hero Web Part to a Page

You can add an empty Hero web part, even if the page is not a Communication Site page.   

  1. Click Edit – found at top right of the page;
  2. Above the Hero web part, hover your mouse until a line with a circle appears:

Plus sign for adding web parts to a page

Click the + sign in the green circle.  Choose Hero web part;

  1. Click the Edit button for web parts.  Select the type of layout you want. Options include a grid from 1 to 5 tiles or 1 to 5 vertical layers;
  2. Click Select Link for each tile you want to change;
  3. Click Change in the toolbox.  Choose a location from where to get your content:


    1. Recent:  listed here will be your recently opened documents, images, and pages;
    2. OneDrive:  obtain a link for a document or image that you have stored on OneDrive;
    3. Site:  obtain a link for a document, image, or page from a Site that you specify;
    4. Upload:  upload an image or document from a personal device;
    5. From a Link:  manually enter the link to a document, image, or your page from OneDrive for Business or SharePoint Online;
  4. Select your page, image, or document.  Click Open;
  5. In the Toolbox and under Image, select Custom Image or Color Only (this option is available only for the Tiles layout).  An image will automatically be selected from the page or document that you are linking to when Auto-Selected is activated;
  6. For the image, enter in Alternative Text;
  7. Click on Options, and if you decide to, you can show a Call to Action Link by switching the toggle to Yes.  Next, add your Call to Action Text.  The Call to Action link is available only for the largest tile in a tiled layout whereas, in a layered layout, it is available for each layer; and
  8. Under Options, a Topic heading can be added for each layer by switching the Topic Heading to Yes for layered layouts.  Once switched to Yes, add your Topic Heading Text.

The Hero web part is the most configurable and contains the main content that you want to share with your audience. This is where features, announcements, status updates and news are shared.  Combining intriguing headlines and attention-grabbing images, the Hero web part seduces the audience to engage by reading, responding and participating. In our next installment, Part 5:  News, Events, Documents and Image Gallery, we will examine the last four web parts to complete the customization of your Office 365 Communications Site.

Creating and Sharing an Office 365 Communication Site

In our previous installments, The Basics of the Office 365 Communication Site and The Components of the Office 365 Communication Site, we discussed the fundamental reasons for creating a Communication Site and looked at the components of the Communication Site in greater detail. 

In this installment, we will advance to creating an Office 365 Communication Site.

6 Simple Steps to Creating an Office 365 Communication Site

The following are the six basic steps in creating a new Communication Site.  After creating your Communication Site, the Site can be customized with various web parts.  The six basic steps are:

  1. Sign in to Office 365;
  2. Select the App Launcher icon located in the top left corner of the page.  Next, select the SharePoint tile.  If you do not see the SharePoint tile, then click on the Sites tile.  If SharePoint is not visible, then click All;
  3. Once on the SharePoint homepage, click on the + Create Site.  Two Site creation options will be available:  Team Site and Communication Site.  Choose the option for Communication Site;

Pick a Modern Site Template

  1. Select one of the Site Designs (Topic, Showcase, or Blank – see Part 2 for details);

Communication Site Design

  1. In the next window, name your new Communication Site in the Site Name box.  In the Site Description box, provide information which conveys to your audience the purpose of your site; and  
  2. Click Finish.  Your Communication Site has now been created.  It will appear on other sites that you are following, but will not inherit permission settings or navigation of other sites.  Note that this Communication Site is not shared with others until you have used the Share command. 

Sharing a Site

Sharing a site is very simple!  By using the Share command, you an invite people in your organization to a site.  After creating a new site, it is a quick way to invite people and to grant permission to the people who you want to use your site. 

One way to build team spirit and collaboration is to take advantage of sharing the site with a Kick-Off! This is a great method to emphasize team collaboration and to announce to the organization the new project that will be taking place. 

To share a site:

  1. On the site that you want to share, click Share;
  2. A Share Dialogue Box will appear.  Type in the names of the invitees from your organization;
  3. Include a message with your invitation; and
  4. Click Share. 

The people from your organization that you have invited will now have access to your site once they accept your invitation.

As you can see, creating an Office 365 Communication Site is very simple, and consists of only 6 steps!  Sharing the Communication Site is also simple.  The next step will be to add, delete, and customize the web parts which delivers the content to your audience.  This is explained in detail in Part 4:  Adding, Deleting and Customizing Web Parts for an Office 365 Communication Site – The Hero Web Part  and Part 5:  Adding, Deleting and Customizing Web Parts for an Office 365 Communication Site – The News, Events, Document and Image Gallery Web Parts.

The Components of the Office 365 Communication Site


In our previous installment, The Basics of the Office 365 Communication Site, we discussed the basics of the Communication Site, including when to use it, the type of content that could be shared, what to expect when creating it, what devices are compatible and the different web parts for inclusion of images, video and such. 

In this installment, we will look at what components comprise the communication site and delve into greater detail of each component.

Ease of Creating the Communication Site

The creation of a Communication Site is simple and straightforward.  There are three site designs that you can choose from as the basis for your Communication Site.  These are:

1. Topic: sharing of information including events, news, launches, and other content;

2. Showcase:  featuring a product, team, or event with the use of photos or images; and

3. Blank:  a blank page allows you the creative space to design and customize your own layout.  

In each site design, you have the ability to add, remove, or reorder web parts.  In addition, if you have permission to edit the site, at the top of the Communication Site is a link to add a new list, page, document library, news post, or web app to the site. 

Preformatted site designs aid in the ease of designing the Communication Site and with three different layout styles, how you want to communicate is made easy.

Site Designs in Detail

1.  Topic

When you want to share with your broad audience information regarding events, news, updates and other content, the Topic design would be the most ideal.  When you create a Communication Site based on the Topic design, your homepage includes several web parts that are highly customizable.  The default web parts included for the Topic design for a Communication Site include the Hero, News, Events, and Documents.

Hero

This web part brings visual interest and focus to your page.  With the ability to display up to five items in the Hero web part, you can draw attention to each by adding compelling images, text, and links. 

Topic SiteThe default layout is five tiles:  one large tile on the left and four smaller tiles forming a square on the right.  The number of tiles can be changed and can range from one tile to five tiles. 

News

With the News web part, you can engage your team with interesting stories and important information. Keep them informed of what is happening with status updates, eye-catching posts, announcements, and people news through graphics and rich formatting.  The News web part has a default layout called Top Story which displays on the left with a large image space, and to the right, in list format, three additional stories.  The second layout style is called Side-By-Side which lists stories in two columns.  The final and third layout style is called the List which shows the news posts in a single column. With the News web part, you have the option of choosing the layout that best suits your needs.

Events

Upcoming events can be displayed in the Events web part. Information regarding the event such as date, time, location and the ability to add it to your calendar are all functions of the Events web part.

Documents

The beauty of Microsoft products is the usability of its products across platforms. In the Documents web part, you can insert documents created from Word, Excel, Visio, and PowerPoint.  The starting page of the document is in a frame and allows the user to scroll through the pages or, if they choose, to download the document.


2.  Showcase

Showcase SiteThe Showcase design is to bring focus and attention to your featured highlights through the use of attention-grabbing graphics. The default web parts included in the Showcase design in conjunction with the Communication Site are Hero and Image Gallery. 

Hero

For the Showcase design, there are two Hero layout options. The first is the Tile layout and the second is the Layer layout.  The default is a vertical layout with three layers but you have the option of changing the number of layers from one to five.  

Image Gallery

A picture says a thousand words, so naturally, an Image Gallery could be used to convey many messages and ideas to your audience.  The Image Gallery web part shares collections of images on a page.  Create your gallery by drag and dropping your selected images, and then ordering them in the sequence that is preferred.  Images can be viewed in a tile layout or as a carousel. 


3.  Blank

Unlike the previous two site designs, the Blank design allows you to choose your page layout.  After you have chosen your page layout, you then add the web parts that you want. 

The page layout can also be customized by rearranging the web parts, and by adding, removing, or changing columns on the page. 

Blank Site


We have now reviewed each of the individual components that make up the whole of the Office 365 Communication Site. In our previous installment, Part 1: The Basics of the Office 365 Communication Site, the fundamentals for the Communication Site were addressed. In this second installment, we looked closer at the building blocks for the Communication Site. Now that we understand the different types of site designs, web parts and layouts, we are now ready to begin creating the Office 365 Communication Site, which is discussed in Part 3:  Creating and Sharing an Office 365 Communication Site.

Office 365 Communication Site


The Basics of the Office 365 Communication Site

What is a SharePoint Communication Site? 

There are two types of sites that can be created to share information in SharePoint, but these sites target different audiences. As you are already familiar with, the Team Site audience comprises of the members of your team on a specific project.  All or most members of a Team Site can contribute content to the site and this information is limited to the members of the team, members of the project, and specific stakeholders.  The purpose behind Team Sites is for communication for collaboration between team members. 

On the other hand, a SharePoint Communication Site is just that – it is used to communicate to a broader audience including other project teams or the entire organization.  Unlike a Team Site where the majority, or all, of the members can contribute content, a small set of members contribute content to the Communication Site.  The Communication Site is the platform for sharing important information with others, especially those outside of your project team either on weekly or monthly basis; thus, content may include news, reports, statuses, product launches and other information that may be of interest to the broader audience. 

Communication Site content has been adapted to be mobile friendly while dynamically displaying and delivering content in visually compelling formats. Office 365’s Communication Site continues to offer mobile accessibility for SharePoint on the go and with the Cloud. 

Communication Site

Image showing News and Site Cards on Smart Phone and Tablet

Source: https://products.office.com/en-us/sharepoint/collaboration

Is it Easy to Create a Communication Site?

As with all Microsoft products, the development team has maintained its user-friendliness with Office 365 Communication Site creations.  There are three templates for creating new Communication Sites. The three initial site design templates are topic, showcase, and blank. 

Each template is completely configurable and contains pages within each template. These are also configurable. 

The Topic template is the best choice when there is a large amount of information to share. This information may include events, news, and other content.

The Showcase template is used for “showcasing” or featuring a team, product or event through the use of images or photos.

The Blank template can be configured and customized to your specific needs.

Communication Site Designs (left to right):  Topic, Showcase, Blank

Source: http://blogs.office.com

Once you have created your new Communication Site, you can then drag and drop to reorganize web parts on the page to highlight, showcase and announce the news to your broad audience. News and pages allow for multi-column layouts, providing the ability to creatively design and communicate your messages in a meaningful and intuitive fashion.

What Content Can Be Shared?

Feeling a little inundated with update emails?  Communication Sites can alleviate the email jam by allowing you to share your plans and updates in interactive and engaging ways.  By creating a page on a Communication Site, real-time data can be pulled across from Office 365 by embedding documents and videos.  This information can come from SharePoint documents, reports from Power BI, Microsoft Stream videos and discussions taking place on Yammer, all of which provide current, dynamic and rich internal communication.  All members can keep informed and for new members, it is a point from which they can gather information to quickly get up to speed. 

Where Can Office 365 Communication Sites be Connected From?

Not only can you access the Communication Site from your mobile app, but you can access, create content and engage with others from any device.  The full site, news, pages, navigation, search, and additional functionalities are natively viewable, engaging and functional.  From within the mobile SharePoint app, you can engage in a Yammer conversation, create a news article or read a page – all from within the context of the site. 

How Else Does Office 365 Communication Sites Enhance and Encourage Communication?

Communication Sites communicate effectively and efficiently through visually dynamic pages.  Your home page and sub-pages can be customized to meet your needs, but most importantly they can be made to look great!  Full-width layouts, spanning the page left to right, provides the page space to emphasize your most essential information.  With the enhanced title region and customized header image, along with full control over what portion of the image is the most important to highlight, visually presenting your home page, news and subpages with an attention-grabbing header graphic and title will not only look great on your desktop, but also on your mobile device. 

It is not just enough to communicate the recent news to your audience, but it necessary to engage in discussion, thereby, retaining your audience.  With the ability to comment on each news article and page, it allows your audience to provide feedback, which in turn can be used for the improvement of the page, article or project. 

A valuable feature is the ability to share the news via email. Unlike other shared information via email, news shared from a Communication Site will not only provide a blue link, but it will also provide a visual (thumbnail) and an informative preview (title, description) that adds context to the news article and email.  The ability to provide a message from the sender is also available. 

What is Displayed and Where Does the Data Come From?

As mentioned, the data displayed is dynamic and is pulled from either Microsoft Stream (videos or full channels) or Power BI (interactive reports).  Other sources of information and data can be pulled by adding web parts into your articles.  The first type is an Image web part which allows insertion of images and GIFs.  Sometimes there is too much content to be shown within the first view, truncating all other highlighted content. In these cases, selecting the “See All Pages” which proves to be handy.  When chosen, a full-page experience appears, providing a full view of all the content and activity.  The last web part is the “News” which is used to showcase your news by using multiple layouts to highlight what is important.  Layouts include Top story layout, which is the default, or List where you can view news in a list, or Side-By-Side. 

In this installment, we have determined:

1.  Why and when do you use a Team Site versus an Office 365 Communication Site;

2.  The simplicity of creating a new Office 365 Communication Site;

3.  What content is shared on a Communication Site;

4.  Where and what content can be shared from a Communication Site;

5.  Where can an Office 365 Communication Site be connected from;

6.  What devices can connect to a Communication Site;

7.  How is communication enhanced and encouraged by Office 365 Communication Sites; and

8.  What is displayed and where does the data come from.

From these, we now have an understanding of why we would create a Communication Site. With this understanding, we can now proceed to look at the Office 365 Communication Site in greater detail.

SharePoint and Office 365 PowerApps Enhanced


Why use PowerApps?

PowerApps is used to build customized SharePoint forms without the need for writing code or formula, simplifying and transforming the cloud and mobile business process.  Though geared towards power users, any user can use PowerApps to customize default forms to view and edit SharePoint data.  Over 160 data services are accessible, including Office 365, Dynamics, Box, Salesforce, Twilio and Mail Chimp.  Embedded into SharePoint, these forms provide a native and seamless experience for users. At Ignite 2017, Microsoft announced many new and upgraded features to PowerApps that not only will ease the creation of apps but will benefit the end user in the ease of usability. 

In addition to viewing and editing SharePoint data, the ability to upload attachments into a list is incorporated into PowerApps.  Not only will this ease the workflow, but the ability to multi-select items from a list within your customized PowerApps forms provides additional user-friendliness which translates into saved time for the user. 

The Ease of Authoring Apps

Without having to write code for rules and conditions, PowerApps makes it easy for users to start building apps without a single formula.  Add PowerApps Studio, and your work in progress will now be automatically saved. Three key features of PowerApps include:

Rule Builder:  the rule builder allows the user to express conditional logic for actions and formatting by simple point and click.  The rule builder lessens the amount of time required to create sophisticated apps without the need to create advanced formulas.

Auto Save Apps:  apps are automatically saved in the background, allowing the creator to focus on building apps without the fear of losing any work that is in progress.

Guided Configuration:  setting up forms, galleries, data tables and other complex controls in context is simplified with the wizard-like guided configuration tool.

Visibility and Trust for Enterprises

Greater central administration and control for IT teams is available through PowerApps.  Some features include compliance certification, analytics, and a centralized admin centre:

Compliance Certification:  available in the Microsoft Trust Center is the Business Application Platform which includes PowerApps, Microsoft Flow, and Power BI. Compliance certification includes EU Model Clauses, HIPAA/HITEC, ISO 9001, 27001 and 27018, PCI, SOC 1, 2 and 3.

PowerApps Admin Center: provides control to tenant admins the ability to view a list of all apps created in their organization and list all users who are using PowerApps.  Additionally, admins will also be able to:

Update app permissions – add or change users with whom the app is shared with

Delete an existing app – delete an existing app that is not used by any user

View data sources of app – view the data sources used by an app

Update owner of app – update the owner of the app

PowerApps Usage Analytics:  by embedding Power BI reports, app creators and admins can understand application usage from detailed analytics through PowerApps.

Embedding Capabilities

PowerApps will provide app creators the ability to create apps that will have direct interaction with different solutions and websites through its embedding capabilities.  End-users will benefit by having the ability to use the apps in the context of the solution they are using. 

Embed PowerApps as Web Parts in SharePoint: the PowerApps web part enables PowerApps to be embedded in any SharePoint page, including list forms.  With this, users can customize their business processes by using a custom-built app and can take action right from SharePoint.

Embed PowerApps in Power BI Reports:  apps built with PowerApps will be embeddable into Power BI reports, providing business analysts the ability to set filters and data parameters to produce the required data in reports within the app.  Users can then take actions based on the insights they see in Power BI.

Server-Side Business Logic:  rich data bound apps built by PowerApps will be supported in the Common Data Service for relationships and server-side logic in Q1 2018.

Managing the App – PowerApps Admin Centre

1. Click Environments near the left edge of the PowerApps Admin Centre. Select the environment that you want to view the list of apps;

2. On the horizontal navigation bar, select Resources, then Apps.  From the Apps list, select the app that you want to manage or view;

3. View or Manage the app with the following operations:  delete the app, view connection, flows and other details associated with the app, and view and modify users with whom the app is shared with.

PowerApps Analytics – The App Performance Report

The PowerApps Analytics report is accessible by app authors and provides analytical performance data that has been tracked on a specific app for the past 30 days.

Accessing the App Performance Report

To access the PowerApps analytic apps performance report, follow the following steps:

1. Go to web.powerapps.com;

2. On left navigation bar, select Apps;

3. Select Analytics (preview) for the app; and

4. From the drop-down, select Performance.

To download the report, select Export Data by clicking the ellipses in the top right corner of the chart.  The report will be exported in a .cvs file.

PowerApps Analytics – The Dashboard

The following information can be found on the dashboard:

1. Time to first screen – this is the time it takes from clicking the app icon to PowerApps handing control to the app’s first screen.  This is for the 50th, 75th, and 95th percentiles.  Note that this excludes the time to load the app’s first screen.

2. Time to first screen without connection set up – this is the time it takes from clicking the app icon to PowerApps handing control to the app’s first screen. This excludes the time the user spends on the connection setup. Information is for the 50th, 75th, and 95th percentiles.  Note that this excludes the time to load the app’s first screen.

3. Session length – this is the time the users spend on the app after a successful launch of the app. This includes the 50th, 75th, and 95th percentile times.

4. Number of users per session length – provides the user distribution, after a successful launch, over session lengths of < 1 minutes, 1 – 5 minutes, and > 5 minutes.

At Ignite 2017, Microsoft announced many new and upgraded features to PowerApps that not only will ease the creation of apps but will benefit the end user in the ease of usability.   These were only a few of the latest enhancements to PowerApps as there will be more features coming with future releases.

The Enriched Microsoft Flow


At this year’s SharePoint Virtual Summit, Microsoft announced many new and exciting features and enhancements to its suite of applications. These innovative features affect the following applications:

SharePoint – continues to gain momentum with over 100 million monthly active users. SharePoint plays an important role in Office 365 by empowering customers with the ability to share, manage, and create content, knowledge, and apps to weave a more connected workplace.

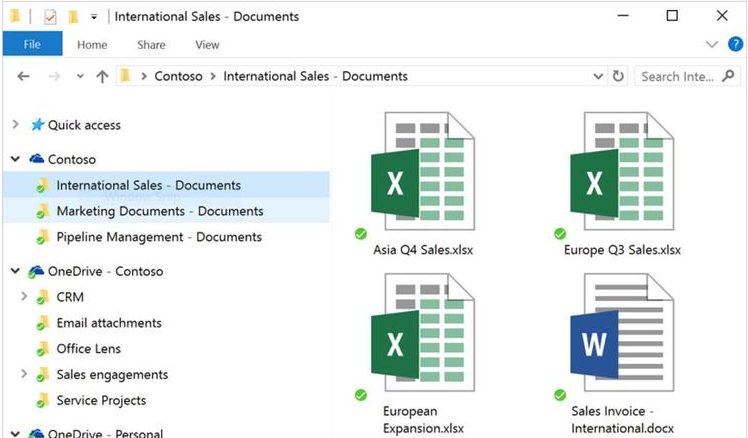
OneDrive (File Explorer on Windows and Finder on Mac) – Collaboration requires access and sharing of documents between team members, who may either be within your organization or outside of it. With OneDrive, you can securely share your files with a link to anyone inside or outside of your organization with real-time collaboration, whether it be on your desktop, laptop or mobile device.

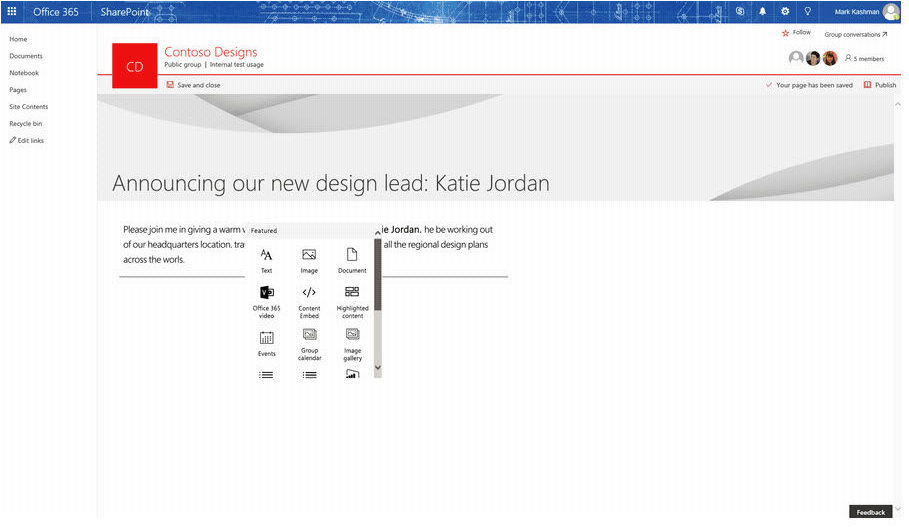
SharePoint Communication Sites – Collaboration within your team is important, but reaching and engaging a broader audience within your organization is just as important. Providing updates through a beautifully designed dynamic site, the Communication Sites was developed with these special focuses for your audience across your organization via desktop, laptop, and mobile device.

SharePoint Forms with PowerApps – Easily create custom forms that surface in the context of a SharePoint list or library, providing data that users can then create, view and interact by using your custom form. PowerApps is a powerful tool for users as they are empowered to drive the transformation of the team and organizational processes. 

SharePoint and Microsoft Flow– Built-in approval flows allow you to send documents with a custom message and the recipient can approve the request directly from a rich, actionable email message or provide feedback, without leaving their inbox.

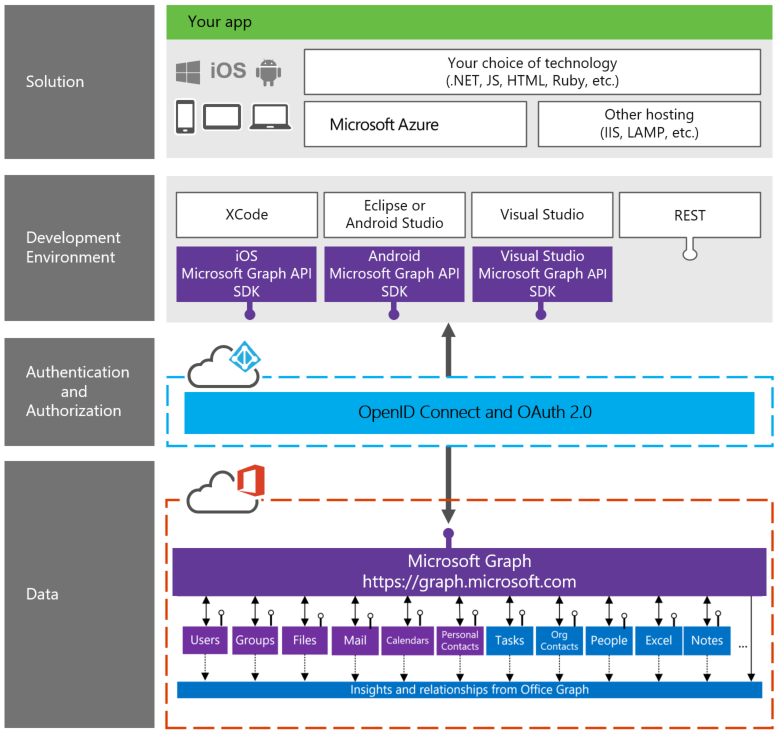
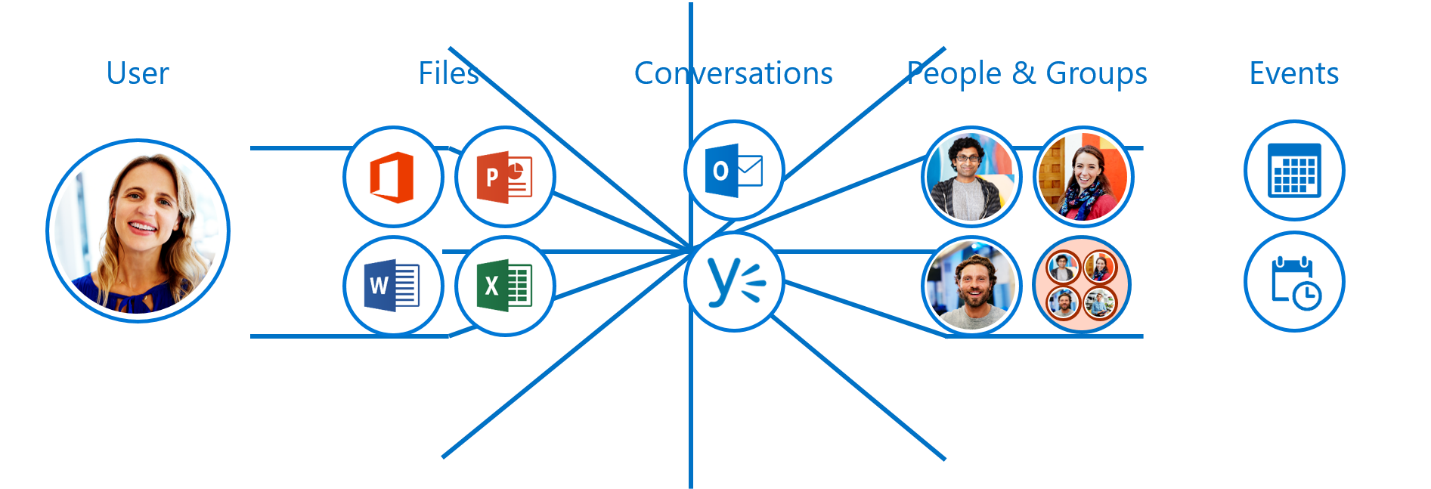
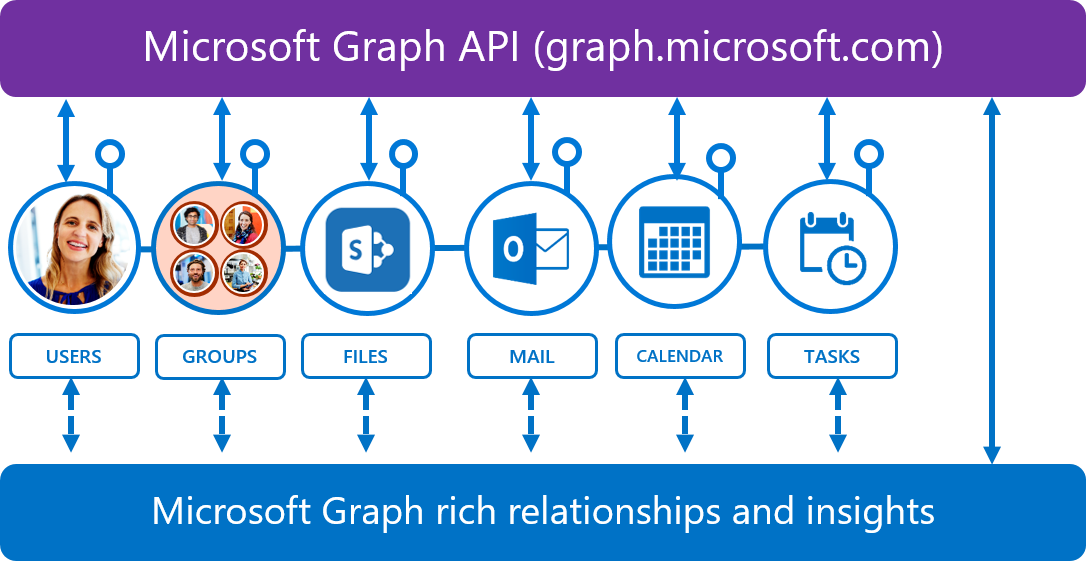
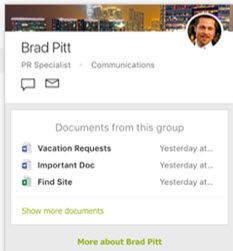
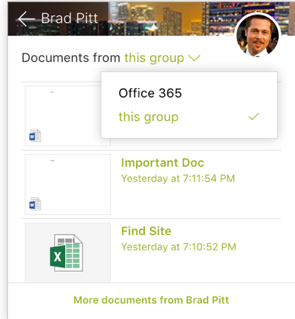
Microsoft Graph –Relevant and valuable results are surfaced from content that is sourced from files, sites, news, and from people cards, which includes their skills, interests, and projects, which is all driven from machine knowledge that runs Microsoft Graph.

These are just a few of the new innovations announced at this year’s Summit, but in this article, we are going to focus on the many new aspects of Microsoft Flow and SharePoint.

What is Microsoft Flow?

Microsoft Flow was integrated with SharePoint in 2016 (see my article https://www.maadarani.com/sharepoint-and-flow/). Microsoft Flow is a workflow tool which allows quick delivery of automated information to your audience whether on-prem or in the Cloud. The ability to automate and receive notifications, synchronize files and obtain data between your favorite apps and services provides you the ability to reach out beyond your intranet. Once your audience reacts to the trigger, their action reaches back to Flow which then logs their reaction into a SharePoint List or Excel file.  This data is beneficial for analytics, providing the ability to review and enhance processes by streamlining with recurrent cycles that can be set hourly, daily, weekly or as frequently as minutes. 

Prior to integration, the creation of simple workflows required the use of SharePoint Designer or third-party tools.  Though SharePoint Designer was developed specifically for SharePoint, it did not lend itself easily to creating workflows within SharePoint.  To write the coding for the workflows, one had to learn the syntax, the many quirks of SharePoint Designer, debug and tweak the code for countless hours. 

Now, with Microsoft Flow, creating workflows is much easier. Microsoft Flow employs a graphic user interface and with the many templates in its library.  Microsoft Flows interact with other applications like MailChimp, Twitter, SharePoint, OneDrive, and Dropbox and many other applications. 

Microsoft Flow has advanced even further since its integration in 2016.  Not only can you embed Microsoft Flow within Microsoft’s own products, 20 product partners have now integrated their products to be accessible within Microsoft Flow creating the opportunities for limitless types of workflows.

Partnering with Microsoft Flow – The Possibilities and Outcomes

Building Custom Connectors

Adobe has developed its Creative Cloud connector which has its own set of actions and triggers by leveraging Microsoft Flow’s rich custom connector to build connectivity to their own services directly inside Microsoft Flow. There are two types of triggers that Microsoft Flow supports, polling and webhooks, and both are leveraged in Adobe’s Creative Cloud connector. 

ISV Cloud Embed

Microsoft is offering ISVs to pilot their new ISV Cloud Embed Program. The Cloud Embed Program will be enabled later this year. This program will allow information staff and power users of ISVs the ability to add and customize workflows as part of their applications. If you are an ISV and would like to participate in the pilot program, then apply by completing this simple online form

Connecting with Flic

What is Flic?  Flic is a physical button that uses wireless Bluetooth technology, pairing itself with your Bluetooth wireless device and provides you three clicks that execute three specific commands from a distance.  For example, the first may start your playlist, the second may pause your playlist, the third may skip to the next song. Or, the first can turn on your lights, the second can begin playing your music, the third click can turn on your smart TV.  Continuing to expand its unlimited uses, there is now a beta version of a Flic hub, which allows Flic buttons to be distributed throughout an environment, such as in an exhibition and when a visitor clicks the Flic button, a flow immediately runs in response.  This is only one example of how Microsoft Flow can be partnered and implemented with a third party.

Common Business Automation with Microsoft Flow

Microsoft Flow is being embedded into a range of Microsoft business application products, providing a powerful end-user experience with the capability of creating and implementing the automation of flows at their level.

As of May, Microsoft Flow can be triggered within SharePoint from within Document Libraries, SharePoint Lists or OneDrive for Business folders.  Some added features include the collection of additional data once the flow is run, including request for feedback from the user to the reviewer, assigning a priority (i.e. high/medium/low priority) of a flow document, and the ability to share the flow with others in the organization but withholding permission to edit the flow.

Dynamics 365 for Financials & Operations, Business Edition, will also benefit from the embedding of Microsoft Flow into its application. The user will now be able to manage flows from within the context of Dynamics 365 without having to leave the application. The Dynamics 365 customer will not only benefit from a fast, automated workflow but will also now have a seamless experience.


One of the most exciting announcements is the Microsoft Flow “Bot” – the Microsoft Teams @FlowBot.  This bot brings automation into Teams workspaces, allowing team members to trigger flows right inside of Teams conversations. A team member will have the capability of setting up a flow where a text message is sent to appropriate staff regarding an impending issue and the actions taken can be logged in an Excel spreadsheet. 

Microsoft Flow and Every Level of User

With its simplified workflow automation, Microsoft Flow is user-friendly from beginners to advanced users.  With just a few clicks, a user can easily start automating a flow. 

There are a variety of workflow scenarios with connector supports for many different services.  A user begins by choosing the service that he is interested in and then browses what the connector can do.  Once the user determines which connector is appropriate, he can then use that connector as a jump-off point to build his flow. 

When we think of Flows, we think of complex “if this happens, then that happens” type of scenarios. Sometimes, users only need basic operations to be completed, like adding numbers together, retrieving the correct time, or replacing a string of text. These can be accomplished with Flow’s rich set of actions, which resemble Excel expressions, inside any flow action. For those with Azure Logic app experience, the transition is simple as Microsoft Flow uses the exact same Workflow Definition Language as Azure.  For those unfamiliar with this language, inline help is available to help with building out their flow with each expression. 

Button technology provides faster, richer flows and instant action.  Workflows can be kicked off by the pressing of a button, either digital or physical.  With two rich capabilities, Microsoft Flow button provides flow authors the choice of how new accounts are used in shared buttons. In one instance, authors can ask the person clicking the button to provide their account, or, the author can bake an account directly into the flow.  The second instance allows authors to define the input, such as dropdown lists for the buttons, which restricts the user to choose an option from a pre-defined list.

The tight integration between Microsoft Flow and SharePoint and other software, such as button integration, is essential for Microsoft customers as it provides simple, effective and clear flows at any user level. 

Administrative Control and Life Cycles

Not only are there enhancements in the creation of flows, but within the administrative and life cycles of the flows, administrators are given more granular control along with management capabilities which translates to the effective empowerment of end users with capabilities rich in automation. 

In the Microsoft Flow admin centre, admins can now view and manage all flow inside their organization. Analytics allow admins to download flow usage in their tenant, providing the necessary data to understand exactly where and how flows are being used, how they are tracking against their billing quotas, and based on flow usage, determine which scenarios are being adopted the fastest, and using this information, to identify those most useful to employees.

Managing Lifecycle of Flows

For some companies, it is essential to have the ability to verify their solutions before rolling out across the board. For others, it is necessary for system integrators to build their solution within their environment, export it in a package, and then distribute directly to their customer’s tenants.  The management and control of the life cycle of flows are critically important, and at the SharePoint Virtual Summit, it was recognized.  To meet these types of criteria, solutions built with Microsoft Flow can now be imported and exported with other assets like PowerApps across environments, including from test to production environments. 

In addition, users can now convert Microsoft Flows to Azure Logic apps by saving any flow as a Logic App resource template.  Like any Logic App resource, the template can be managed and deployed through Visual Studio or directly in the Azure portal to a user’s subscription of choice.

As Microsoft continues to innovate and enrich their applications and setting the standard in the industry, many partners strive to match these standards.  As third-party developers combine their application features with those of Microsoft, SharePoint and Office 365 will continue to empower its users with powerful applications that are becoming more user friendly and more specific to user needs by leveraging machine learning building towards a corporate world of collaboration on the go.