Hybrid BCS Part 4 – Connect to on-premises services
 Wednesday, August 26, 2015
- By : Mike Maadarani
 0 comment
Setting a hybrid connection between you SharePoint Online and on-premises required communication trusts between the 2 farms. Refer to this article Configuring Hybrid Infrastructure for more details on how to configure your hybrid infrastructure.
Validate external access to reverse proxy
At this point in deploying the BCS hybrid scenario, you should confirm that you can access your on-premises SharePoint 2013 farm that has been configured to receive hybrid calls from SharePoint Online.
To confirm access to external URL:
- Copy the certificate to your extranet computer, and then click the certificate. You will be prompted for the certificate password. This adds the certificate to your personal certificate store.
- Open a web browser and browse to the externally published URL of your on-premises farm. You should be prompted for credentials. If not, check your browser settings and make sure that your logged on credentials are not being automatically passed.
- Provide the credentials of the federated user. This log on must succeed and you should see the published site. If this does not work, contact the administrators who set up your hybrid infrastructure. Do not proceed any further with the BCS hybrid scenario until this issue is resolved.
Prepare your tenant environment
In order to allow your SharePoint Online tenant to connect to your on-premises tenant, you will need to configure your security to allow accepting connection to your services. The following steps are an example of what you need to establish a trust between your Online and on-premises tenants.
- Click a service account that will access the OData service endpoint that you have previously configured; this procedure will be called ODataAccount
- Create a global security group for your OData service endpoint; this procedure will be called ODataGroup
- Add the service account to the global security group
Configure Secure Store target application
- Go to your on-premises tenant SharePoint Central Administration
- Navigate to Application Management > Manage service applications
- Click the Secure StoreI
- if you have never used your Secure Store, you will need to generate a new key first
- Click on Generate New Key
- Enter your Passphrase then click OK
- Click on New under Manage Target Applications
- Enter the name of your application, the display name, and your email address
- Select Group in the Target Application Type
- Click Next
- Accept the defaults values in the Create New Secure Store Target Application page
- Click Next
- Enter the Farm Administrator account in the Target Application Administrators, and enter the group name you created for you OData Service Endpoint in the Members section
- Click OK
- Click OK
Important:
A pass phrase string must be at least eight characters and must have at least three of the following four elements:
- Uppercase characters
- Lowercase characters
- Numerals
-
Any of the following special characters
"! " # $ % & ' ( ) * + , – . / : ; < = > ? @ [ \ ] ^ _ ` { | } ~
![]() Important:
Important:
The pass phrase that you enter is not stored. Make sure that you write this down and store it in a safe place. You must have it to refresh the key, such as when you add a new application server to the server farm.
For security precautions or as part of regular maintenance you may decide to generate a new encryption key and force the Secure Store Service to be re-encrypted based on the new key. You can use this same procedure to do this.
Caution:
You should back up the database of the Secure Store Service application before generating a new key.
Set Permissions on your Online BCS
Setting your permissions on your Online BDC Metadata store is different than the on-premises tenant.
-
- Open your SharePoint Online administration page
- Click on bcs
- Click on Manage BDC Models and External Content Types
- Under Permissions, click on Set Metadata Store Permissions
- Select All users then set the Execute
- Select the checkbox to Propagate permissions to all BDC Model
- Click OK
Connect your O365 BCS to your on-premises
Unlike BCS in SharePoint 2013, BCS in SharePoint Online requires that you configure a connection settings object (CSO), which contains additional information to establish the connection to the external system and the OData source you have created.
When you create a CSO in your SharePoint Online tenant, you must provide a URL for your on-premises farm (the external URL you have configured in your reverse proxy to connect to your internal SharePoint services). Your SharePoint Online tenant will try to reach out to that endpoint in order to invoke your on-premises BCS and connect to your data source.
Whatever URL you may choose to publish, your CSO must have /_vti_bin/client.svc at the end of the URL in order to work properly.
Before you begin this procedure, make sure you have the following:
- Install configuration tools on an on-premises web server.
- The ID of the Secure Store target application that you configured.
- The Internet-facing URL that Office 365 uses to connect to the service address and that was published by the reverse proxy
- The ID of the Secure Store target application for the Secure Channel certificate in Office 365.
To create a CSO to your on-premises tenant:
- Open your SharePoint Online administration page
- Click on bcs
- Click Manage connections to on-premises services
- Click Add
- Enter the Title and the OData Service Address URL
- Under Authentication, select Use credentials stored in SharePoint on-premises
- Enter the Secure Store Target Application ID
- Under Authentication Mode, select Impersonate Window’s Identity
- Enter the internet facing URL you have configured under the reverse proxy; make sure you include /_vti_bin/client.svc at the end of the URL
- Click Create
Since your model will be using your Connection Settings object that you create in your SharePoint Online in order to connect to the on-premises data, there are some changes you need to make to it; if you do not do this then your model will not be able to connect to the on-premises data source:
- Make a copy of the ECT file that you'll be importing so you don't break the version you have with your OData project
- Delete the ODataServiceMetadataUrl and ODataServiceMetadataAuthenticationMode properties from the LobSystem property list in the ECT file
- Delete the ODataServiceUrl and ODataServiceAuthenticationMode properties from the LobSystemInstance property list in the ECT file
- Add this property to the list of properties for both the LobSystem and LobSystemInstance: <Property Name="ODataConnectionSettingsId" Type="System.String">yourConnectionSettingsObjectName</Property>
Import your ECT file to SharePoint Online
Similar to the steps for your on-premises tenant, you need to import your new ECT file you have modified in the previous section to your SharePoint Online BCS tenant.
- Open your SharePoint Online administration page
- Click on bcs
- Click on Manage your BDC Models and External Content Types
- Click on Import
- Navigate to your ECT file locations and import each ECT file; as an alternative solution, you can develop a PowerShell script to import all the files
- Click OK
Once your model is uploaded successfully you can create a new External List in SharePoint Online and use that to work with your on-premises LOB data.
Follow this article to create an External List.
Configuring Hybrid Infrastructure
- Monday, August 24, 2015
- By : Mike Maadarani
-
0 comment
Setting up SharePoint on-premises requires that you meet basic SSO deployment requirements and then configure SharePoint 2013 services and inbound requests.
When you set up and enable SSO, users in your organization are able to use their corporate credentials to access the Office 365 service offerings. This removes the burden of managing multiple logon identities and passwords. Without SSO, an Office 365 user would have to maintain separate user names and passwords. For an even better end-user experience, you can create and deploy smart links, which can help speed user sign-in requests by reducing the number of redirects necessary for authentication.
In addition to user advantages, administrators and the organization can also benefit from SSO. For example, configuring SSO helps to enforce the organization’s password policies and account restrictions in both the on-premises directory and the Office 365 directory.
To prepare, you must make sure the environment meets the requirements for SSO and verify that the Active Directory and Azure Active Directory tenant is set up in a way that is compatible with single sign-on requirements. Also, Active Directory must be deployed and running in Windows Server 2003 R2, Windows Server 2008, Windows Server 2008 R2, Windows Server 2012, or Windows Server 2012 R2 with a functional level of mixed or native mode. If you plan to use AD FS as your STS, you will need to do one of the following:
- Download, install, and deploy AD FS 2.0 on a Windows Server 2008 or Windows Server 2008 R2 server.
- Deploy an AD FS 2.0 proxy, if users will be connecting from outside the company network.
- Install the AD FS role service on a Windows Server 2012 or Windows Server 2012 R2 server.
In addition, Active Directory must have certain settings configured to work properly with single sign-on. In particular, the UPN, or the user logon name, must be set up in a specific way for each user.
Configure SharePoint 2013 services
You need to configure the User Profile Service to synchronize user and group profiles from the on-premises Active Directory domain. When federated users access resources in a hybrid environment, the STS makes calls to the User Profile Service to obtain user account metadata, such as the UPN and email property values. This metadata is used by the STS to construct security tokens during the authentication process.
SharePoint Online presents claims to the on-premises SharePoint farm by using the Simple Mail Transfer Protocol (SMTP). To support this, you need to ensure that the SharePoint user profiles for all federated users are populated with the user’s email address by using the correct UPN.
This means that the work email field in the on-premises SharePoint User Profile Store needs to contain the user’s federated email address. For example, if a federated user logs on to the on-premises domain as contoso\karenb and the public domain for the hybrid environment is contoso.com, her federated email address is karenb@contoso.com.
You must verify that the App Management and Microsoft SharePoint Foundation Subscription Settings services are started and configured. These services must be enabled to support certain configuration procedures, and to help register SharePoint Online as a high-trust application in SharePoint 2013.
Configure SharePoint 2013 for inbound requests
If the hybrid environment is configured for an inbound authentication topology, you must ensure that a single on-premises web application is configured to receive requests from SharePoint Online. This web application is referred to as the primary web application for the hybrid environment, and it accepts requests from the external endpoint URL. No specific web application configuration is required to support a one-way outbound authentication topology.
In a SharePoint Server 2013 hybrid environment, outbound connections can be made from any on-premises web application. A single SharePoint Server 2013 web application must be configured for inbound connections; it is used as the primary web application for accepting inbound connections and configuring services and connection objects for the hybrid features you deploy. You can either create a new web application and site collection or configure an existing web application for this purpose.
Configure SharePoint Online
Setting up SharePoint Online requires that you choose an application authentication topology and make additional configuration choices for the service.
Choose authentication topology
As shown in Figure 1, your choice of an authentication topology determines how certificates are configured and what capabilities are present in the hybrid solution.
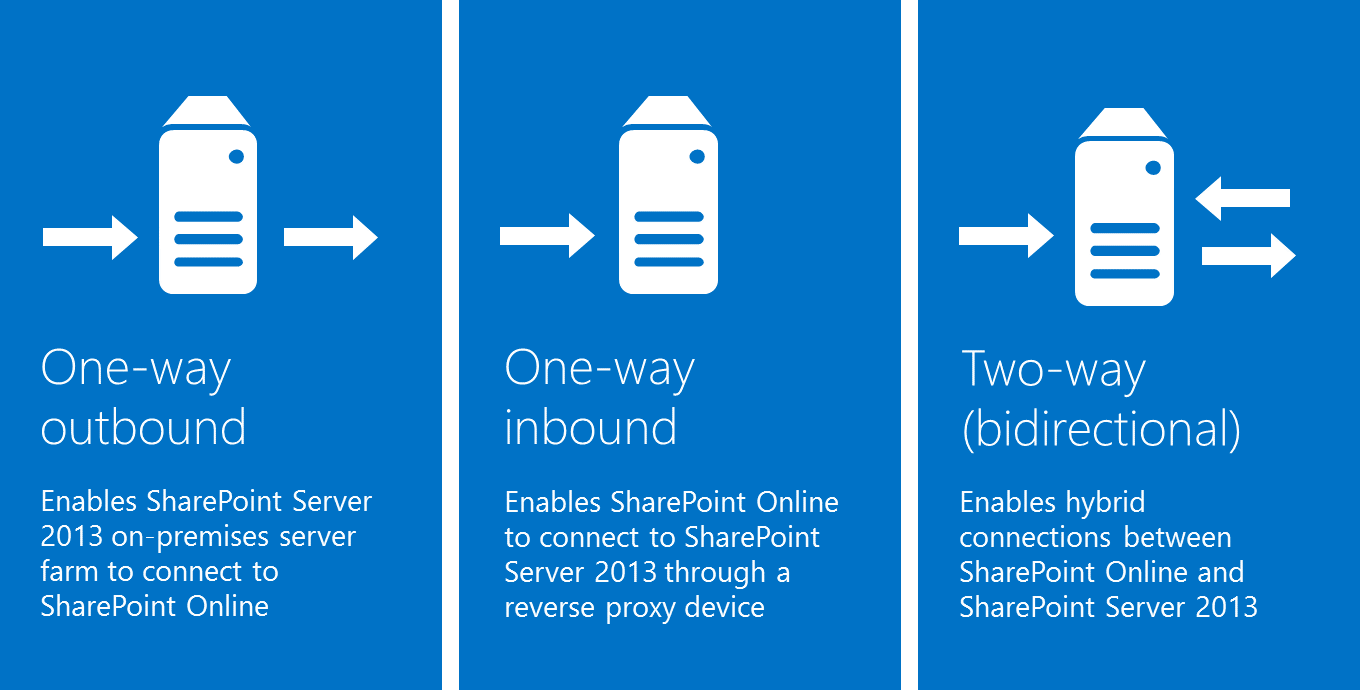
Figure 1: Application authentication topologies
One-way outbound topology
One-way outbound topology is not supported with hybrid BCS. Only one-way inbound and two-way (bidirectional) topologies.
One-way inbound topology
A one-way inbound hybrid topology enables SharePoint Online to connect to SharePoint Server 2013 through a reverse proxy device (Figure 2). For example, users of a SharePoint Online Search portal can see both local and remote search results, but only local results are available in the SharePoint Server 2013 Search portal.
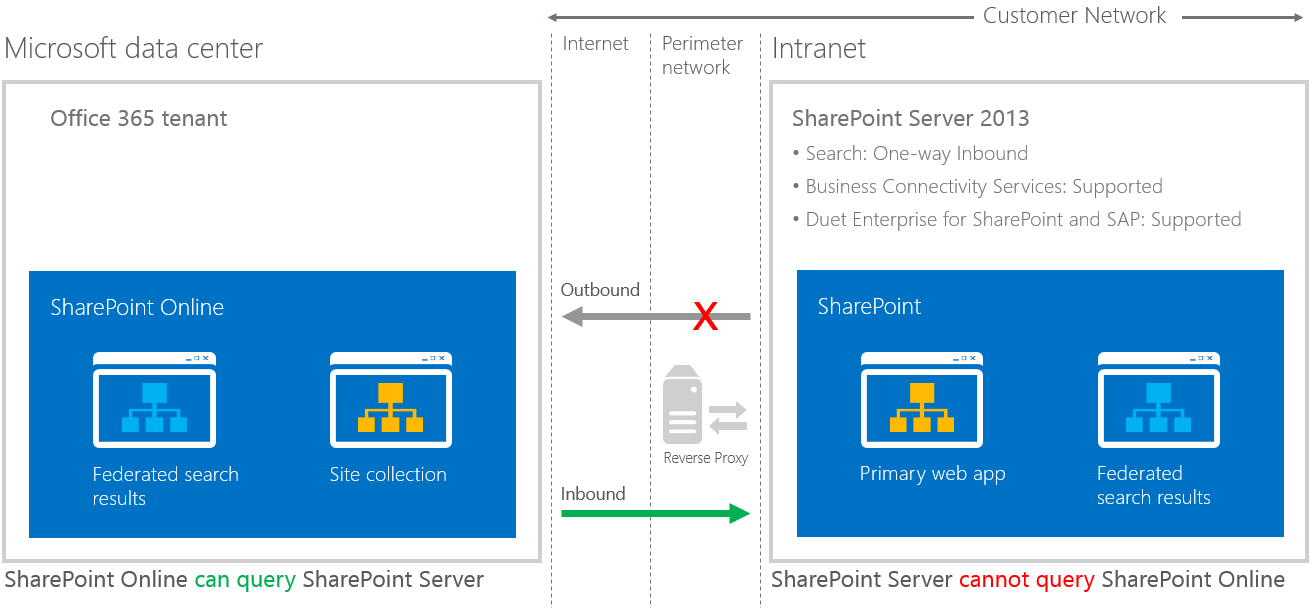
Figure 2: One-way inbound topology
A one-way inbound topology can be configured to let users access on-premises SharePoint search results from the Internet, as long as they have access to the intranet through a virtual private network or DirectAccess.
- On-premises SharePoint Server 2013 Enterprise Search portal: Local search results are available
- SharePoint Online Search portal: Local and remote search results are available
Two-way (bidirectional) topology
A two-way topology enables bidirectional hybrid service integration between the on-premises SharePoint Server 2013 farm environment and the Office 365 tenant (Figure 3). For example, search can be configured to allow federated users to see both local and remote search results in either SharePoint Server 2013 or SharePoint Online Search portals.
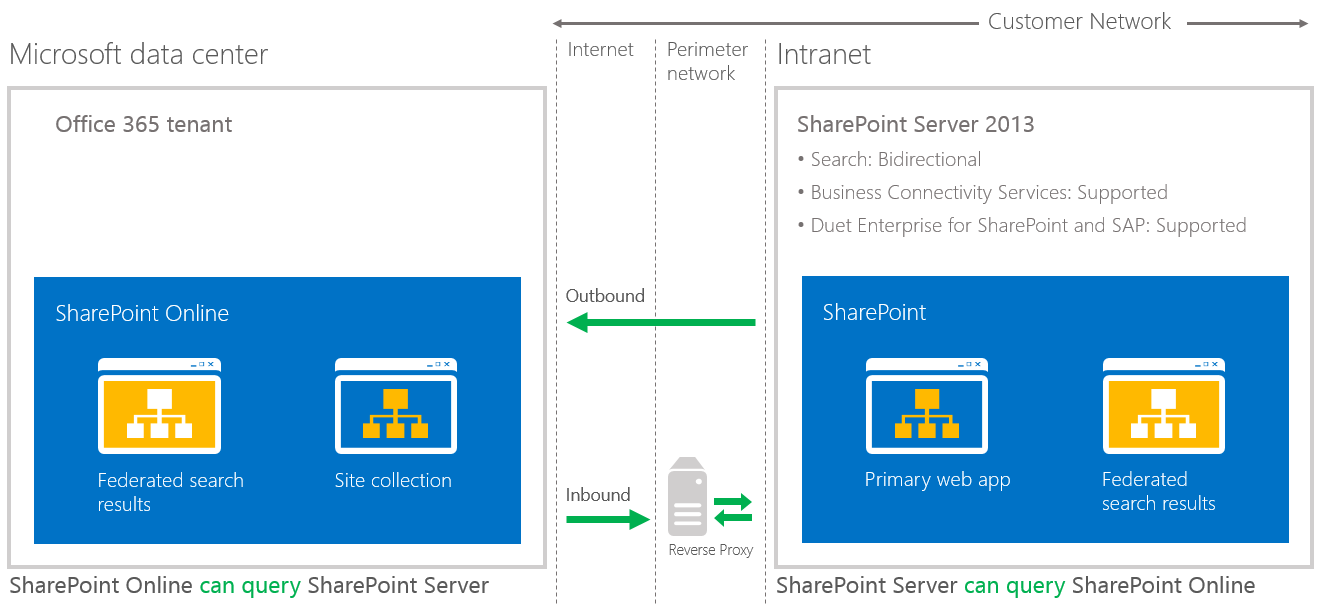
Figure 3: Two-way (bidirectional) topology
A two-way topology can be configured to let users access on-premises SharePoint search results from the Internet, as long as they have access to the intranet through a virtual private network or DirectAccess.
- On-premises SharePoint Server 2013 Enterprise Search portal and SharePoint Online Search portal: Local and remote search results are available.
- If extranet authentication services are configured, extranet users can log on remotely through an on-premises Active Directory account and use all available hybrid functionality.
Refer to these articles to configure your reverse proxy server and how to establish a secure connection between your Online and on-premises tenants.
| Link to procedure | Description of procedure |
| Configure a one-way inbound hybrid topology | Learn how to configure the infrastructure for SharePoint 2013 hybrid environments that use a one-way inbound authentication topology. |
| Configure a two-way bidirectional hybrid topology | Learn how to configure the infrastructure for SharePoint 2013 hybrid environments using a two-way authentication topology. |