List Template Duplicate Field
 Tuesday, November 14, 2017
- By : Mike Maadarani
 0 comment
Many of us have saved custom lists as templates in SharePoint Online or on-premises, to be re-purposed in the future, as an easy way to re-create the same list, with the same content types, metadata and structure. This is a an easy way for developers to give the end user a prepackaged custom list, rather than developing a provisioning tool to create a unique list. This added benefit to this method is the ability to allow the end-user to quickly create their own list based on a specific template, without the need to ask IT to do it for them.
In some rare cases, if you are trying to created a list from a custom list template, you may end up getting an error of a duplicate field name. The exact error will be "A duplicate field name was found". The list template has been created in the same site collection and you cannot find why and where is the other duplicate field name.
Cause
There are 2 possible causes to your issue:
- Your list template is referencing the same field twice
- Your list template is referencing a field tat already exist in the site collection but with a different GUID
Resolution
In my case, the second cause was my issue. The resolution for both issues is similar. Here are the steps:
Step 1 – Editing your template
- Save your template.tsp to your desktop
- Rename your template.tsp to template.cab
- Extract your template.cab to a specific location
- Edit the manifest.xml
- Look for the duplicate field name and delete the node.
This will do it for there are 2 nodes for the same field name. If this is not the case, then the GUID is your issue, and you will need to change the GUID in your template with the right GUID from your site collection. Remember that when you create a list from a custom template, if the any column already exist in the site collection, the GUID of the list template must match the GUID of the site column in the site collection.
Proceed with the following steps to resolve your issue:
Step 1.1
-
Run the following PowerShell command to find the GUID of your site column
$web = Get-SPWeb http://portal
$columnName = "Your column name"
write-host $web.Fields[$columnName].Title -nonewLine
write-host " " $web.Fields[$columnName].Id
$web.dispose - Replace the GUID in the list with the GUID from the PowerShell. In most cases the GUID exists in 2 places in the list template
-
Save the manifest.xml
Step 2
Now this is the fun/tricky part. You will need to assemble your manifest as a cab again. Run the following steps:
- Run command prompt and browse to the folder where your manifest.xml is
- Run the following command: makecab manifest.xml templatename.cab
- Rename your templatename.cab to templatename.stp
- Upload your new stp file to your list templates library
Problem solved!
OneDrive Part Two: Additional Ignite 2017 Announcements
- Saturday, November 04, 2017
- By : Mike Maadarani
-
0 comment
At Ignite 2017, many new and innovating announcements were shared, but most notably, were the many new features for OneDrive. In my previous article, OneDrive Part One: Files On-Demand, we examined the many new features and advantages of Files On-Demand. In this article, we will review the many other new features that were announced.
These new features include silent sync auto-account configuration with ADAL, Microsoft 365 powered device with OneDrive, multi-geo, updated OneDrive Admin Center, support for workflows via Microsoft Flow, simple and secure external sharing of documents without a Microsoft account, support for on-prem customers with Windows and Android App, support for NGSC (next generation sync client) in SharePoint 2019.
Silent Sync Auto-Account Configuration for OneDrive with ADAL
Silent sync and account configurations for OneDrive are now supported by Microsoft Azure Active Directory Authentication Library. Silent Sync will automatically configure OneDrive during a new device provisioning. In addition to this, for a new user being added, OneDrive is automatically set up without any interaction of the new user. By automatically setting up a new user, there is now insurance that all users will have access and the capabilities to leverage OneDrive.
Microsoft 365 Powered Device with OneDrive
What is a Microsoft 365 Powered Device with OneDrive? It is a modern device running Office 365 ProPlus and Windows 10 and is managed with Enterprise Mobility + Security (EMS).
Why is this exciting? The traditional way of deploying a device was purchasing the device, having it shipped to IT where it is then imaged and prepared for the end user. Once ready, it is then shipped to the end user, which, quite often, took several days. With a Microsoft 365 Powered Device with OneDrive, the device can now be shipped directly to the end user, who can then, with great anticipation and excitement, open the box and take out the laptop/desktop/mobile device, and begin immediately using it for work after answering a few questions after turning it on. After these questions are answered, Windows Autopilot (integrated with Azure AD Premium and Intune) will automatically configure the new device as a new Microsoft 365 powered device based on unique corporate IT and user needs. The best part – the end user’s files, apps, emails, and preferences are automatically deployed while enforcing ITs security policy. In addition to all this, the system is always up-to-date with latest security and protection as well as continually updated services which provide a consistent, rich, and valuable content to the end user. All of this is achieved over the cloud, without physical contact between the administrator and device.
A Microsoft 365 Powered Device with OneDrive has taken what took days to deploy to only minutes to deploy – how cool and exciting is that?!?
Support for Synchronization of Encrypted Libraries
Libraries encrypted with Information Rights Management (IRM) or Digital Rights Management (DRM) are fully supported with OneDrive syncing. Why is this important? Rights Management is the prevention of printing, forwarding, and copying of sensitive information by unauthorized people by restricting permission access. The access and restrictions are enforced, even if the information is received by unintended recipients as the access permission is stored in either the workbook, document, presentation or the email message itself. This access permission must be authenticated against the Rights Management server. In SharePoint, downloaded files not only must be authenticated, but they are also encrypted and can only be opened by users that meet the requirements of the Rights Management policy that is set in the SharePoint library.
External Sharing without a Microsoft Service Account
The capability to share information externally with those who do not have a Microsoft service account (MSA) can now be accomplished with a simple and secure method. You can now create and provide a one-time use verification code which grants external users access to specific content. A limited time, single-use, verification code link is securely emailed to the external recipient. After opening the email, entering, and submitting the verification code, access to files and folders is then granted to the external recipient without the need for them to create and/or maintain an MSA as they have verified that they are the account holder of the email address. As an added layer of security, IT administrators are able to specify how often external recipients must re-verify their email address as well as obtaining a new verification code.
User Experience Updates
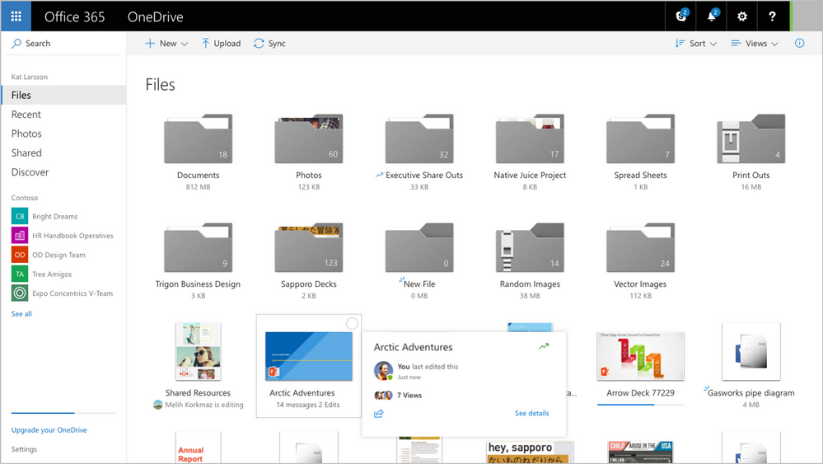
An update to the OneDrive web UI has resulted in delivering visual information quickly and concisely with one glance. If there are documents in the folder, there will now be a slip of paper inside the folder and the folders now sport a number count of items in it. New items will generate a notification to alert that there is a new item while the hover panel not only provides stats but it now also provides the opportunity to share directly from the hover panel. The People Card and Info Pane quickly provide information as to who has accessed content, what content has been shared, and who has not accessed the content. OneDrive is now faster, more intuitive, and highly responsive, resulting in a streamlined, efficient and maximized workflow process.
Seamless Sharing in Office, Windows, and Mac
Office 2016 will reflect the updated sharing UI whereby the sharing of Mac, Windows, and the Web have been standardized and will be seamless across platforms.
Multi-Geo
Multi-Geo addresses data residency and compliance for global companies. In SharePoint and OneDrive in Office 365, the multi-geo capability will provide a choice of geographical locations to store and manage your data. One or more satellite geo locations will connect to the main Office 365 tenant, the default location. In other words, Multi-Geo allows a single tenant to span across multiple geo locations.
Service Level Encryption with Customer Key
The customer key service is a new layer of security that provides you the control to encrypt and/or decrypt individual encryption keys used to encrypt your cloud storage services for OneDrive and SharePoint in Office 365. The customer key service encryption allows you to revoke or change access to these keys, effectively preventing Microsoft from accessing this content. This added layer not only hands you control of your data but also allows you to meet the compliance and specification policies of your company.
OneDrive Admin Centre
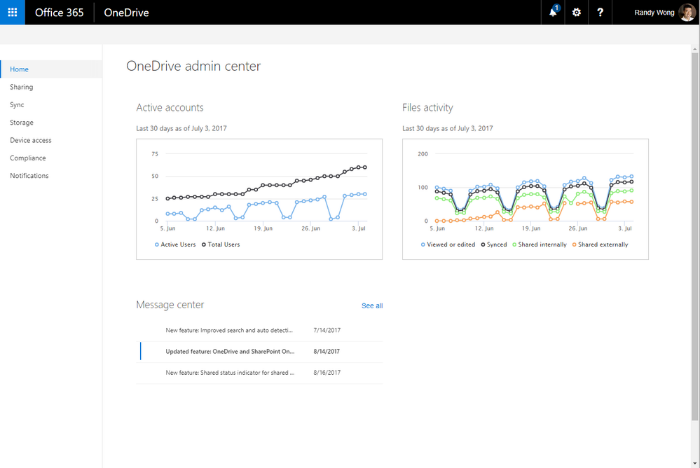
In the OneDrive Admin Centre, information regarding active accounts, file activity, and OneDrive Message Centre are all available on the OneDrive admin console.
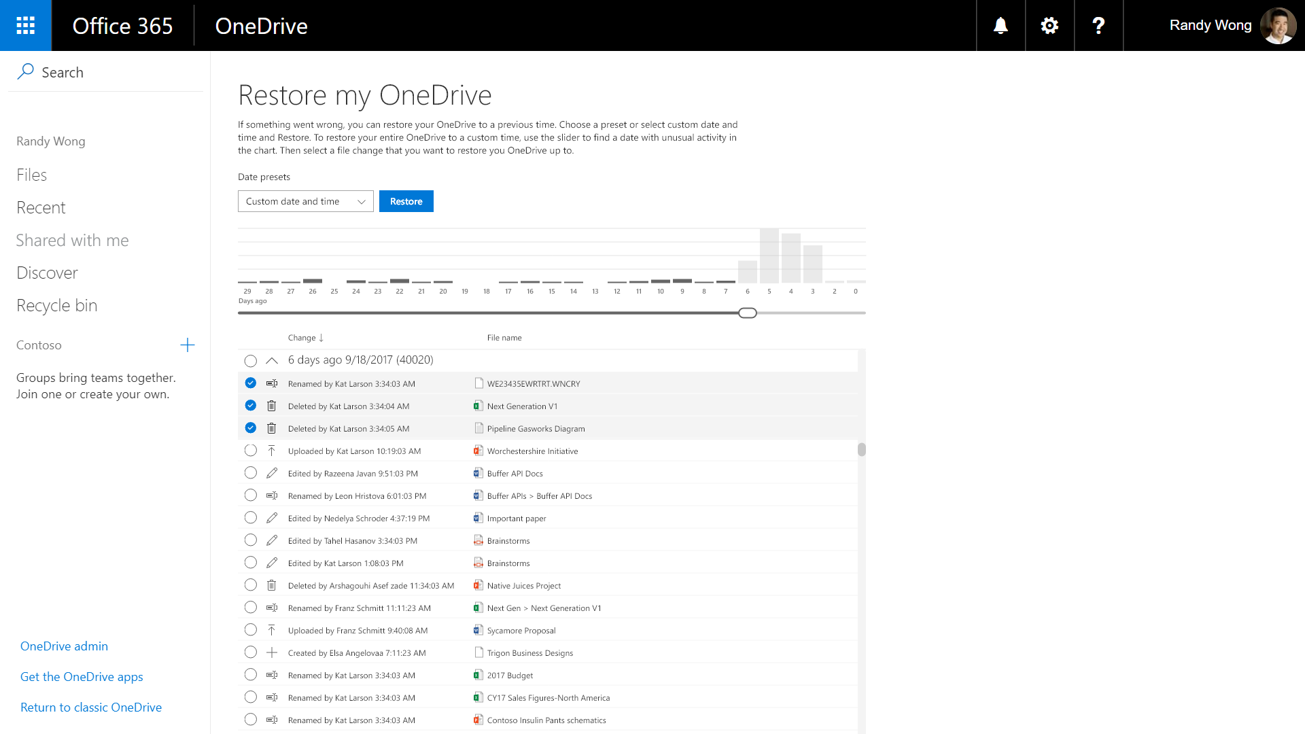
Files Restore
Disaster planning is imperative, and with Files Restore, recovery from disastrous events such as corruption, unexpected data loss or mass deletions, can be performed from this self-service.
Additional highlights include: support for workflows in Microsoft Flow in OneDrive; a self service migration toolkit for those who would like to migrate from share drives or other cloud-bases services to OneDrive on their own; implementation of new ux for mobile clients for ease of sharing and managing files on the go; opening a file in OneDrive web or a shared link to a Word or PowerPoint file will now open right into edit mode of that app; support for clients on Android platforms for OneDrive On-Prem clients; zip files can now be viewed on the web allowing you to see what is inside so that you can choose the files you would like to extract; sync client has now been integrated into Mac Office as part of the installation process; and, the OneDrive sync client released for SharePoint 2019 is now supported.
As you can see, Microsoft continually innovates, updates and adds facets to OneDrive, SharePoint and Office 365 that continually provide better cohesion between platforms, stronger collaboration tools and increased efficiency in the workflow for end-users.
OneDrive Part One: Files On-Demand
- Thursday, November 02, 2017
- By : Mike Maadarani
-
0 comment
At Ignite 2017, many exciting and new announcements were shared alongside visuals thrown up on the big screen. Many of the MS products have been enhanced, and OneDrive is one of them.
These upgraded or new features for OneDrive include Files On-Demand, silent sync auto-account configuration with ADAL, Microsoft 365 powered device with OneDrive, multi-geo, updated OD Admin Center, support for workflows via Microsoft Flow, simple and secure external sharing of documents without a Microsoft account, support for on-prem customers with Windows and Android App, support for NGSC (next generation sync client) in SharePoint 2019.
OneDrive Files On-Demand
One of the most exciting announcements is the OneDrive Files On-Demand capability.
Turning on Files On-Demand will allow you to see, in File Explorer, thumbnail files without having to download the files. The ability to access all your files offline is not only convenient, but it also saves storage space on your device. The creation of new online files, or ones created on another device, will appear as online-only files. Once connected to the internet, these files will be accessible like every other file on your device.
There are additional advantages to Files On-Demand including the flexibility to set files or folders to always be locally available, the ability to see information about files including if it is shared with others, and most importantly, ability to see thumbnails of files even if the required application is not installed to open it (over 270 file types are recognized) are all additional advantages with Files On-Demand.
A handy visual tag is placed on the bottom left of each thumbnail file which indicates its status of availability in File Explorer. The following chart easily explains each of the scenarios:
|
|
Online-only files don’t take up space on your computer. You see a cloud icon for each online-only file in File Explorer, but the file doesn't download to your device until you open it. You can’t open online-only files when your device isn’t connected to the Internet. |
|
|
|
When you open an online-only file, it downloads to your device and becomes a locally available file. You can open a locally available file anytime, even without Internet access. If you need more space, you can change the file back to online only. Just right-click the file and select “Free up space.” |
|
|
|
Only files that you mark as "Always keep on this device" have the green circle with the white check mark. These always available files download to your device and take up space, but they’re |


Using and Turning on Files On-Demand
Files On-Demand works with all files, whether work or personal, that are accessed from either OneDrive or SharePoint Online team sites. Compatible with all current apps, including Windows desktop and Windows Store apps.
The following steps will turn on Files On-Demand:
- Sign into OneDrive on your device;
-
In the notification area and at the far right of the taskbar, right-click on the white or blue OneDrive cloud icon. Select Settings;
.png)
Missing the blue or white cloud OneDrive icon in the notification area? Click the caret “^” (show hidden icons icon) to show the OneDrive blue or white cloud icon. If it appears, complete steps 1 and 2.
Still missing the blue or white cloud OneDrive icon in the notification area? OneDrive may not be active on your device. To run OneDrive on your device, select Start on the bottom left corner of your taskbar. In the search bar, type “OneDrive”. Select OneDrive from the search results.
- Next to Save space and download files as you use them on the Settings Tab, check off the box. This will now enable Files On-Demand. It is important to note that the settings for Files On-Demand are unique to each device and as such, this process will have to be done on each device that you want to have Files On-Demand activated.
Marking a Folder or File for Offline Use or as Online-Only
- On the selected folder or file, right click; and
- Choose either Free Up Space or Always keep on this device. Remember that new files or folders that are created online appear as online-only. Also, files that were created on another device will appear as online-only. Appearing online-only ensures maximum space is saved. It is also important to note that a folder marked as “Always keep on this device” will have all files in that folder download to the device as always-available files. Note that individual folders within that folder can be marked as available if the folder is online-only.
Hiding Folders on Your Device
For privacy reasons, such as having personal files on your work computer, you may not want a folder to download to certain devices. In these instances, you will want to hide a folder on your device. To hide a folder, follow these steps:
- At the bottom right of the taskbar is where the notification area is located. The OneDrive icon is represented by a blue or white cloud. Double click on this icon to open OneDrive;

Troubleshooting:
- If the OneDrive icon does not appear in the notification area, then click the caret “^” to expand the hidden icons.
- If the icon appears, complete steps 1 and 2.
- If the OneDrive cloud does not appear, then this is an indication that your device is not running OneDrive. To initiate OneDrive on your device, select Start on the bottom left corner of your taskbar. In the search bar, type in “OneDrive”. From the search results, select OneDrive. Your device will now run OneDrive.
- Select the Settings gear in the Activity Centre;
- Choose Folders next to the location where you want to choose the folder; and
- Find the folder that you do not want to be downloaded onto this device. Clear the checkbox next to this folder. This folder will no longer be downloaded onto this device.
You will need to repeat the above steps on each device that you do not want the folder to download to as settings for Files On-Demand are unique to each device.