Microsoft Graph API – Part 3 – Customizing Queries for Results
 Monday, October 31, 2016
- By : Mike Maadarani
 0 comment
This is our last article of 3 parts about Microsoft Graph API. In the first article, Microsoft Graph API – An Introduction, we had a quick overview of the Graph API and how it evolved from the Office Graph API. We also talked about what you need to know about setting up your endpoint API and tokens to build your custom solutions.
In part 2, Microsoft Graph API – Bringing it together, we showed you the structure of the Graph API that are composed of four layers: Data, Authentication and Authorization, Development Environment, and Solutions Layers. We also reviewed the importance of Active Directory and how organizations have started to build applications on the Graph API.
In this article, we will go a bit deeper in developing queries and syntax with the platform.
Common Microsoft Graph Queries
Microsoft Graph API is currently available for preview only with two endpoint versions. The first addresses users, groups, contacts, calendars, mail, and files. The endpoint is https://graph.microsoft.com/v1.0 and is available for your production environment. The second addresses tasks, people, OneNote, Excel, contacts (organization). The endpoint is https://graph.microsoft.com/beta and is available for preview.
Microsoft Graph API v1.0
Common queries that can be used to access the Microsoft Graph API is as follows:
|
Operation |
Service endpoint |
|
GET my profile |
https://graph.microsoft.com/v1.0/me |
|
GET my files |
https://graph.microsoft.com/v1.0/me/drive/root/children |
|
GET my photo |
https://graph.microsoft.com/v1.0/me/photo/$value |
|
GET my mail |
https://graph.microsoft.com/v1.0/me/messages |
|
GET my high importance email |
https://graph.microsoft.com/v1.0/me/messages?$filter=importance%20eq%20'high' |
|
GET my calendar |
https://graph.microsoft.com/v1.0/me/calendar |
|
GET my manager |
https://graph.microsoft.com/v1.0/me/manager |
|
GET last user to modify file foo.txt |
https://graph.microsoft.com/v1.0/me/drive/root/children/foo.txt/lastModifiedByUser |
|
GET unified groups I’m member of |
https://graph.microsoft.com/v1.0/me/memberOf/$/microsoft.graph.group?$filter=groupTypes/any(a:a%20eq%20'unified') |
|
GET users in my organization |
https://graph.microsoft.com/v1.0/users |
|
GET group conversations |
https://graph.microsoft.com/v1.0/groups/<id>/conversations |
Source: https://graph.microsoft.io/en-us/docs
Microsoft Graph API Beta
Queries that are available in the beta version are as follows, but is important to note that they are in beta and it is not suggested that these be applied in the production environment:
|
Operation |
Service endpoint |
|
GET people related to me |
https://graph.microsoft.com/beta/me/people |
|
GET files trending around me |
https://graph.microsoft.com/beta/me/trendingAround |
|
GET people I am working with |
https://graph.microsoft.com/beta/me/workingWith |
|
GET my tasks |
https://graph.microsoft.com/beta/me/tasks |
|
GET my notes |
https://graph.microsoft.com/beta/me/notes/notebooks |
Source: https://graph.microsoft.io/en-us/docs
Syntax Patterns
For developers, the syntax patterns, at this time of publication, are as follows:
1. Microsoft Graph API Endpoint:
{Graph Endpoint} https://graph.microsoft.com
2. Target Service Version:
{Version} such as v1.0 or beta
3. Tenant Name or Specific Entities:
{Tenants} such as users, groups, files
4. Particular Item from Entity Set:
{Id} such as single user and file
5. Specific Property of Particular Object Selected from Entity Set:
{Property}
Query Parameters
Microsoft Graph API supports the following query options which allow you to specify and control the amount of data that is returned in a response:
- $Select – include in response comma separated list of properties: https://graph.microsoft.com/v1.0/me/messages?$select=from,subject
-
$Expand – include in response expanded comma separated list of relationships: https://graph.microsoft.com/v1.0/me/drive/root?$expand=children($select=id,name)
Note: maximum number of expanded objects for a request is 20 and if the query is placed on the user resource, the properties of only one child object or collection can be retrieved at a time. - $OrderBy – include in response comma separated list of properties used to sort order of items in response collection: https://graph.microsoft.com/v1.0/users?$orderBy=displayName%20desc(asc)
-
$Filter – filters response based on a set of criteria:
- By name: https://graph.microsoft.com/v1.0/users/?$filter=startswith(displayName,{Name})
- By entity type: https://graph.microsoft.com/v1.0/me/messages?$filter=from/emailAddress/address%{Value}eq%{EmailAddress}%27
- $Top – Number of items to return in a result set: https://graph.microsoft.com/v1.0/users?$top={Number}
- $Skip – Number of items to skip in a result set: https://graph.microsoft.com/v1.0/me/events?$orderby=createdDateTime&$skip={Number to be skipped}
-
$skipToken – paging token used to get next set of results:
- https://graph.microsoft.com/v1.0/users?$orderby=displayName&$skiptoken=X%{value}%
- To return the next page of users within your organization, the syntax is: https://graph.microsoft.com/v1.0/users?$orderby=displayName&$skipTokes =%{value}
- $Count – A collection and the number of items in the collection: https://graph.microsoft.com/v1.0/me/contacts?$count=true
- $directReports – Gets user objects, each with up to 20 directReport objects in the directReports collection: https://grap.microsoft.com/v1.0/users?$expand=directReports
By applying custom queries and setting specific parameters, Microsoft Graph API can be customized to provide tailored solutions to your corporation on a platform of your choice, including Android, Windows, and iOS.
Microsoft Graph API is an excellent solution from Microsoft to meet the demands of businesses in today’s world of cloud computer based business. Flexible, seamless and efficient, Microsoft Graph API is the solution for obtaining aggregate data from various Microsoft cloud-based services including SharePoint, SharePoint Mobile, Office 365, Outlook, Calendar and social media apps such as Twitter and Yammer.
Microsoft Graph API – Part 2 – Bringing it Together
- Saturday, October 29, 2016
- By : Mike Maadarani
-
0 comment
In our first Part, Microsoft Graph API – An Introduction, we reviewed the evolvement of Office Graph into Microsoft Graph API. We also looked at the reasons as to why a change in process for accessing data was required. Next, we delved into how the transition of obtaining aggregate data from various cloud services with a complex system of individually specific APIs and multiple tokens became one singular endpoint API and one token. Customizing app solutions has become easier with a single endpoint API, and the possibility to provide these solutions in Windows, Android, and iOS platforms is becoming a reality with the move to open source developer tools.
The Structure of Microsoft Graph API Developer Stack
In order to develop applications based on Microsoft Graph API, a basic understanding of the developer stack in needed. There are four layers:
1. Data Layer:
Office Graph and Microsoft Graph API reside in this layer. Information regarding people, emails, notes, documents and relationships with each other is delivered from this layer.
2. Authorization and Authentication Layer:
Authorization and authentication use OpenID Connect and OAuth2.0 to perform these functions.
3. Development Environment Layer:
Software Development Kits (SDK) for Windows, iOS, and Android reside in this layer. Development tools such as Visual Studio, XCode, Eclipse, Android Studio and REST (Representational State Transfer) are available in this layer.
4. Solution Layer:
Your app or solution is deployed from this layer on either Microsoft Azure or on other hosting platforms such as LAMP and IIS while enabling the developer to use their choice of language such as .NET, JS, HTML, and Ruby depending upon the apps solution that is being targeted (Windows, Android or iOS).
This is best illustrated in the infographic below (source: https://graph.microsoft.io/en-us/docs).
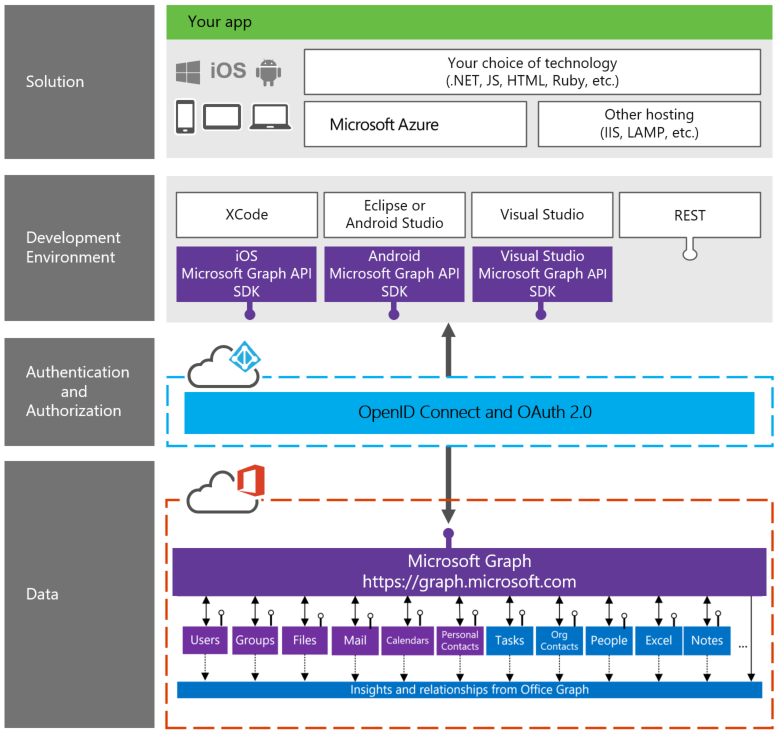
Microsoft Graph API Developer Stack – Illustration
The Importance of the Microsoft Active Directory (AD)
Microsoft Active Directory (AD) is a structure used on computers and servers running a Windows operating system. The primary function of the AD is to store network, domain and user information, such as user accounts, passwords, and profiles, in a single, protected location.
The AD is only as useful as the information that has been submitted and entered. The importance of having a complete and accurate user profile is the key to successfully accessing user and business information. For many corporations, the AD is lacking substance and with the lack of key information, collaboration, communication, and efficiency is greatly decreased with collaboration tools such as SharePoint, Delve, and business processes built on flow. Achieving AD compliance has always been a challenge for organizations with the lack of Governance and AD maintenance. This particular issue is being addressed by Hyperfish.
Recognizing this as a point of need for businesses, Hyperfish was developed to achieve corporate compliance with each user by interactively engaging the user to complete the necessary information fields. Hyperfish monitors the AD, or the Azure Active Directory (AAD) for missing, incomplete or out of date information. After analysis, the system will then contact the user at the most appropriate time and method to elicit responses from the user to complete their profile. The user will be prompted with suggestions which are based on information gathered from email, social media, and other data sources. An AD that is complete will improve the quality and speed of communication between team members, and can be combined with Workflow, Office 365, SharePoint and SharePoint Mobile to maximize the effectiveness of collaboration.
The Microsoft Active Directory serves as the hub of corporate user information, allowing administrators to set rules and trusts according to teams and privileges and when populated correctly, provides pertinent information which ensures utmost proficiencies in collaboration and communication.
Our last part will be an in-depth look at the most common Microsoft Graph API queries, syntax standards and parameter settings in Microsoft Graph API – Customizing Queries for Results.
Microsoft Graph API – An Introduction
- Thursday, October 20, 2016
- By : Mike Maadarani
-
0 comment
What is Microsoft Graph API?
Microsoft Graph API (Application Programming Interface) is the evolvement of Office 365 Unified API into a single stop for a cloud solution by exposing multiple Microsoft cloud service APIs through a single REST (Representational State Transfer) API endpoint. Microsoft Graph API provides seamless navigation between service entities such as users, groups, mail, messages, notes, tasks, and calendar, and Office Graph. Data can be accessed from multiple Microsoft cloud services such as Exchange, OneDrive, SharePoint, OneNote, Planner and Azure Active Directory.
As business and society move towards storing and accessing data in the cloud, the increase in traffic and increase in data volume results in data congestion. This translates into lost productivity, delays in decisions and miscommunication between groups and management. With each step towards cloud-based computing and collaboration, Microsoft is addressing the issue of cloud data congestion with Microsoft Graph API.
What is the Difference Between Office Graph and Microsoft Graph API?
When we examine Microsoft cloud services, we can see services that include SharePoint Mobile, Office 365, OneDrive, Outlook, Calendar, Skype, and Yammer. Each of these services is used to manage documents, email, events, collaboration and social interactions. These services can then be viewed as two types of entities: content and communication.
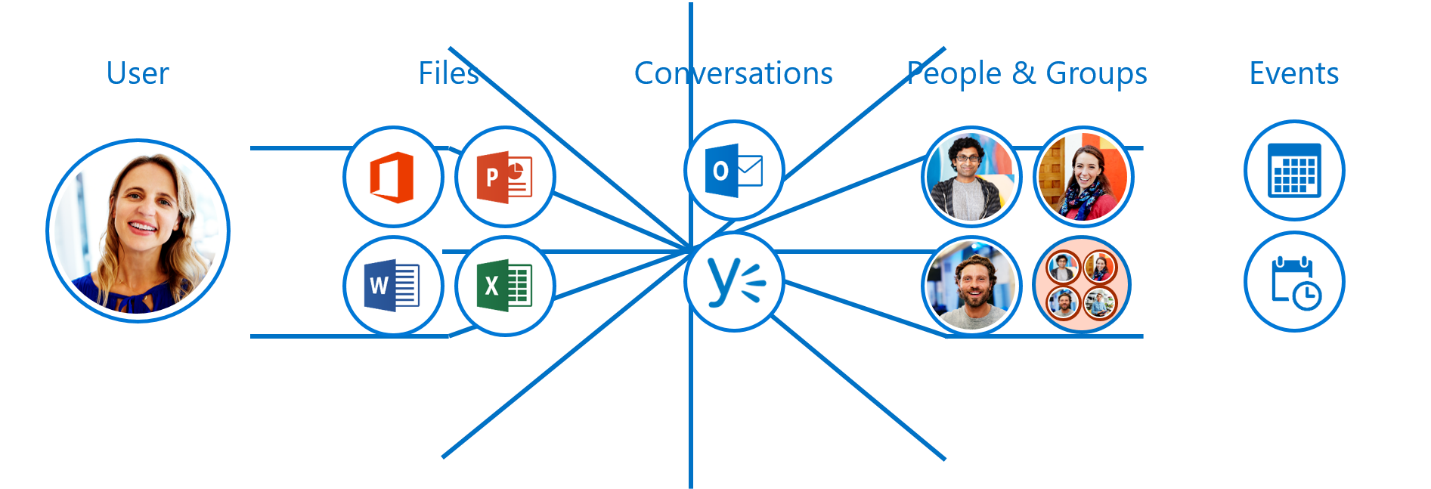
Let’s back up a bit to fully understand how Microsoft Graph API works. Before API, there was Office Graph. Office Graph was developed to link the two entities of content and collaboration together. Imagine the user centrally located on a blank page. As the user connects to various content and communicates with team members, a thin spider web connects the user with each action thus creating a web of all his actions and relationships to users around him. This spider web network shows the direct and indirect relationships the user within his work environment and how he responds and actions out his responses and questions.
With machine learning algorithms built into Office Graph, the user’s daily activity and the relationships between nodes, such as who the user reports to, who the colleagues of the user are, which documents are most frequented by the user, and so on, can be determined. By collecting and analyzing, this algorithm allows Office Graph to learn the user’s most frequented services and bring them to the top of the page for easy access.
With Office Graph, the user has created a web that consists of content and communication. Each piece of content is a node. Each person is a node. Each form of communication is a node. Office Graph connects these nodes together through specific APIs. Each one has its own API. Office Graph creates a small web for each user, whereas, Microsoft Graph API creates a web not only for one user but interlinks related users across an entire organization resulting in a large web of collaboration and communication.
Here is an image that shows how we can use Office Graph to connect and surface data among different areas of the Office 365 and Azure stacks.
The larger the web, the slower the time to access and find data. Microsoft Graph API retained the inherent machine learning capabilities as one of the responses to this issue. By collecting and analyzing, the machine learning algorithm allows Microsoft Graph API to learn the users working relationships and brings to the forefront the most frequented services not only for each individual user but as an organization as a whole by connecting each individual with collaborators and teams.
The single and greatest response to cloud data congestion is that Microsoft Graph API was evolved further so that multiple API exposures from Microsoft Cloud services are handled through a single REST API end point. In other words, there is one endpoint to rule them all!
How does Microsoft Graph API work?
In Office Graph, data in Office 365 is filed in individual silos. These standalone silos are labeled users, groups, files, mail, calendar, contacts, tasks, people, Excel and insights and relationships. Each silo has it very own unique API which caused a challenge for developers to access the data and eventually, it became cumbersome due to the complexity of accessing the individual APIs for different types of data and linking them to each other in different services. For example, accessing users and people in Azure Active Directory required one set of rules while accessing users and people in SharePoint required a second set of rules. In addition, separate access tokens had to be created to access data from different data silos. This was time intensive and not clean methodology! And so, Microsoft Graph API was born.
Microsoft Graph API provides access to Office Graph data with a single endpoint to display the data in your cloud app. Gone are the days of multiple tokens. With Microsoft Graph API, only a single access token is required regardless of which Microsoft cloud service that information is being retrieved from. Microsoft Graph API provides sleek, seamless and efficient access to information when you need it and how you need it.
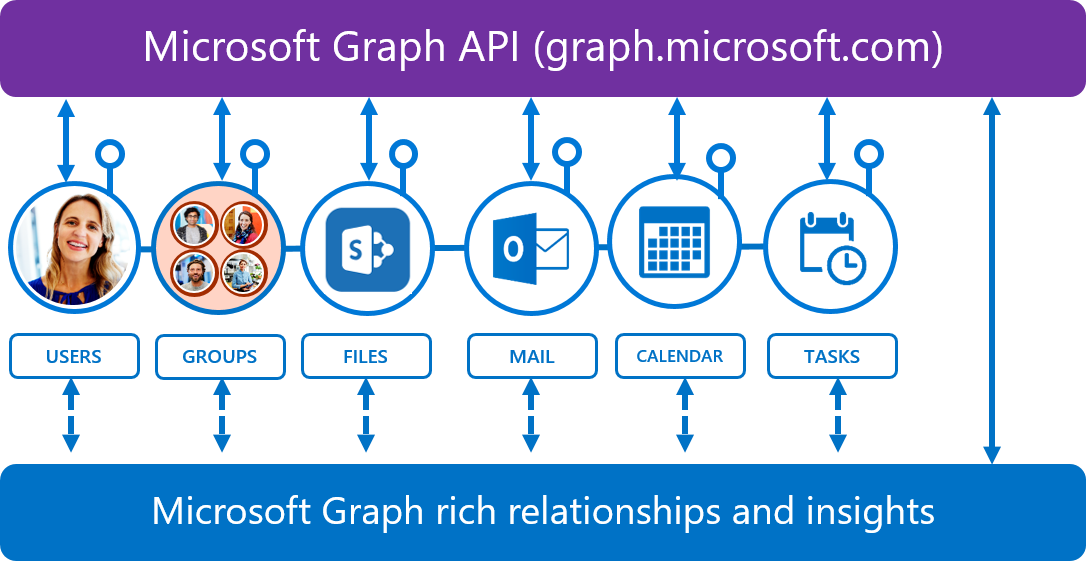
In short, Microsoft Graph API provides a unified REST API endpoint, https://graph.microsoft.com, for accessing aggregated data from multiple Microsoft cloud services in a single response by using a single authentication token. Yes, it’s that simple.
In Part 2, Microsoft Graph API – Bringing it Together, we will delve into the developer stack and the importance of having a substantial Microsoft Active Directory. In our last Part (3), we will look closely at the common Microsoft Graph API queries in Microsoft Graph API – Customizing Queries for Results.
SharePoint 2016 – User Profile Service and Microsoft Identity Management
- Wednesday, October 12, 2016
- By : Mike Maadarani
-
0 comment
User Profile Service – The New User Profile Service Application
The User Profile Service Application, ForeFront Identity Management (FIM), in SharePoint 2010 and 2013, will be replaced with a new User Profile Service in SharePoint 2016. The new User Profile Service will provide two methods for profile synchronization:
1. Active Directory Import (ADI) – User Profile Service Instance is the simplest and most direct route to Active Directory;
2. External Identity Manager (EIM) – use of an external FIM or custom coding provides possibilities to connect external systems to the Active Directory.
ADI is included with SharePoint 2016; therefore, it will not need a separate server installation. As a separate server installation is not required, the fastest way to get up and running with profile import is by using User Profile Service Instance with Active Directory Import (ADI). It is one of two User Profile Sync application options, where Microsoft Identity Manager (MIM) is the second option.
Active Directory Import
Active Directory Import is the most heavily used sync engine for SharePoint and is used by Office 365 to import profile data from the intermediary directory that is synced to SharePoint’s profile store. This fact alone should remove any doubts regarding its capability of handling large volumes of data for large enterprises.
ADI assumes one source of identification in the corporation and imports from one system, making it very easy and smooth for administrators. Unlike the old 2010/2013 User Profile Synchronization Service with FIM, importing with ADI is one directional, allowing it to be super fast and efficient. This means you cannot export or update your AD from SharePoint profiles using ADI. Importing capabilities support secondary accounts, custom property mappings, account mappings for Windows, FBA, and Trusted Identity Providers. However, there are some limitations of ADI where support for the following are either lacking or insufficient: cross-forest contact resolution, mapping to SharePoint System properties, augmenting profiles with data from BDC, mapping multi-value to single or vice versa, and mapping two different AD attributes to the same SharePoint property.
Microsoft Identity Management
As Microsoft transitions to mobile cloud computing, many features in SharePoint are being revisited and either removed or replaced. For Microsoft, the importance of security, whether it be data loss prevention, control of user profile information, or enterprise security through management access, is a top priority.
One such feature that has been revisited and replaced is the ForeFront Identity Management (FIM) technology that was first introduced in SharePoint 2010 and 2013. FIM was built years ago, and although it was great back in the days, it is too much to re-build or extend to meet today’s needs. Microsoft Identity Manager (MIM) is the successor to FIM. It is important to note that MIM is not built into SharePoint 2016; therefore, it requires a separate server installation.
Unlike its predecessors, MIM provides an identity and access management system that begins on ground with on-prem environments and reaches up to the sky with cloud environments. It is a vast system that provides identity management, user provisioning, device registration, application access control, data loss protection and federation.
Corporations can easily secure their modern hybrid infrastructure through the combination of MIM with Windows Server Active Directory and Microsoft Azure Active Directory. Multiple on-prem authentication stores, such as Active Directory, LDAP, and Oracle, are bridged seamlessly with MIM through Identity and Access Management (IAM) solutions. The result is consistent experiences for on-prem LOB applications and SaaS solutions.
There are three notable features of MIM:
1. Cloud-ready identities: provides standardized Active Directory attributes and values, partitioned identities for cloud synchronization, reporting connected to Azure Active Directory and preparation of user profiles for Office 365;
2. User Self-Service: password resets with Multi-Factor Authentication, account unlock, REST-based APIs for AuthN/AuthZ, certificate management support for multi-forest and modern applications;
3. Enhanced Security: privileged user and account discovery, management of workflow with elevated administrator access, reporting, and auditing specific to privileged access management, Windows PowerShell support, and REST-based API.
What MIM has that ADI Doesn’t
Since MIM is not built into SharePoint 2016, being external has its advantages. The main advantage is that MIM can be customized for bidirectional data flow which provides a great advantage over the unidirectional data flow for ADI. In addition to this, MIM is flexible and allows for customized import. In fact, it automatically imports user profile photos. MIM also supports non-active directory LDAP and multi-forest scenarios.
Not only does MIM offer customizable solutions to the SharePoint farm, it is a sound financial choice, being cost effective as it uses existing MIM expertise, infrastructure, and investment.
With the future of SharePoint heading straight for the cloud, enterprise security has become even more important than it has been in the past. In response, SharePoint now has two options of syncing User Profiles: Active Directory Import and Microsoft Identity Manager. Depending upon the needs of your enterprise, ADI and MIM provide unique capabilities in managing global security.
Introduction to SharePoint Framework: The Nuts and Bolts
- Monday, October 10, 2016
- By : Mike Maadarani
-
0 comment
What is SharePoint Framework?
SharePoint Framework is a new page and web part model that provides full support for client-side SharePoint development with easy integration of SharePoint data and Microsoft Graph through open source tooling which enables the building of SharePoint customizations for mobile, on-prem, online and OneDrive for Business. With SharePoint Framework, modern web technologies and tools provide a development environment to build experiences and apps that are ready and mobile-ready from the start.
In the next 3 blog articles, I will be shedding some lights on the new Framework and how you can start preparing to adopt the new development platform.
SharePoint Framework is written in JavaScript which allows developers, both inside and outside of Microsoft, to use their preferred web developer tools to develop SharePoint and customized solutions. This is an incredible leap as this allows developers on any platform to extend SharePoint’s standard capabilities. In addition, SharePoint Framework accompanies the new SharePoint UX, which is designed for the world’s mobile-first, cloud-first communication era. By moving towards open source resources, not only has a new door for developers has been opened, but it is also creating a new relationship between developers and SharePoint, resulting in a complete win for the client.
By moving to open source, will SharePoint Framework solutions work on classic sites? The answer is simply this: eventually, on existing team sites, it will and on new modern team sites, yes it will. However, classic solutions will not work on the new modern team sites. Moving forward, it is highly advisable to become familiar with SharePoint Framework and the tools to prepare yourself when SharePoint Framework is released.
Let's talk Framework, Development and Scaffolding tools in my next article!
Cloud Search Service Application
- Sunday, October 09, 2016
- By : Mike Maadarani
-
0 comment
One of the great enhancements in SharePoint 2016 and in the SharePoint 2013 August 2015 CU, is the Hybrid Search using Cloud Search Service Application (CSSA). The new CSSA will allow organizations to take advantage of the new hybrid capabilities, in order to create a unique search experience with one index, with crawled content from Office 365 and On-Premises data. Having one Index is huge step to better enhance the end user experience and making it easier to find results from different sources.
In this article, I will be showing step-by-step how to set up your CSSA . It is a pretty simple process if you follow the steps in order.
First of all, let's review how the CSSA indexing and crawling works. Picture 1 shows that crawling is initiated from on-premises, but the index is stored on your Office 365 tenant.
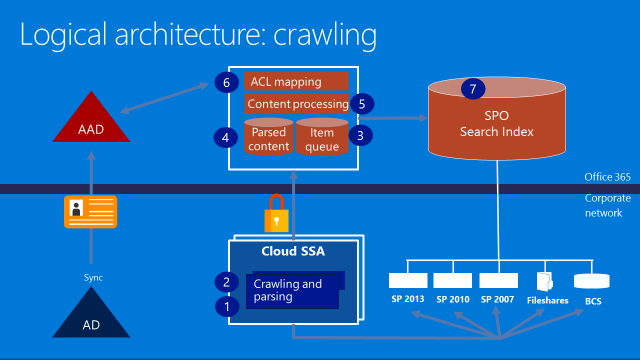
Picture 1
Picture 2 describes the flow of the search queries and the possibilities to send a query from the cloud or on-premises.
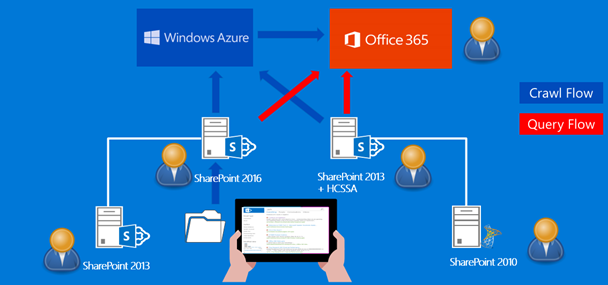
Picture 2
Mandatory Requirements
The following are mandatory requirements to get your CSSA working:
1. SP2013 with August 2015 CU or SP 2016
2. O365 Subscription
3. Azure Subscription
4. Synchronize users and groups from on-premises to Office365 Azure Active Directory (DirSync, AADSync, or AADConnect)
5. Create cloud Search service application
6. Install onboarding pre-requisites
7. Execute onboarding script
Azure AD (AAD) requirements
- Need Azure Subscription (or trial subscription) or Office 365 paid license
- Verified domain; xxx.onmicrosoft.com is not enough
-
On-premises:
- AD Server must be 2003 or later
- If you want to use password writeback, then you must have Windows Server 2008 with latest SP and KB2386717; otherwise use Windows Server 2008 R2+
- Azure AD Connect can be installed on AD or any server part of the domain
- If you plan password synchronization is required, then server must be 2008 R2 SP1 or later
- .NET 4.5.1 or later
- PowerShell 3.0
- If you are using ADFS, then SSL is needed x.509 (self-signed is OK in test lab
Step 1 – Synchronize AAD
First you must synchronize your On-Premises AD with AAD. Follow these steps to install and configure your AAD Connect: https://azure.microsoft.com/en-us/documentation/articles/active-directory-aadconnect/
Step 2 – Create your CSSA
You can either use Central Admin or PowerShell. If you are using Central Admin, then you will see a new checkbox for the cloud search option. You must check it to make sure you are creating a CSSA and not a regular SSA. If you are like me, who prefers to use PowerShell, then you will make a small change to your existing script. If you don’t have one, you can download any SSA script, but make sure you add the following variables to the New-SPEnterpriseSearchServiceApplication:
New-SPEnterpriseSearchServiceApplication -Name $SearchServiceAppName -ApplicationPool $appPool -DatabaseServer $DatabaseServerName -CloudIndex $true
Then you need to set your SSA Property to true by executing this command: $Searchapp.SetProperty(“IsHybrid”,1), before you set your Search Topology.
Your Powershell Script should like similar to this:
SSADB = "SharePoint_Demo_Search"
$SSAName = "Search Service Application SPS Baltimore"
$SVCAcct = "<search Service account>"
$SSI = get-spenterprisesearchserviceinstance -local
#1. Start the search services for SSI
Start-SPEnterpriseSearchServiceInstance -Identity $SSI
#2. Create the Application Pool
$AppPool = new-SPServiceApplicationPool -name $SSAName"-AppPool" -account $SVCAcct
#3. Create the search application and set it to a variable
$SearchApp = New-SPEnterpriseSearchServiceApplication -Name $SSAName -applicationpool $AppPool -databaseserver SQL2012 -databasename $SSADB –CloudIndex $true
#4. Create search service application proxy
$SSAProxy = new-SPEnterpriseSearchServiceApplicationProxy -name $SSAName" Application Proxy" -Uri $SearchApp.Uri.AbsoluteURI
#5. Provision Search Admin Component
Set-SPEnterpriseSearchAdministrationComponent -searchapplication $SearchApp -searchserviceinstance $SSI
#6. Create the topology
$Topology = New-SPEnterpriseSearchTopology -SearchApplication $SearchApp
#7. Assign server(s) to the topology
$hostApp1 = Get-SPEnterpriseSearchServiceInstance -Identity "SPWFE“
$Searchapp.SetProperty(“IsHybrid”,1)
New-SPEnterpriseSearchAdminComponent -SearchTopology $Topology -SearchServiceInstance $hostApp1
New-SPEnterpriseSearchCrawlComponent -SearchTopology $Topology -SearchServiceInstance $hostApp1
New-SPEnterpriseSearchContentProcessingComponent -SearchTopology $Topology -SearchServiceInstance $hostApp1
New-SPEnterpriseSearchAnalyticsProcessingComponent -SearchTopology $Topology -SearchServiceInstance $hostApp1
New-SPEnterpriseSearchQueryProcessingComponent -SearchTopology $Topology -SearchServiceInstance $hostApp1
New-SPEnterpriseSearchIndexComponent -SearchTopology $Topology -SearchServiceInstance $hostApp1 –IndexPartition 0
#8. Create the topology
$Topology | Set-SPEnterpriseSearchTopology
Step 3 – Validate your CSSA
Run the following PowerShell script to validate that your SSA is cloud based.
Add-PSSnapin Microsoft.SharePoint.Powershell
$ssa = Get-SPEnterpriseSearchServiceApplication
Get-SPEnterpriseSearchTopology -Active -SearchApplication $ssa
Get-SPEnterpriseSearchStatus -SearchApplication $ssa -Text |ft Name, state,Partition,Host -AutoSize
$ssa.CloudIndex
This should return True.
Step 4 – Install On-Boarding Pre-requisites
You must install the following, in order, before you proceed with the On-Boarding script:
1. Microsoft Online Services Sign-In Assistant: https://www.microsoft.com/en-ca/download/details.aspx?id=28177
2. Reboot the Server
3. Microsoft Azure AD PowerShell: http://go.microsoft.com/fwlink/p/?linkid=236297
If you do not install the above, then the next step will not work as it is needed to establish the trust between your Farm/CSSA and your Online tenant.
Step 5- Run On-Boarding Script
The On-Boarding script is a PowerShell, provided by Microsoft, that you must run as your last step to complete your CSSA configuration. You can download the On-Boarding script from GitHub. When you run this script, you will be asked to enter your O365 tenant credentials. The user must be a tenant admin account to be able to execute the script.
Crawl your content
Once you have completed, you can start adding you content sources to your CSSA. Your content sources can be any SharePoint portal (2010, 2013, 2016, etc.), any folders, exchange, etc. Basically, it is the same content sources you used to crawl with a regular SSA.
When you are completed, then you can navigate to your SharePoint Online, search for a keyword and results should appear from Online and On-Premises.
Create subsites in SharePoint Online with CSOM
- Thursday, October 06, 2016
- By : Mike Maadarani
-
0 comment
Often, when we are engaged with new Office 365/SharePoint Online projects, we may have to create hundreds of subsites within a site collection. unfortunately, we still do not have PowerShell Cmdlets to create SharePoint webs, and we can only create SharePoint Online Site Collections using the New-SPOSite Cmdlet. However, it is definitely possible to create your subsites remotely on your SharePoint Online tenant using CSOM.
To make it more efficient, we are going to create an XML file, store all the subsites info in it, then read the XML file from CSOM to populate your Site Collection structure.
The script below describes all the steps you need to automate your SharePoint Online Site Collection.
XML File
First, let's create a new XML file and call it contoso.xml. The XML will have the URL of the Site Collection and the webs to be created within it (technically you can use the same XML to create multi level subwebs). The file will look like this:
<?xml version="1.0" encoding="UTF-8"?>
<Webs>
<Web>
<Url>https://contoso.sharepoint.com/sites/<Site Collection></Url>
<Sites>
<Site>
<Name>Site1</Name>
<Title>Title 1</Title>
</Site>
<Site>
<Name>Site2</Name>
<Title>Title 2</Title>
</Site> </Sites>
</Web>
</Webs>
You can download a sample of the XML document here: contoso.xml
CSOM Code
There are few steps you need to take to get the CSOM code.
First, you need to add references to your SharePoint client assemblies.
Add-Type -Path (Resolve-Path "C:\CreatePublishingSite\Microsoft.SharePoint.Client.dll")
Add-Type -Path (Resolve-Path "C:\CreatePublishingSite\Microsoft.SharePoint.Client.Runtime.dll")
Add-Type -Path (Resolve-Path "C:\CreatePublishingSite\Microsoft.SharePoint.Client.Publishing.dll")
Second, you need to authenticate to your SharePoint Online tenant and load your XML file:
$userName = "username@contoso.onmicrosot.com"
$pwd = Read-Host -AsSecureString "Please enter your password"
Third, loop through the file and create the sites:
[XML]$Import = Get-Content "C:\CreatePublishingSite\PageList-min.xml"
Foreach ($objWeb in $Import.Webs.Web)
{
Write-Host $objWeb.Url -BackgroundColor Green
$ctx = New-Object Microsoft.SharePoint.Client.ClientContext($objWeb.Url)
$ctx.Credentials = New-Object Microsoft.SharePoint.Client.SharePointOnlineCredentials($userName, $pwd)
if (!$ctx.ServerObjectIsNull.Value)
{
Write-Host "Connected to SharePoint Online site: '$siteUrl'……" -ForegroundColor Green
}
else
{
Write-Host "Could not connect to SharePoint Online site: '$siteUrl'" -ForegroundColor Yellow
}
$rootWeb = $ctx.Site.RootWeb
$ctx.Load($rootWeb)
$ctx.ExecuteQuery()
$groups = $rootWeb.SiteGroups
$ctx.Load($groups)
$ctx.ExecuteQuery()
Foreach ($objSubWeb in $objWeb.Sites.Site)
{
Write-Host "Creating Sub Site…." $objSubWeb.Title -ForegroundColor Yellow
$WCI = New-Object Microsoft.SharePoint.Client.WebCreationInformation
$WCI.WebTemplate = "CMSPUBLISHING#0"
#$WCI.Description = "SubSite"
$WCI.Title = $objSubWeb.Title
$WCI.Url = $objSubWeb.Name.Replace(" ", "-")
$WCI.Language = "1033"
$subWeb = $ctx.Web.Webs.Add($WCI)
$subWeb.BreakRoleInheritance($false, $false);
$subWeb.Update()
$ctx.Load($subWeb)
$ctx.ExecuteQuery()
Write-Host "Sub Site Created…." -ForegroundColor Yellow
}
}