SharePoint and Microsoft Flow Part 2: Building a Flow Resource Community

It is important to remember that not all users will be familiar with Flow. As such, creating a Flow Resource Community requires forethought and organization to provide a self-service space where users can gather, find useful resources, and collaborate to create Flows that streamline processes and increase work efficiency. This space may contain internal training resources such as videos, blogs, and links to documentation. It may also contain links to external resources such as Microsoft with its vast library of documents, blogs, videos, and training resources. Creating a Flow Resource Community in SharePoint circumvents exposure of proprietary systems by keeping it within the organization.

As every licensed flow user will be able to create and export flows, creating work and process efficiency is a high priority. With the Flow Resource Community, users can review, choose, and implement existing flows quickly. The Community will allow users to share what they have created and by doing so, will help prevent the “re-inventing the wheel” cycle. More importantly, as a collaborative environment, users will not only share their creations, but they will receive tips on how to improve it from their peers. Automating and streamlining work-life has not been easier.

As with submitting flows to the public Microsoft Flow Template Gallery, users will be able to submit their creations to the SharePoint Flow Custom Gallery and have them either approved or rejected by your organization’s Flow Approval Team. Keeping the approval and rejection process within your organization underscores your organization’s ability to review, accept or reject Flows in order to provide the highest value to its users.

What are the Pieces to Building a Flow Resource Community?

The Flow Resource Community is housed within SharePoint but requires Microsoft Flow to provide the solution. The Community is composed of a SharePoint Communications Site, Flow Template Gallery which uses news pages with an approval workflow for submissions, instructions on how to use the site and the integration of Flow and Yammer for collaborating and connecting with other users. An events calendar is also a critical piece as it provides the ability to create, invite, and schedule training sessions and live meetups.

How Does this Enhance Adoption and Help Efficiency with MS Flow?

The visual layout of the Flow Resource Community page is comprised of four hero images. These provide links to internal and external resources. The four heroes are:

  1. Welcome to Microsoft Flow – contains the resources on how to use Microsoft Flow;
  2. Learn More About Microsoft Flow – explains and teaches how to use Microsoft Flow;
  3. Microsoft Flow Blog – contains information within write-ups; and
  4. Microsoft Flow Community – features Microsoft Flow resources for your Flow Community.

Using a Communications Site provides the ability to associate it with a Hub Site, which in turn, provides the capability for the templates to bubble up to a Resource Community hub site. By doing so, these templates can be used and shared with other services within your organization. Not only does this streamline work processes but eliminates redundancy and increases efficiency while cutting costs.

In addition to the four hero images, there is a section called the Flow Catalogue. The news functionality is used to bring in the templates and the text, and images can be used to highlight the new or important templates.

Highlighted templates will appear as images in this Flow Catalogue section. Every Flow will provide the following information when it is opened:

  1.  How does the Flow work;
  2. What are the details of the Flow;
  3. Preview image of the Flow instructions; and
  4. Download link to download this Flow.

Next to the highlighted Flow Template are images indicating where this Flow resides in the Custom Flow Template Gallery. Images for SharePoint, OnPrem, Outlook, or OneDrive amongst other applications will appear so that you can be sure you are using a Flow that is applicable to your application.

On the right-hand side of the page is a section called Useful Links and includes the following: Flow Gallery, Submit a New Flow Template, and Import A Flow.  If you click on the Flow Gallery link, not only will you see the Flows highlighted on your homepage, but you will see all the flows in your gallery.  

The voice of the community is the driving force to ensuring that this is a collaborative environment. Yammer has been integrated as the collaboration tool, the announcement platform, and the communications platform. With Yammer, users interact directly in the feed by adding posts or comments, responding to comments, or “liking” a comment. Users can ask questions and receive feedback on their flow templates.

To encourage continual learning, sharing, and creativity, the Events section is the space where personal meetups can be highlighted. These meetups provide in-person, interactive discussions about Flow. Discussions may focus on suggestions for improvement, training, lectures, invited expert guest speakers or perhaps web-meetings.

By providing a space for users to gather, discuss, learn, research, and support each other, they are now capable of going forward with creating new flow templates that can be submitted for approval in your Custom Flow Template Gallery in SharePoint.

SharePoint and Microsoft Flow – Part 1: Automating Business Processes

Microsoft Flow and Automating Business Processes

As technology progresses, more and more companies are relying on automated business processes within SharePoint. Microsoft Flow connects with hundreds of services and with recent enhancements, it provides the capability not only to customize Flow Templates but to share them in the Microsoft Flow Template Gallery with the public (the world) by exporting them or keeping them private within your organization by importing them into your organization’s private Custom Flow Template Gallery. Through this type of worldwide and corporate collaboration, the extensive gallery helps to create and modify flows based on approved and contributed flows, thereby preventing the “re-inventing the wheel” cycle. They can also be used as a learning tool where the flow can be reviewed to see how it was created so that it can be modified to your organization’s needs.

The Office 365 Flow engine automates tasks between Office 365, SharePoint, and third-party services whether they are on-premises, in the cloud, and even if they are not part of Microsoft’s catalogue.

Who can create and edit Flows? If the Flow connects to a modern list or library, then anyone who can add or edit the modern list or library will have the ability to create Flows from the Flow drop-down menu.

What is the Microsoft Flow Template Gallery?

The Microsoft Flow Template Gallery features hundreds of Flows that have been created by Microsoft that are available to be reviewed, used, or modified to create a customized flow for your organization. There are flows that have been created for SharePoint, OneDrive, Office365 Outlook, Twitter, Dropbox, Yammer, and more (in fact, a total of 226 unique services!). 

The Gallery also features Flows that have been created by the public. These Flows are submitted to Microsoft and are then reviewed and are either approved prior to being added to the Gallery Collection or rejected and deleted from the pending for approval list. This is truly a global effort to collaborate by bringing, featuring, and sharing the most useful fluid Flows from around the world. There is bound to be one that you can use as the launching point for yours, or perhaps, you could use it as is.

There are many types of Flows that are grouped in collections, including flows for sales and marketing, receiving on-the-go information, improving productivity, streamlining and improving the HR process, easing software development, automating tasks that occur in the classroom, and more.

There are five types of Flows:

  1. Multi-step Flows: perfect for repetitive tasks;
  2. Approve Requests: create, use, and share approval workflows that provide the opportunity for process requests with quick responses;
  3. Conditional: make decisions in your workflow when certain conditions are met (if this happens, then do this);
  4. Utilize On-Premises Data: connects you to on-premises data and cloud-based services; and
  5. Security: prevent data breaches by customizing and/or using built-in data loss prevention policies.

Each Flow is triggered by either an action or by a connection. There are eight SharePoint Triggers in Microsoft Flow including actions affecting an item or file, such as when it is created, deleted or modified, and when a file’s properties are created or modified. Examples of services that can act as triggers include emails, completion of forms, information entered in a table, or the use of a hashtag.

The templates in the Gallery will already contain the trigger (the connector) to trigger the workflow for one or more actions with optional conditional or transformational functions. Conditional functions will cause an action to occur only when something is true while the actions consist of the work that the flow performs. In SharePoint, there are 29 actions available within Microsoft Flow that allows you to create and update files, extract data, use this data, and more.

Because Microsoft Flow connects with hundreds of services, it is important to search for the SharePoint templates only. An image of all applicable application connectors will be visually displayed on the template page. In addition to the search function, there is the ability to refine the search further by employing the filter options to view flow templates of certain types such as notification flows, data collection flows, etc.

By integrating Microsoft Flow with SharePoint, the capability to schedule Flows to run at different time increments for each action allows greater customization for the flow. You can also action all the items at once and this is quite convenient when actions are based on a date field.

Sharing Microsoft Flow Templates

There are two options to sharing Flow templates that you create. How you want to share depends upon whether you want to share with the world-wide Microsoft Flow community in the template gallery or strictly within your organization in its own customized template gallery.

There are two scenarios for sharing flow templates. The first is to create, export, and submit the flow to Microsoft. If the flow is accepted after being reviewed, it will be uploaded and will be available to the public in the Microsoft Flow Template Gallery. If your goal is to share with the world, then this is where you want it to be featured.

The second is to create, export, and submit the flow to your organization’s Custom Flow Template Gallery. To maintain data security, or keep proprietary connections secure, flow templates in your organization’s Custom Flow Template Gallery are only accessible by users within your organization.

The Flow Template Gallery, whether publicly shared or shared internally, is part of the organization’s system to encourage collaboration and creativity with users investing their time to create innovative solutions. By integrating various applications, such as Yammer, users are able to provide and receive communications from other users, especially feedback on flows to help improve and streamline them.

In the next instalment, Building a Flow Resource Community, we will discuss the importance of creating and supporting a Flow Resource Community for the users in your organization. We will also look closely at the resources and layout that should be included in the Flow Resource Community. We will also delve deeper into the process of creating and submitting custom flow templates to the Microsoft Flow Template Gallery or to your organization’s Custom Flow Template Gallery.

How to Tag SharePoint Modern Pages

Tagging and Metadata – An Overview

In a previous installment, Modern SharePoint Metadata, we discussed the importance of tagging a page with accurate metadata to curate the appropriate information to your targeted audience. Through the use of correct and accurate metadata, or tags or properties, on SharePoint modern pages, your audience will receive targeted, relevant, and important information in their news feed and when they do a search.

What is the Difference Between Tagging: Then and Now

Prior to this enhancement, tagging modern pages was cumbersome and not entirely intuitive. Once would have to add a custom property to a content type that was inherited from the Site Page. Not only cumbersome but from an end-user perspective, it was not easy to set up or configure. Additionally, the property on the page’s content could not be viewed. With this new enhancement, these issues have been addressed and solutions are being implemented to rectify them.

What can be Tagged in SharePoint Modern Pages?

SharePoint modern pages can be tagged based on categories that you would like to use, such as page type for specific end-user groups, business function, target audience, location, and other categories that would enable you to reach and group your end users distinctly from other groups.

How to Tag Modern Pages and Display Based on End-User

Adding the Page Property (or Tag)

The column on a Site Page houses the page properties. To define a new page with new properties, go to the Site Pages page and choose Add Column to the Site Pages Library. Provide a name for this column. The name of the column becomes the Page Property. From this page property column, you can then provide the Description, choose “Choice” as the Type of column, and then choose the “Definition” for the Choice column. The values in the side illustration use options like “News Release”, “Announcement”, or “President’s note” as the choices.

Adding the Page Property to a Page

Once the page properties have been added to the Site Pages library by adding a new column, all new site pages can be tagged with that value from that page property.

To tag a page, go into edit mode on the page by clicking Edit Page. Then click Page Details located on the top ribbon. This will then open up the page’s property panel. This is the property panel for the new site page that you have added to the Sites Pages library and this is the location where you can edit its property. In the below illustration, then this is where the property category was chosen to be blue. Once the property (column) has been added to the Sites Pages library, all new site pages can be tagged with the same value for that page property. Click Save when done.

Tagging a page

Customizing the Page

By following the steps above, one can create more pages with the same properties. You can also customize the look of the page. For the example below, if the property is to group by category, such as announcement, then the header of the page can reflect blue.


Page Property
If there is a need or desire to show the value of the property on the page, one can do so with the use of web parts. Simply add the web part Page Property, click the Add Properties button. Add the value that you want to be displayed on the page on the right hand sided pop-out panel.

Time Saving Tip

Once your page is set up with all the values and tags that you require, simply create a copy of the page to create a new page. Not only will the content be copied, but also the page property. You can update or change the content as needed.

Summary Page: Creating for Each Category Property

A summary page which displays links for news or pages under one category can provide detailed information of what your targeted audience is seeing and receiving in their news feed.

To create a summary page for each Category property:

1.   Create a new Site Page with an appropriate title;

2.   Add web part Highlighted Content;

3.   Configure properties of Highlighted Content. A property panel will appear on the right-hand side displaying the properties;

4.   Set the Source of the content to “The page library on this site”;

5.   Choose the Type of source, either Pages or News;

6.   If Pages is chosen, then Filter will provide an option for Page Properties;

7.   Under Property Name, choose the page property from the drop-down menu; and

8.   Options to Select Values will appear in another drop-down menu. Here you can choose the filter that you want the pages to be filtered by.

Once these filters are saved, the Highlighted Content web part will curate and display the results almost instantaneously even though the content has been retrieved based on tags and not solely on filters. The summary page will display thumbnails of the curated pages based on the tagging.

Getting Organized

By adding custom columns to your pages, you can now organize your pages by creating views and grouping them in the Site Pages library. Having the ability to group your Site Pages by a Page Property will provide you an overview as well as greater flexibility in organizing and grouping your pages.

As you can see, accurate metadata and tagging will provide not only appropriate and useful content to your audience, but will also provide the abilities to organize, plan, and scale SharePoint with corporate growth.

SharePoint Online: Managing Access Requests

When a user requires access to a site that they do not have access to, what do they do? This is where the access request feature comes into play as it provides the user the option of requesting access to the site. How will the site owner know that someone is requesting access? As the site owner, one can configure the settings so that an email is sent once someone requests access to a site. Upon receipt of this email, the site owner or the delegate(s) will have the authority to approve or decline the request. In addition to approving the request, the delegate will have the opportunity to assign a specific level of permission for the user.

The access request feature also works with the Share command for sites. If someone who does not have full control for a site (a non-site owner) uses the Share command to invite other users to view the site, then an access request email will be generated and sent to the site owner. As with the access request feature, the site owner will then be able to approve or decline the request. If the site owner is approving the request, then he will have the opportunity to assign a specific level of permission to the user.

How to Change Access Request Settings

As the site owner, you will have to decide whether you would like members of your site groups to have the ability to invite non-members to access the site contents. These features can be enabled or disabled.  If you choose to disable this option of sharing, then an error message will appear if a team member tries to Share the site as the Share option remains available on the menu.

To disable or enable sharing by team members with non-team members, follow these steps:

  1. Go to Settings;
  2. Choose Site Permission;
  3. Click on Advanced permission settings;
  4. On the Permissions tab, choose Access Request Settings;
  5. The Access Request Settings dialogue box will appear. In this dialogue box, you can either select or de-select Allow members to share the site and individual files or folders.
    The checkbox for Allow members to invite others to the site members group, Team Site Members, must be selected in order to enable members to share the site. Note that this will be automatically selected or deselected depending upon the option you choose; and
  6. Click OK.
Image: Office Support – Office 365
Image: SharePoint.stackexchange.com  

How to Set Up Access Requests

How will a site owner know if a user is requesting access to the site? Managing these requests can be accomplished by configuring the access request feature to send an email to the site owner when an access request is submitted.

It is simple to set this up:

  1. In Settings, choose Site Permissions;
  2. Click Advanced permission settings;
  3. Choose Access Request Settings located on the Permissions Tab;
  4. The Access Request Settings dialogue box will appear. In this box, select the check box for Allow access requests;
  5. There are two different paths here to take and is dependent upon whether you are implementing SharePoint Online or SharePoint Server 2019.

    For SharePoint Online, you can choose access requests sent to either members of the Admin Group, the Owners group, a specific user, or a distribution list. Remember that only members of the Admin Group or Owners group can approve or decline access requests.

    For SharePoint Server 2019, add an email for a specific user or for a distribution list;
  6. For SharePoint Online, an optional custom message can be included to show users on the access request page; and
  7. Click OK.

Approving or Declining Access Requests in SharePoint Online

To approve or decline an access request in SharePoint Online, follow these steps:

  1. Click on Settings;
  2. Choose Site Contents;
  3. Click Access requests;
  4. Find the request you want to update under Pending Requests;
  5. Open the menu by clicking on the three ellipses (…);
  6. If the access request is being approved, assign the permission level for the user. This can be found under Permissions. To document your decision, you have an option to write a message to the person requesting access; and
  7. Depending upon your decision, click either Approve or Decline.

If you want to see past access requests, click Show History.

One advantage of SharePoint Online is the ability to manage invitations to external guests who do not have an Office 365 subscription. As an Office 365 customer using SharePoint Online, the Access Requests page provides the resources to manage guest user invitations to Office 365 non-subscribers.

Managing Invitations to External Guest for SharePoint Online

If an invitation has been sent to an external user, but you would like to withdraw it before their acceptance, then follow these steps:

  1. Click on Settings;
  2. Choose Site Contents;
  3. Click Access requests;  
  4. Find the guest you would like to uninvite;
  5. Open the menu by clicking on the ellipses (…);
  6. The Properties window will now open; and
  7. Click Withdraw to uninvite the guest.

What happens if the guest has already accepted their invitation and you want to uninvite this guest? You will not be able to uninvite them, but you can remove them from the SharePoint permissions group that you assigned them. Another workaround is to request your Office 365 Admin or SharePoint Online Admin to remove the guest from the list of users for your environment.

Resending Invitations

All invitations sent to external users expire in 90 days. Within the 90 days, the invitation can be re-sent but the expiration date is not extended. Once the 90 days have lapsed, the invitation cannot be re-sent. A new invitation will have to be sent.

To resend an invitation, simply:

  1. Choose Settings;
  2. Click Site Contents;
  3. Click Access requests;
  4. Find the invitation that you want to resend under Guest User Invitations;
  5. Open the menu by clicking on the ellipses (…);
  6. Confirm the selected group is the permission group you want to add the guest to under Permission. If it is a different one than from the original invitation, then you have the opportunity to change it at this point; and
  7. Click Resend.

The external invitation has now been re-sent. Managing access requests in SharePoint Online is very straightforward and puts some control in the site user’s hands while providing full control to the site owner. Though site users have the capability to invite internal and external users to collaborate on sites, the site owner continues to maintain full control of who can access the site and at what level of security they are able to access the site at. The added flexibility of Office 365 and SharePoint Online is the capability to withdraw external invitations and to resend them when needed. By combining the features of the Share command and access request features, the process of managing who has access to a site and at what permission level has been greatly simplified for the site owner.

The Components of the Office 365 Communication Site


In our previous installment, The Basics of the Office 365 Communication Site, we discussed the basics of the Communication Site, including when to use it, the type of content that could be shared, what to expect when creating it, what devices are compatible and the different web parts for inclusion of images, video and such. 

In this installment, we will look at what components comprise the communication site and delve into greater detail of each component.

Ease of Creating the Communication Site

The creation of a Communication Site is simple and straightforward.  There are three site designs that you can choose from as the basis for your Communication Site.  These are:

1. Topic: sharing of information including events, news, launches, and other content;

2. Showcase:  featuring a product, team, or event with the use of photos or images; and

3. Blank:  a blank page allows you the creative space to design and customize your own layout.  

In each site design, you have the ability to add, remove, or reorder web parts.  In addition, if you have permission to edit the site, at the top of the Communication Site is a link to add a new list, page, document library, news post, or web app to the site. 

Preformatted site designs aid in the ease of designing the Communication Site and with three different layout styles, how you want to communicate is made easy.

Site Designs in Detail

1.  Topic

When you want to share with your broad audience information regarding events, news, updates and other content, the Topic design would be the most ideal.  When you create a Communication Site based on the Topic design, your homepage includes several web parts that are highly customizable.  The default web parts included for the Topic design for a Communication Site include the Hero, News, Events, and Documents.

Hero

This web part brings visual interest and focus to your page.  With the ability to display up to five items in the Hero web part, you can draw attention to each by adding compelling images, text, and links. 

Topic Site
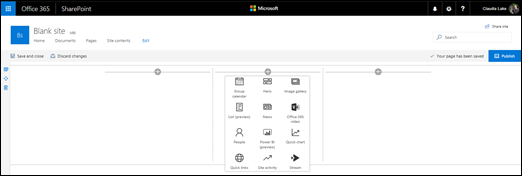
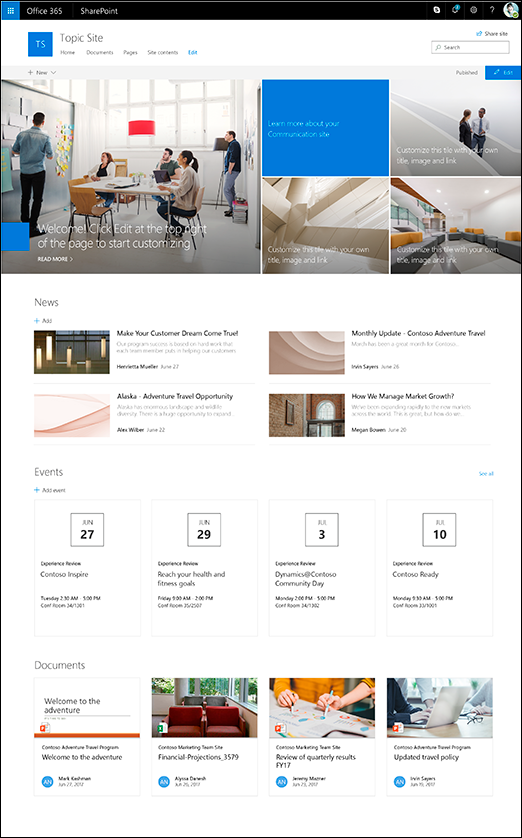
The default layout is five tiles:  one large tile on the left and four smaller tiles forming a square on the right.  The number of tiles can be changed and can range from one tile to five tiles. 

News

With the News web part, you can engage your team with interesting stories and important information. Keep them informed of what is happening with status updates, eye-catching posts, announcements, and people news through graphics and rich formatting.  The News web part has a default layout called Top Story which displays on the left with a large image space, and to the right, in list format, three additional stories.  The second layout style is called Side-By-Side which lists stories in two columns.  The final and third layout style is called the List which shows the news posts in a single column. With the News web part, you have the option of choosing the layout that best suits your needs.

Events

Upcoming events can be displayed in the Events web part. Information regarding the event such as date, time, location and the ability to add it to your calendar are all functions of the Events web part.

Documents

The beauty of Microsoft products is the usability of its products across platforms. In the Documents web part, you can insert documents created from Word, Excel, Visio, and PowerPoint.  The starting page of the document is in a frame and allows the user to scroll through the pages or, if they choose, to download the document.


2.  Showcase

Showcase Site
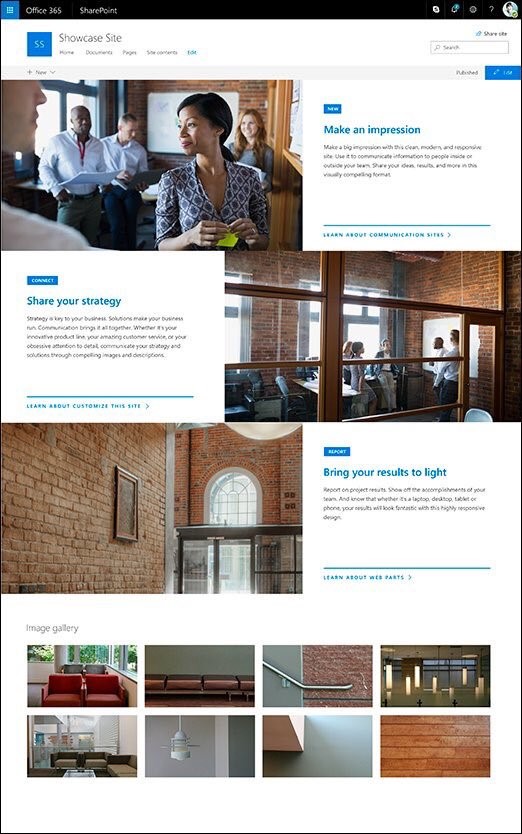
The Showcase design is to bring focus and attention to your featured highlights through the use of attention-grabbing graphics. The default web parts included in the Showcase design in conjunction with the Communication Site are Hero and Image Gallery. 

Hero

For the Showcase design, there are two Hero layout options. The first is the Tile layout and the second is the Layer layout.  The default is a vertical layout with three layers but you have the option of changing the number of layers from one to five.  

Image Gallery

A picture says a thousand words, so naturally, an Image Gallery could be used to convey many messages and ideas to your audience.  The Image Gallery web part shares collections of images on a page.  Create your gallery by drag and dropping your selected images, and then ordering them in the sequence that is preferred.  Images can be viewed in a tile layout or as a carousel. 


3.  Blank

Unlike the previous two site designs, the Blank design allows you to choose your page layout.  After you have chosen your page layout, you then add the web parts that you want. 

The page layout can also be customized by rearranging the web parts, and by adding, removing, or changing columns on the page. 

Blank Site


We have now reviewed each of the individual components that make up the whole of the Office 365 Communication Site. In our previous installment, Part 1: The Basics of the Office 365 Communication Site, the fundamentals for the Communication Site were addressed. In this second installment, we looked closer at the building blocks for the Communication Site. Now that we understand the different types of site designs, web parts and layouts, we are now ready to begin creating the Office 365 Communication Site, which is discussed in Part 3:  Creating and Sharing an Office 365 Communication Site.

Introduction to SharePoint Framework: The Nuts and Bolts


What is SharePoint Framework?

SharePoint Framework is a new page and web part model that provides full support for client-side SharePoint development with easy integration of SharePoint data and Microsoft Graph through open source tooling which enables the building of SharePoint customizations for mobile, on-prem, online and OneDrive for Business. With SharePoint Framework, modern web technologies and tools provide a development environment to build experiences and apps that are ready and mobile-ready from the start.

In the next 3 blog articles, I will be shedding some lights on the new Framework and how you can start preparing to adopt the new development platform.

SharePoint Framework is written in JavaScript which allows developers, both inside and outside of Microsoft, to use their preferred web developer tools to develop SharePoint and customized solutions. This is an incredible leap as this allows developers on any platform to extend SharePoint’s standard capabilities. In addition, SharePoint Framework accompanies the new SharePoint UX, which is designed for the world’s mobile-first, cloud-first communication era. By moving towards open source resources, not only has a new door for developers has been opened, but it is also creating a new relationship between developers and SharePoint, resulting in a complete win for the client.

By moving to open source, will SharePoint Framework solutions work on classic sites? The answer is simply this: eventually, on existing team sites, it will and on new modern team sites, yes it will. However, classic solutions will not work on the new modern team sites. Moving forward, it is highly advisable to become familiar with SharePoint Framework and the tools to prepare yourself when SharePoint Framework is released.

Let's talk Framework, Development and Scaffolding tools in my next article!

Cloud Search Service Application


One of the great enhancements in SharePoint 2016 and in the SharePoint 2013 August 2015 CU, is the Hybrid Search using Cloud Search Service Application (CSSA). The new CSSA will allow organizations to take advantage of the new hybrid capabilities, in order to create a unique search experience with one index, with crawled content from Office 365 and On-Premises data. Having one Index is huge step to better enhance the end user experience and making it easier to find results from different sources.


In this article, I will be showing step-by-step how to set up your CSSA . It is a pretty simple process if you follow the steps in order.

First of all, let's review how the CSSA indexing and crawling works. Picture 1 shows that crawling is initiated from on-premises, but the index is stored on your Office 365 tenant.

CSSA Logical Architecture
Picture 1

Picture 2 describes the flow of the search queries and the possibilities to send a query from the cloud or on-premises.

Hybrid Search
Picture 2

Mandatory Requirements

The following are mandatory requirements to get your CSSA working:

1.       SP2013 with August 2015 CU or SP 2016

2.       O365 Subscription

3.       Azure Subscription

4.       Synchronize users and groups from on-premises to Office365 Azure Active Directory (DirSync, AADSync, or AADConnect)   

5.       Create cloud Search service application   

6.       Install onboarding pre-requisites

7.       Execute onboarding script

Azure AD (AAD) requirements

  1. Need Azure Subscription (or trial subscription) or Office 365 paid license
  2. Verified domain; xxx.onmicrosoft.com is not enough
  3. On-premises:

    1. AD Server must be 2003 or later
    2. If you want to use password writeback, then you must have Windows Server 2008 with latest SP and KB2386717; otherwise use Windows Server 2008 R2+
    3. Azure AD Connect can be installed on AD or any server part of the domain
    4. If you plan password synchronization is required, then server must be 2008 R2 SP1 or later
    5. .NET 4.5.1 or later
    6. PowerShell 3.0
    7. If you are using ADFS, then SSL is needed x.509 (self-signed is OK in test lab

Step 1 – Synchronize AAD

First you must synchronize your On-Premises AD with AAD. Follow these steps to install and configure your AAD Connect: https://azure.microsoft.com/en-us/documentation/articles/active-directory-aadconnect/

Step 2 – Create your CSSA

You can either use Central Admin or PowerShell. If you are using Central Admin, then you will see a new checkbox for the cloud search option. You must check it to make sure you are creating a CSSA and not a regular SSA. If you are like me, who prefers to use PowerShell, then you will make a small change to your existing script. If you don’t have one, you can download any SSA script, but make sure you add the following variables to the New-SPEnterpriseSearchServiceApplication:

New-SPEnterpriseSearchServiceApplication -Name $SearchServiceAppName -ApplicationPool $appPool -DatabaseServer $DatabaseServerName -CloudIndex $true             

Then you need to set your SSA Property to true by executing this command: $Searchapp.SetProperty(“IsHybrid”,1), before you set your Search Topology.

Your Powershell Script should like similar to this:

SSADB = "SharePoint_Demo_Search"

$SSAName = "Search Service Application SPS Baltimore"

$SVCAcct = "<search Service account>"

$SSI = get-spenterprisesearchserviceinstance -local

#1. Start the search services for SSI

Start-SPEnterpriseSearchServiceInstance -Identity $SSI

#2. Create the Application Pool

$AppPool = new-SPServiceApplicationPool -name $SSAName"-AppPool" -account $SVCAcct

#3. Create the search application and set it to a variable

$SearchApp = New-SPEnterpriseSearchServiceApplication -Name $SSAName -applicationpool $AppPool -databaseserver SQL2012 -databasename $SSADB –CloudIndex $true

#4. Create search service application proxy

$SSAProxy = new-SPEnterpriseSearchServiceApplicationProxy -name $SSAName" Application Proxy" -Uri $SearchApp.Uri.AbsoluteURI

#5. Provision Search Admin Component

Set-SPEnterpriseSearchAdministrationComponent -searchapplication $SearchApp -searchserviceinstance $SSI

#6. Create the topology

$Topology = New-SPEnterpriseSearchTopology -SearchApplication $SearchApp

#7. Assign server(s) to the topology

$hostApp1 = Get-SPEnterpriseSearchServiceInstance -Identity "SPWFE“

$Searchapp.SetProperty(“IsHybrid”,1)

New-SPEnterpriseSearchAdminComponent -SearchTopology $Topology -SearchServiceInstance $hostApp1

New-SPEnterpriseSearchCrawlComponent -SearchTopology $Topology -SearchServiceInstance $hostApp1

New-SPEnterpriseSearchContentProcessingComponent -SearchTopology $Topology -SearchServiceInstance $hostApp1

New-SPEnterpriseSearchAnalyticsProcessingComponent -SearchTopology $Topology -SearchServiceInstance $hostApp1

New-SPEnterpriseSearchQueryProcessingComponent -SearchTopology $Topology -SearchServiceInstance $hostApp1

New-SPEnterpriseSearchIndexComponent -SearchTopology $Topology -SearchServiceInstance $hostApp1 –IndexPartition 0

#8. Create the topology

$Topology | Set-SPEnterpriseSearchTopology

Step 3 – Validate your CSSA

Run the following PowerShell script to validate that your SSA is cloud based.

Add-PSSnapin Microsoft.SharePoint.Powershell

$ssa = Get-SPEnterpriseSearchServiceApplication     

Get-SPEnterpriseSearchTopology -Active -SearchApplication $ssa     

Get-SPEnterpriseSearchStatus -SearchApplication $ssa -Text |ft Name, state,Partition,Host -AutoSize

$ssa.CloudIndex
 

This should return True.

Step 4 – Install On-Boarding Pre-requisites

You must install the following, in order, before you proceed with the On-Boarding script:

1.       Microsoft Online Services Sign-In Assistant: https://www.microsoft.com/en-ca/download/details.aspx?id=28177

2.       Reboot the Server

3.       Microsoft Azure AD PowerShell: http://go.microsoft.com/fwlink/p/?linkid=236297

If you do not install the above, then the next step will not work as it is needed to establish the trust between your Farm/CSSA and your Online tenant.

Step 5- Run On-Boarding Script

The On-Boarding script is a PowerShell, provided by Microsoft, that you must run as your last step to complete your CSSA configuration. You can download the On-Boarding script from GitHub. When you run this script, you will be asked to enter your O365 tenant credentials. The user must be a tenant admin account to be able to execute the script.   

Crawl your content

Once you have completed, you can start adding you content sources to your CSSA. Your content sources can be any SharePoint portal (2010, 2013, 2016, etc.), any folders, exchange, etc. Basically, it is the same content sources you used to crawl with a regular SSA.

When you are completed, then you can navigate to your SharePoint Online, search for a keyword and results should appear from Online and On-Premises.

SharePoint Framework: Developer and Scaffolding Tools


SharePoint Framework leverages commonly used developer tools and it does not dictate which JavaScript framework should be used to build the solutions. In the past, development of solutions was reserved to Visual Studio on Windows and developers primarily used C#. Communicating with SharePoint was done using SharePoint’s server API, or most recently, CSOM, JSOM or REST. The shift from a proprietary model requiring a significant amount of knowledge to a flexible and highly customizable framework was driven by huge customer demand for the need to customize SharePoint on-prem, online and in the Cloud. In addition, traditional farm based solution is incompatible with cloud based tools and technology. In order to continue moving forward with cloud based applications, a major change had to take place.

SharePoint Framework is highly customizable as it is entirely based on open source JavaScript. Its framework was developed in React as Microsoft chose to develop Delve and the new document library in React. Design and build is executed in the superset of JavaScript – TypeScript. TypeScript is then transpiled into JavaScript making development work more routine-based thus reducing coding errors. Though it is not mandatory that developers use TypeScript, though the investment of learning it will pay off in the long run, it should be noted that it is highly recommended that development of solutions should be done with TypeScript to ensure that customized solutions will be mobile friendly and looking great across all platforms during build and final release.

SharePoint Framework allows you to extend your existing tools and solutions while taking full advantage of exciting open source tools such as Yeoman, Gulp, Workbench, Node.js, GitHub and Angular while still maintaining the option to use Visual Studio, Visual Studio Code and Visual Studio Team Services.

Many open source tools have been available in the open source community for a number of years, but these tools are "new" in SharePoint Framework. Most notably are three products that are an integral part of SharePoint Framework and they each support the framework in the following capacities:

Yeoman is the scaffolding tool for web applications. With Yeoman, developers can create project structures that facilitate the use of custom functionality. This in turn allows developers to work faster.

Gulp makes development efficient through the leveraging of a wide variety of plug-ins to perform repetitive development tasks, automate minification and perform compression.

Workbench allows the developer to test new web parts and apps before migrating them to production environments by replicating SharePoint as a local and offline environment.

SharePoint Page Experience

As a core component, the modern SharePoint Page has a notably developer friendly page structure. Pages can be constructed by using any client-side JavaScript templating framework and can be technologically independent. This page structure provides the ability to host web parts, add-ins and new opportunities.

The framework provides a page layout that is responsive and mobile-ready. Each page has a "Chrome" structure that surrounds the page body. This section contains the out of the box logic supplied by Microsoft plus additional developer logic that has been built on top of it. Simply put, it contains your business context. This Chrome layer manages the presentation of the page so that it displays appropriately on the device whether it be desktop, tablet or smartphone.

The Page Body becomes the canvas where web parts, apps, files, Delve components and other elements can be placed and arranged according to business needs. By layering this on top of the Chrome layer, there is no need to worry about proper display presentation on different devices. The Page Body is where the developer mostly lives, interacting with anything that has been built and placed here. The developer, regardless of skill level, is able to customize SharePoint pages by adding any build that has been placed on the canvas by clicking on a plus sign, selecting and placing the components.

Through this process, developers will be able to extend the capabilities of SharePoint more efficiently, reliably and quickly, and best of all, if you follow the rules, it will be mobile ready and responsive right from the start.

As SharePoint Framework has not yet been released, the question of how do we prepare for it begs to be asked. Stay tuned as I answer this question in the second installment of The New SharePoint Framework: Prepare Yourself!

Prepare for SharePoint 2016


On March 14, 2016, Microsoft announced the general availability for SharePoint 2016. We have been testing it, along with many companies for the past year or so, and it offers great features and enhancements to the previous versions. If you have done so, I encourage you to download the software, test it out, and start preparing to move to it.

In this article, we will review some of the great new and improved features in the new SharePoint 2016 release:

Hybrid in SharePoint Server 2016

In SharePoint Server 2016, hybrid attributes are available to empower options for organizations:

  1. Hybrid Sites: Hybrid sites characteristics allow your users to have experience that is integrated while using SharePoint Server and SharePoint On-Line portals. Users see them consolidated in one list, and can follow SharePoint Server and SharePoint On-Line sites.
  2. Hybrid OneDrive for Business: Organizations can use profiles in Office 365, instead of on-premise; this is great feature if companies want to save on-premise storage.
  3. Hybrid Cloud Search: With cloud hybrid search, all this stated functions can be carried out:

    1. You index each of your crawled content, including on-premises content. You can create the crawler in SharePoint Server 2016 Release Candidate. Use the exact same search connectors in SharePoint Server, and Office SharePoint Server 2007, SharePoint Server 2010 and to crawl the same content sources 2013.
    2. When your search index is queried by users in Office 365, they get search results that are incorporate from both on- premises and Office 365 content.

App Launcher and UI changes

SharePoint 2017 and Office 2013 are pretty much identical now with the enhanced UI changes to 2016 and the introduction of the AP Launcher.

MinRoles

You can now select the role for the server when you configure SharePoint. By selecting the role, it will only install what’s required for this role, and nothing else, but it does better than that, it will make sure that all servers that belong to that role are compliant. But if you change your mind later, you can convert the server to a new role if needed.

Zero downtime patching and feature packs

No more downtime when patching your farm, but it requires high availability of each role. The updated bits will be much smaller and faster to install to allow the support of zero downtime. Also, Microsoft will be moving into more Feature Packs rather than Service Packs, to make the on-premise version as close as possible to Office 365 when applicable. And no, you will not have an on-premise Delve J. Expect the first feature pack to be ready for us in 2017.

List Threshold

The 5,000  view threshold has been removed; kind of J. SharePoint has always supported 30,000,000 items, but there was a limit not to have more than 5,000 items in a view, to prevent SQL locking that can affect your entire farm.

The 5,000 limit is necessary, but now the index will automatically be created, so technically, the limit is still there, but you don’t have to worry about it.

File Size Upload

Although I don’t recommend uploading large files for performance to store then in a SharePoint database, but the you can upload files beyond 2 GBs now.

Fast Site Creation

You can now create site templates to be used to create site collections in less than 1 seconds (compared to about 60 seconds in some cases). Using a PowerShell command, you will enable this feature and will allow you to start using the Fast Site Creation feature.

Data Loss Prevention (DLP)

With this particular new capability, you can:

  1. Search for Company across SharePoint Online SharePoint Server 2016, and OneDrive for sensitive content.
  2. Leverage 51 built-in sensitive information types (credit cards, passport numbers, Social Security numbers, and more).
  3. Use DLP Queries in the site collection that is eDiscovery to find sensitive content relating from the SharePoint eDiscovery Center to business regulations that are common, identify violating files, and export a report.
  4. Turn on DLP Policies from the Compliance Policy Center site group when documents with sensitive information are stored in SharePoint to notify administrators and end users and mechanically shield the files from improper sharing.