OneDrive and SharePoint Multi-Geo


Office 365 Multi-Geo provides an answer for many multinational companies who must meet local policies regarding local data residency. Or perhaps there are different levels of need, such as one office requiring local data residency while another may not. Multi-Geo enables a single Office 365 tenant to span across multiple Office 365 datacentre geographies (Geos) while addressing the needs of clients who may be required or need to keep data locally. The greater need that is addressed with Office 365 Multi-Geo is the ability for international satellite offices to collaborate with each other on a global scale.

Multi-Geo affects two types of data:  user attached resources, such as user mailboxes and OneDrive; and shared resources, such as SharePoint Team Sites and Office 365 Groups, which includes shared sites and shared mailboxes.

Multi-Geo is available in 3 geographical locations: North America, Europe and Australia. By enabling your tenant to be Multi-Geo, you could extend your tenant into nine potential geos. These nine geos include Asia-Pacific, Australia, Canada, European Union, India, Japan, UK, US, South Korea. Additional geos will be launched in the future, including France. At the time of writing, services available in Multi-Geo include Exchange Online (in preview), OneDrive for Business (in preview), and SharePoint Online (in development).

Because Office 365 Multi-Geo is a single tenant spanning across multiple geos, rolling out globally is very straightforward in the Global Admin Centre. Once your tenant is Multi-Geo enabled, open PowerShell where you will specify the:

ServiceType – which service do you want to extend such as Exchange, SharePoint or Skype For Business

Location – where you want to extend the content to (which geo will you extend to)

InitialDomain – what content do you want to extend to the geo. Because data in SharePoint and OneDrive, as it is provisioned, must be addressable by a URL, the InitialDomain specifies the URL for the content to reach the extended geo.  

Once executed, the system will refresh and update the URL for all affected users in the extended geos.  

Office 365 Multi-Geo: Common Foundations and Concepts

There are 3 basic concepts for the Admin and these are:

AllowedDataLocation: tenant level property that specifies the allowed geos for Office 365 applications. New and additional geos will not show up automatically and this setting will need to be set up initially or when Microsoft releases new locations.  

PreferredDataLocation (PDL): user-level property that specifies the location of Mailbox and OneDrive with one PDL assigned per user. On the user objects, configure PDL in Azure AD. This information will then flow into Exchange and OneDrive resulting in users mailboxes and OneDrives to be placed in their respective locations.

Azure AD Connect Tool: used to configure PDL, for On-prem AD, on synchronized user objects.

Exchange Online Multi-Geo: Mail & Calendar

Multi-Geo for Exchange Online has been in development for many years and had been implemented since it was first developed. Based upon these capabilities in Exchange Online, it is continuing to evolve. In Exchange Online, the global front-end service, single namespace, allowed service access via outlook.office.com and already multi-geo being the point of connection for the client to Exchange Online. With Office 365 Multi-Geo, you can now select where the users’ data is stored in the background.

Auto-discovery of mailbox location was implemented in On-Prem sites whereby Outlook automatically connected a user to their mailbox. In Office 365 Multi-Geo, auto-discovery automatically connects the user’s mailbox when they are moved from one geo location to another. For an end user, this will be like magic as this functionality runs in the background and is invisible to them.

Having a central site with multiple geos requires a standardization such as a single view Exchange Tenant Configuration. Stored in the Exchange Directory, the recipient information and tenant configuration ensure that the view of the tenant configuration is the same regardless of which geo you are accessing it from.

There are several Admin advantages with Multi-Geo when it comes to mailboxes. First, new mailboxes can be provisioned directly into a specified Geo. Second, existing Office 365 mailboxes can be moved into a specific Geo without disrupting the end user. Lastly, existing Exchange On-prem mailboxes can be on-boarded to a specific Geo.

From the end user’s perspective, Office 365 Multi-Geo is mostly invisible for both mail and calendar.  

OneDrive Multi-Geo: Files

OneDrive Multi-Geo

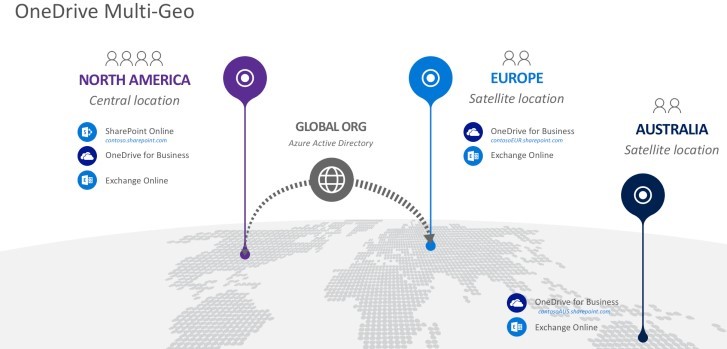
What is a OneDrive Multi-Geo? The central location for the satellites will have SharePoint Online, OneDrive for Business, and Exchange Online. The structure for the whole organization includes one global Azure Active Directory. Having a single tenant allows management of all users for the whole organization, regardless of where they are located. For each satellite location that the central location extends to, access to OneDrive for Business Multi-Geo and Exchange Online is given when the user is assigned their mailbox and OneDrive.

OneDrive Multi-Geo: Admin Centre

There is a separate OneDrive Admin Centre for each Geo because OneDrive is URL based. In the OneDrive Admin Centre, you will be able to see whose OneDrive is where, which will streamline the unlocking for the rollout of OneDrive. Another advantage of having separate OneDrives per Geo is the management of OneDrive settings. By having separate Admin Centres, the settings can be specified for each Geo.

In terms of licensing and other aspects of managing user aspects, one can access the Global Office 365 Portal Centre. Here, user-specific aspects such as passwords can be managed.

OneDrive Multi-Geo: Geo Users

The Geo user does not know that they are a Multi-Geo user. Once a user launches their app on the browser, they are automatically redirected to the Geo that they have been assigned to by the Admin. For the mobile client, Office Client, and OneDrive sink client, the user only needs to enter their email address. The Client is Geo-aware and will automatically connect the user to the corresponding OneDrive in the correct Geo.

Office 365 Multi-Geo: Delve, Profile, and Unified Auditing

How does the Delve experience look like when there are multiple users collaborating from different Geos? A user will see all the signals from all the users across the Geos, including their own Geo.

From a security compliance perspective, Unified Auditing allows the Admin to see a single unified view of all the activities that have occurred in your Multi-Geo tenant, regardless of what the user has done or where the content resides. The activities log can be exported or filtered according to the data that you require.

SharePoint Online Multi-Geo: Sites and Groups

The major difference between OneDrive Multi-Geo and SharePoint Online Multi-Geo is that SharePoint Online Multi-Geo satellites will have the full SharePoint Online experience. This includes SharePoint Online, OneDrive for Business Multi-Geo, Exchange Online and Skype for Business. Team Sites and Office 365 Groups can be created in the satellite Geos in SharePoint Online Multi-Geo.

SharePoint Online Multi-Geo

SharePoint Online Multi-Geo: Admin Centre

Each Geo will be having its own Admin Centre. In the Admin Centre, you will be able to create Team Sites in that particular Geo. To create a Team Site in a specific Geo, you must first navigate to it and then create the Team Site. Otherwise, it will create that Team Site in whichever location are you currently in.

Another consideration is the sharing policy for data residency. As each Geo location may have its own requirements for data residency, the sharing policy can be configured for each Geo independently of the central location as well as with other satellites. If the same policy is to apply across all Geos, then in PowerShell you have the capability to push this policy across all Geos.

Each Geo is identifiable by a user, an Admin, or a compliance officer, based on its unique URL. Because you will choose the namespace for the URL for your SharePoint Admin Centre, it is important to consider how and what you will name this URL.

Data Loss Prevention (DLP) Policies can be created and applied to specific Geos. To These types of policies can be created by going to the Security Compliance Centre. Once created, they can then be applied to a specific Geo’s OneDrive Site, SharePoint Site or mailbox in that site. Each Geo can have its own security compliance policy.

Microsoft has continued to develop and evolve Office 365 Multi-Geo by integrating IT Admin best practices, shared services, and ensuring an invisible and seamless product for end-users. Office 365 Multi-Geo delivers OneDrive as well as SharePoint Online with a single global tenant, which provides centralized control over satellite locations, and each Geo has the capabilities to be customized for its local policies on data residency and policies. Office 365 Multi-Geo is meeting the demands of on the go collaboration across continents and its users.

SharePoint Online External Sharing


One of my favorite topics in Office 365 is external sharing. Sharing and collaboration not only occur within your corporation, but it also involves external customers, clients, suppliers, or vendors. Sharing and collaboration can be achieved with the use of External Sharing in SharePoint Online.

By default, External Sharing for SharePoint Online is turned “On” for the entire environment, which includes all site collections. It is highly suggested to turn this “Off” globally until you have the permissions plan detailed and site collections organized and before users access the sites.

SharePoint Online has the capability for external sharing tenant-wide (global) and at site collection level. The global setting overrides any setting at the site collection level and affects OneDrive.

Types of External Users

An external user is outside of your corporation’s Office 365 subscription and with whom you are sharing content from one or more sites, files or folders. The two types of external users are:

Authenticated Users: these users have either a Microsoft account or they have a school or work account from another Office 365 subscription. Sites and documents are shared in the same manner as you would with internal users with permissions and groups working in the same manner as they would for internal users. However, collaboration tasks are limited to basic tasks as they do not have a license to your Office 365 subscription. The basic collaboration tasks for an authenticated external user include the performance of tasks on a site consistent with the permission level they are assigned, viewing and editing documents can be done in Office Online, and depending on the permissions they have been given, they will be able to see other types of content on sites. They will be able to navigate to subsites within the site collection and will be able to view site feeds

Anonymous Users: these are recipients who have received a shareable link to a folder or document but not sites. They can view or edit the document, be able to upload the folder (depending upon the type of link), and these are all specific to the link sent. This is done without having to log in with a username or password. The links are valid until they are disabled or have expired based on the expiration date. It is important to note that these links can be freely passed around between users.

Sharing Options

The following basic sharing options for tenant and site collection are:

No External Sharing: users with Office 365 subscription can internally share sites and documents

Sharing Only with External Users in Your Directory:  external users who are already in your Office 365 user directory will have access to sites, folders, and documents that are shared with them. These external users may include those users who have previously accepted an invitation, those who you have imported from another Office 365 subscription or a tenant from the Azure Active Directory

Sharing with Authenticated External Users:  sites can be shared with external users who have either a Microsoft account, a work or school account from another Office 365 subscription or an Azure Active Directory Subscription. A one-time code is sent to the user to verify their identity when folders or documents are shared, and they are not required to log in to a Microsoft, work or school account.

Sharing with Anonymous Users: documents and folders can be shared with an anonymous link. Anyone with the link will be able to view or the document and will be able to upload to the folder. Sites cannot be shared with anonymous users.

These options range from the most restrictive to the least restrictive settings. The restrictive setting can still be applied alongside those with fewer restrictions. For example, you can continue to share with authenticated external users, users already in your directory, and internal users while allowing anonymous sharing.

Managing Security Risks

Most corporations will have confidential information that is not to be externally shared. For this type of information, it should reside in one or two site collections with External Sharing turned “Off”. If additional confidential information site collections are required, then create a new site collection and ensure that External Sharing is turned “Off”.

Sharing a Site or Document – What happens?

What happens is dependent upon what type of External Sharing you are executing. There are three scenarios:

Sharing Sites with Authenticated External Users – an email invitation with a link to the site or document is sent to the external user. Clicking on the link will prompt them to log in to their Microsoft account or their work or school account. Once logged in, they are added to the users list in your Office 365 subscription and then given access to the site or document. In the users list, they are listed with #EXT# in their user name. They can now be granted access to additional sites or documents without being sent additional invitations. To discontinue sharing with this external user, you can either remove their permissions from the site or, you can remove them from the user list in Office 365.

Sharing Files and Folders with Authenticated External Users: an email is sent to the authenticated external user which contains a link to the site or file. Each time the file or site is accessed, they are emailed a time-sensitive code that is used to verify their identity. The code must be entered to gain access to the folder or file. To discontinue sharing with them, simply delete the link that was sent to them.

Sharing with Anonymous Users: anonymous users can be granted permission to edit, view, or upload a document to a folder. Links to view and edit are created separately, and each can be disabled with a time expiration. Anonymous user links can be reused and passed around, allowing anyone with this link access to the document or folder.

External Business Partners – How to Collaborate with Them

A SharePoint Online extranet site is a site that is a dedicated site collection for business to business collaboration with a vendor or partner. This site can be locked down so that only site owners can invite external users and only external users from specific domains can be invited. These are quick to set up and are more cost-efficient than on-prem extranet sites.  

External Sharing with SharePoint Online is not only easy and functional, but the ability to create extranet sites for external partners is a flexibility that provides feasibility with the least impact on budgets while ensuring external users have access to content that they require to fulfill their parts of the project.

List Template Duplicate Field


Many of us have saved custom lists as templates in SharePoint Online or on-premises, to be re-purposed in the future, as an easy way to re-create the same list, with the same content types, metadata and structure. This is a an easy way for developers to give the end user a prepackaged custom list, rather than developing a provisioning tool to create a unique list. This added benefit to this method is the ability to allow the end-user to quickly create their own list based on a specific template, without the need to ask IT to do it for them.

In some rare cases, if you are trying to created a list from a custom list template, you may end up getting an error of a duplicate field name. The exact error will be "A duplicate field name was found". The list template has been created in the same site collection and you cannot find why and where is the other duplicate field name.
 

Cause

There are 2 possible causes to your issue:

  1. Your list template is referencing the same field twice
  2. Your list template is referencing a field tat already exist in the site collection but with a different GUID

Resolution

In my case, the second cause was my issue. The resolution for both issues is similar. Here are the steps:

Step 1 – Editing your template

  1. Save your template.tsp to your desktop
  2. Rename your template.tsp to template.cab
  3. Extract your template.cab to a specific location
  4. Edit the manifest.xml
  5. Look for the duplicate field name and delete the node.

This will do it for there are 2 nodes for the same field name. If this is not the case, then the GUID is your issue, and you will need to change the GUID in your template with the right GUID from your site collection. Remember that when you create a list from a custom template, if the any column already exist in the site collection, the GUID of the list template must match the GUID of the site column in the site collection.

Proceed with the following steps to resolve your issue:

Step 1.1

  1. Run the following PowerShell command to find the GUID of your site column
    $web = Get-SPWeb http://portal
    $columnName = "Your column name"
    write-host $web.Fields[$columnName].Title -nonewLine
    write-host " " $web.Fields[$columnName].Id
    $web.dispose
  2. Replace the GUID in the list with the GUID from the PowerShell. In most cases the GUID exists in 2 places in the list template
  3. Save the manifest.xml
     

Step 2

Now this is the fun/tricky part. You will need to assemble your manifest as a cab again. Run the following steps:

  1. Run command prompt and browse to the folder where your manifest.xml is
  2. Run the following command: makecab manifest.xml templatename.cab
  3. Rename your templatename.cab to templatename.stp
  4. Upload your new stp file to your list templates library

Problem solved!


SharePoint Hub Site Announced at Microsoft Ignite


A new SharePoint site, SharePoint Hub Site, was announced at Microsoft Ignite 2017 in Orlando. The purpose of the SharePoint Hub Site is to provide a point of organization for content across SharePoint sites. Hub Sites allow you to associate SharePoint Team Sites and Communication Sites with a parent thereby streamlining and alleviating the issues of locating related content across the organization that appears in other sites. Associating multiple Team Sites and Communication Sites provides the flexibility to model and promote an intranet that reflects the way that your people in your organization organize.  Across associated sites, Hub Sites provide a common navigational structure, look, and feel.  Hub Sites also aggregate news and activities, displaying the roll-up on the Hub Site’s home page. SharePoint Hub Sites can be used to organize content, teams, divisions or resources throughout your business. 

Hub Sites


How do SharePoint Hub Sites work?

Newly created SharePoint Hub Sites propagate the navigation to all the associated sites, creating parent/subsite relationships.  Consistency across sites go from the top down so that all team sites or communication sites inherit common characteristics from the Hub Site. These characteristics include:

1. Navigation: Define top navigation in the hub site that is inherited by associated sites

2. Themes: Define the look and feel of the hub site. This theme remains consistent across all associated sites

3. Logo: The logo is the most important identifier of the site you are visiting.  The logo remains consistent across all associated sites providing the message that says, “You are here, and you have not left”

Hub Site
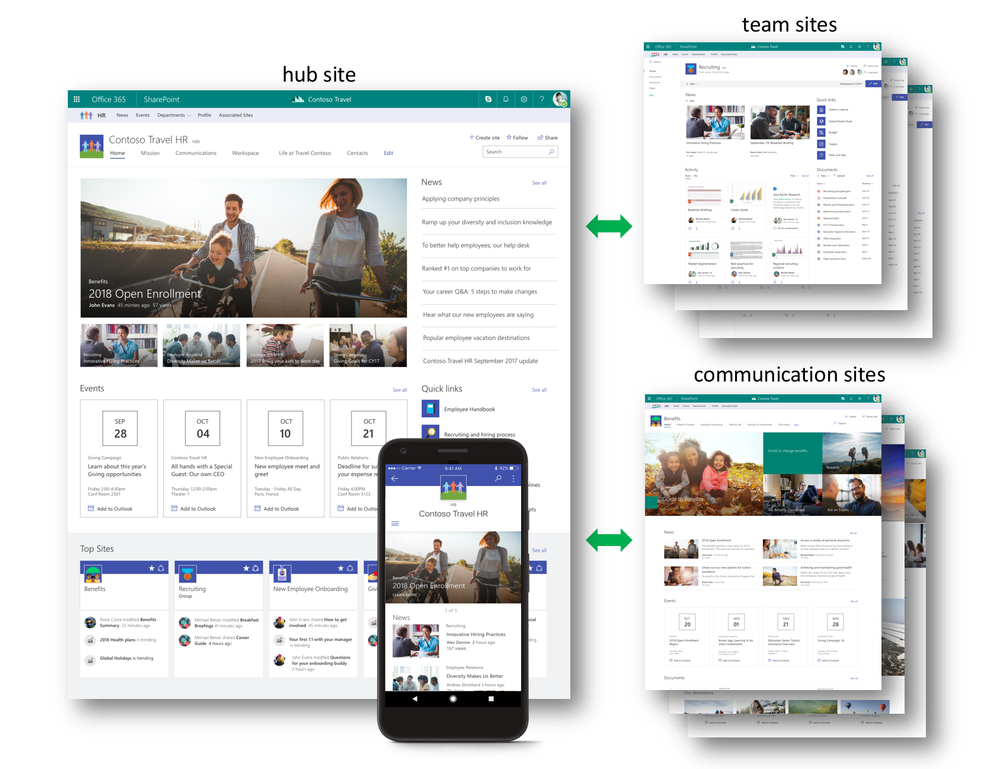
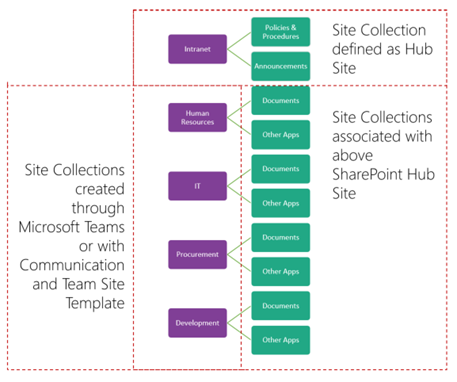
SharePoint is a tool for collaboration and the sharing of information. Within an organization, there can be numerous project teams working on a variety of projects and it is important to increase awareness, visibility, and discoverability to encompass those who are not part of the core team.  It would be unreasonable to expect your audience to search and drill down for the information, but having access to clear, concise communication that expresses in a broad sense of what is happening with the projects and initiatives would be valuable.  Team sites and communication sites push information and content up to the hub site level with rollup web parts.  These parts can surface content from all your associated sites into one place, allowing the flexibility for you to shift your content and associate it where it makes the most sense, unlike rigid hierarchy.  

Content is pushed up to the hub site level with news aggregation, combined site activities, and scoped search. 

News Aggregation: After creating and publishing a news article on an associated site, the news article will surface on SharePoint home, in the SharePoint mobile apps, and on the hub site’s home page.

Combined Site Activities: Site activities are visible on a team site’s home page as well as on the site’s card on SharePoint home. Site activities will roll up from each associated site, becoming visible on the hub site’s home page. This provides the ability to see what is happening across related sites in one view rather than going site by site.  With this information, you can now prioritize and focus your time.

Scoped Search: Searching content from a hub site will result in content from all associated sites which in turn increases relevance and enhances content discovery.

Creating SharePoint Hub Sites

Hub sites can either be created by Administrators who then associate existing team and communication sites to the newly created Hub Site from SharePoint home in Office 365. You can also create an associated site directly from within the hub site itself.   

The site owner can associate an existing team site or communication site within a hub site by following these steps:

1. Click the gear icon located on the upper right of the site

2. Click Site Information

3. In the Edit Site Information, click Hub Site from the drop-down menu.  Choose the right hub site to join.

It is important to note that team sites and communication sites can only be associated with one Hub Site.

As intranets are dynamic, associations may change as projects come to completion and new projects added. It is easy to un-join a Hub Site as it is to join it, allowing you the flexibility to adapt to the ever-changing landscape of the intranet. 


SharePoint Hub Sites and SharePoint Mobile App

Team collaboration and the sharing of information launched itself off the desktop onto mobile devices and SharePoint Mobile App is being updated to render hub sites, their pages, news, and content with smooth navigation between associated sites and scoped search. SharePoint Mobile App will continue to provide quick access to all your sites, news and team members you work with but now with added, enhanced search for content and people across your organization. 

Hub Site Mobile

The building blocks for your intranet have now expanded from the classic publishing sites and sites for application to include team sites, communication sites, and hub sites.  Sharing, managing, finding content, knowledge, and apps, on any device, is easily accomplished with SharePoint, the solution that connects your workplace with its people.

Office 365 Communication Site


The Basics of the Office 365 Communication Site

What is a SharePoint Communication Site? 

There are two types of sites that can be created to share information in SharePoint, but these sites target different audiences. As you are already familiar with, the Team Site audience comprises of the members of your team on a specific project.  All or most members of a Team Site can contribute content to the site and this information is limited to the members of the team, members of the project, and specific stakeholders.  The purpose behind Team Sites is for communication for collaboration between team members. 

On the other hand, a SharePoint Communication Site is just that – it is used to communicate to a broader audience including other project teams or the entire organization.  Unlike a Team Site where the majority, or all, of the members can contribute content, a small set of members contribute content to the Communication Site.  The Communication Site is the platform for sharing important information with others, especially those outside of your project team either on weekly or monthly basis; thus, content may include news, reports, statuses, product launches and other information that may be of interest to the broader audience. 

Communication Site content has been adapted to be mobile friendly while dynamically displaying and delivering content in visually compelling formats. Office 365’s Communication Site continues to offer mobile accessibility for SharePoint on the go and with the Cloud. 

Communication Site

Image showing News and Site Cards on Smart Phone and Tablet

Source: https://products.office.com/en-us/sharepoint/collaboration

Is it Easy to Create a Communication Site?

As with all Microsoft products, the development team has maintained its user-friendliness with Office 365 Communication Site creations.  There are three templates for creating new Communication Sites. The three initial site design templates are topic, showcase, and blank. 

Each template is completely configurable and contains pages within each template. These are also configurable. 

The Topic template is the best choice when there is a large amount of information to share. This information may include events, news, and other content.

The Showcase template is used for “showcasing” or featuring a team, product or event through the use of images or photos.

The Blank template can be configured and customized to your specific needs.

Communication Site Designs (left to right):  Topic, Showcase, Blank

Source: http://blogs.office.com

Once you have created your new Communication Site, you can then drag and drop to reorganize web parts on the page to highlight, showcase and announce the news to your broad audience. News and pages allow for multi-column layouts, providing the ability to creatively design and communicate your messages in a meaningful and intuitive fashion.

What Content Can Be Shared?

Feeling a little inundated with update emails?  Communication Sites can alleviate the email jam by allowing you to share your plans and updates in interactive and engaging ways.  By creating a page on a Communication Site, real-time data can be pulled across from Office 365 by embedding documents and videos.  This information can come from SharePoint documents, reports from Power BI, Microsoft Stream videos and discussions taking place on Yammer, all of which provide current, dynamic and rich internal communication.  All members can keep informed and for new members, it is a point from which they can gather information to quickly get up to speed. 

Where Can Office 365 Communication Sites be Connected From?

Not only can you access the Communication Site from your mobile app, but you can access, create content and engage with others from any device.  The full site, news, pages, navigation, search, and additional functionalities are natively viewable, engaging and functional.  From within the mobile SharePoint app, you can engage in a Yammer conversation, create a news article or read a page – all from within the context of the site. 

How Else Does Office 365 Communication Sites Enhance and Encourage Communication?

Communication Sites communicate effectively and efficiently through visually dynamic pages.  Your home page and sub-pages can be customized to meet your needs, but most importantly they can be made to look great!  Full-width layouts, spanning the page left to right, provides the page space to emphasize your most essential information.  With the enhanced title region and customized header image, along with full control over what portion of the image is the most important to highlight, visually presenting your home page, news and subpages with an attention-grabbing header graphic and title will not only look great on your desktop, but also on your mobile device. 

It is not just enough to communicate the recent news to your audience, but it necessary to engage in discussion, thereby, retaining your audience.  With the ability to comment on each news article and page, it allows your audience to provide feedback, which in turn can be used for the improvement of the page, article or project. 

A valuable feature is the ability to share the news via email. Unlike other shared information via email, news shared from a Communication Site will not only provide a blue link, but it will also provide a visual (thumbnail) and an informative preview (title, description) that adds context to the news article and email.  The ability to provide a message from the sender is also available. 

What is Displayed and Where Does the Data Come From?

As mentioned, the data displayed is dynamic and is pulled from either Microsoft Stream (videos or full channels) or Power BI (interactive reports).  Other sources of information and data can be pulled by adding web parts into your articles.  The first type is an Image web part which allows insertion of images and GIFs.  Sometimes there is too much content to be shown within the first view, truncating all other highlighted content. In these cases, selecting the “See All Pages” which proves to be handy.  When chosen, a full-page experience appears, providing a full view of all the content and activity.  The last web part is the “News” which is used to showcase your news by using multiple layouts to highlight what is important.  Layouts include Top story layout, which is the default, or List where you can view news in a list, or Side-By-Side. 

In this installment, we have determined:

1.  Why and when do you use a Team Site versus an Office 365 Communication Site;

2.  The simplicity of creating a new Office 365 Communication Site;

3.  What content is shared on a Communication Site;

4.  Where and what content can be shared from a Communication Site;

5.  Where can an Office 365 Communication Site be connected from;

6.  What devices can connect to a Communication Site;

7.  How is communication enhanced and encouraged by Office 365 Communication Sites; and

8.  What is displayed and where does the data come from.

From these, we now have an understanding of why we would create a Communication Site. With this understanding, we can now proceed to look at the Office 365 Communication Site in greater detail.

Modern UI – Part II


Modern document libraries and lists were released in the summer of 2016 for SharePoint Online with the goal of creating better end-user experiences, including faster, better, and intuitive responses in a user-friendly environment.  Not only is it highly recommended that one transitions to the “modern” list and library but customizations be converted to the “modern” experience as there are many benefits to the “modern” experience.  Some of these benefits include the following:

updated user interface: “modern” document libraries are similar to OneDrive, offering intuitive responses such as creating new folders and uploading files in the browser;

–  pinned documents:  pin documents so they are above the fold in any screen view for quick and easy access

copy and move:  unlike old copy and move commands, the “modern” experience is intuitive and allows one to create new folders on they fly as the architecture of your information is displayed

decrease number of copies of document: “modern” document libraries are intelligent.  They remember files that you have used in SharePoint which allows you to import files from other libraries as links rather than data files, thereby, decreasing the amount of storage space and duplicity numerous of files. 

organizing files: “modern” document libraries provide the ability to group files directly on the main page without having to go to a separate admin screen.  In addition to this, there is the capability to click and drag columns to change their size plus sorting, filtering, and grouping can be done from any column header

–  mobile browsers:  whether accessing SharePoint Online with a keyboard, mouse, screen reader or touch, all mobile browsers will now have the same features as a desktop

–  editing metadata:  it is no longer necessary to click through multiple screens to apply an update as metadata can now be edited from the main view on the information panel

–   integration:  by integrating Office Online with SharePoint Online, SharePoint Online now provides a complete document preview at the top of the information panel and is completely navigable.  The information panel displays pertinent metadata including history of recent activities, recipients of the file for sharing and updates to the file

It is important to note that the “classic” experience will not be deprecated but will co-exist with the “modern” experience. 

There is an option available to the Admin to enable SharePoint to automatically detect when certain features are being used.  This auto-detect automatically returns the “modern” experience back to the “classic” experience when certain features are used. 

These features that are compatible to auto-detect include:

1. Navigation Features:  all libraries on sites that have metadata navigation and filtering features enables are shown in “classic” experience;

2.  Column Types:  geolocation columns, external data columns, and publishing columns (including publishing HTML, Publishing Image, Publishing Hyperlink); and

3.  Customizations:  JSLink code on fields, and CustomActions that include ScriptBlock or ScriptSrc properties. 

Auto-detect can be enabled, assuming the “modern” experience was not disabled under the site, web, or list levels, by following these steps:

1.  Choose Admin Centres;

2.  Choose SharePoint;

3.  Choose Settings;

4.  Scroll down to SharePoint Lists and Libraries experience; and

5.  Choose New Experience (auto-detect) (the black should appear in the circle next to this). 

Auto-detect is now enabled. 

Customization Options

Unlike the “classic” lists and libraries, the “modern” list and libraries supports fewer customization options; however, the SharePoint Product Group is continually working towards supporting more options in the future.  In the meantime, supported capabilities include Subset of User Custom Actions, Custom Branding, and PowerApps and Flow Integration. 

Customizations that are not currently supported for “modern” lists and libraries include: JSLink based field and view customizations, custom CSS via AlternateCSSUrl web property, custom JavaScript embedded via User Custom Actions, Custom master pages, customization via InfoPath, Minimal Download Strategy (MDS), and SharePoint Server Publishing.  For embedded Custom JavaScript, there will be controlled methods of embedding JavaScript on the pages through SharePoint Framework, and not only client-side web parts. 


User Custom Actions

Not all user custom actions supported by “classic” mode are supported in “modern” experience mode.  The following is a list of supported custom action locations and how they are surfaced in the “modern” UI:

1. User Custom Action Location:  EditControlBlock will be visible and show up as custom menu items; 

2.  User Custom Action Location:  CommandUI.Ribbon will be visible and show up as toolbar items; and

3.  User Custom Action LocationScriptlink and all other locations will not be visible and will not surface in the “modern” experience

Adding custom links to the context menu can be achieved by using the EditControlBlock as the location for your custom action.  Likewise, to extend the toolbar in the “modern” list and library experiences can be achieved by adding a user custom action targeting the CommandUI.Ribbon location. 

User Custom Action Limitations

It is important to keep in mind the limiting parameters when developing user custom actions. These limitations include the following:

1. Control of User Custom Actions:  one does not have complete control of the order in which the user custom actions show up.  The current API does not account for the sequence attributes;

2. Usage of JavaScript:  user custom actions will not show up if JavaScript is embedded in the command actions as it is not supported;

3. ScriptLink and ScriptBlock:  as ScriptLink is not supported, any user custom action relying on ScriptLink will not run in the “modern” experience; and

4.  Image Maps:  Image maps is not supported but you can specify individual images that are only 16 x 16.

Custom Branding

If your site employs a custom theme, then this custom theme will be respected in the “modern” list and library experience. 


Configuring End User Experience

The “modern” or “classic” list and library experience can be controlled at multiple levels:

1.  Tenant Level Configuration:  Highly suggested for disabling the “modern” experience completely.  In your tenant admin center, go to settings, select “classic” experience;

2.  Site/Web Level Configuration:  For preventing a web or site collection from using the “modern” experience, one can enable/disable features; and

3.  List/Library Configuration:  Control can be found at the library level by going to list settings, advanced settings, and then choose how you want to change the behavior.  Optionally, it can also be done using CSOM. 

As the SharePoint Team continues to add more supported features, it is highly recommended that one transitions to the “modern” list and library to take full advantage of the user-friendly environment which results in a satisfying end-user experience. 


SharePoint and Office 365: Patterns & Practices – Part 1: The Basics


What is SharePoint Patterns & Practices (PnP)?

SharePoint Patterns & Practices (PnP) is an initiative that was launched in 2013 with the vision to simplify development by providing an open source, reusable components, and solutions that have been built collaboratively between the community and Microsoft. Through sharing of knowledge of implementation practices in SharePoint and Office 365, Microsoft and the community collaboratively create the starting points for PnP guidance and code samples. 

How does it look like?

There are three levels of engagement.  Imagine a target with 3 concentric circles with the centre of the target being the Core Team.  Encircling the Core Team is the second layer comprised of the Special Interest Groups (SIGs) while the final outer third layer is the Community. 

1.   Core Team:  As the title implies, the Core Team has the greatest direct involvement with the PnP library of code samples and guidance documentation.  Comprised of a small group of individuals from Microsoft and the community, they have been granted permission and direct access to the PnP library to merge approved changes in the PnP library.  By keeping the Core Team small, control can be maintained to ensure proper and appropriate value is added to the PnP library.  


2.   Special Interest Groups (SIGs):  Special Interest Groups are being brought together and are currently being piloted with SharePoint client side development to develop the JavaScript Library.   SIGs meet weekly to exchange thought, processes, and code to build the JavaScript Library.  SIGs do not have access to the PnP library though what they produce will have an impact on the PnP Library.


3.   Community: With the least access to the PnP Library, this group is comprised of both the internal and external community.  Their involvement is through either of the following methods: 


a.    Bi-weekly office hours: hosted by members of the PnP initiative, they review and explain what the Core Team is doing, what they plan to do, and they provide suggestions as to the various areas or topics that could use community contribution.  At the end of the session is an open mic where the community is provided the opportunity to voice suggestions as to what they would like to contribute to the initiative.  These are then pitched to the Core Team, who is then tasked to render the final decisions.    

b.    Monthly Community Calls:   a unidirectional communication informing the community what changes have been proposed, names of members who have been contributing, and names of those who have been doing demos or presentations for the bi-weekly office hours.  Recognition during these calls improves the exposure of members who participate, which in turn, provide endless networking opportunities.  These Monthly Community Calls are held the first Friday of every month.  On every second Tuesday of every month, the community is provided the latest changes in the PnP Library.


What benefits do I receive from PnP?

By becoming an active member and recipient of PnP, not only will you gain a community of peers and experts, but you will also have access to useful libraries and an unfathomable amount of code.  Some of the libraries include the PnP Core Library, which is a NuGet ready to go package, PnP Components, Samples and Solutions, PnP Provisioning Engine, and PnP PowerShell. These are just a few examples of the libraries that you will gain access to.  Under one umbrella, there will be an establishment of common architectural patterns and standardize guidance that is available upon immediate publication of the code.  For those who would like more detailed instructions, there are webcasts available as well as on-line training material.  The best part of joining and participating in the PnP Initiative is that all materials, including videos, presentations, webcasts, are not only available for your viewing, but they are free for re-use in any way that you want! 


How am I supported in the PnP Initiative?

Being an open source community program, there are no sales level agreements (SLAs) for Microsoft support.  As PnP is not a product like Word or MS Office, it is not supported through Premier Support or other official support channels.  Instead, support can be accessed through the SharePoint Developer Group in the Microsoft Tech Community to provide input and/or to ask any questions regarding existing material. 

Microsoft and the community work collaboratively to provide open source code samples with standardized guidance documentation.  Both the code samples and guidance adhere to the PnP guidelines for support and recommended techniques.  These materials are maintained by Microsoft while all PnP implementations are reviewed and approved by SharePoint Engineering.  Most importantly, PnP retains its uniqueness by being supported from within the community by the community.

Create subsites in SharePoint Online with CSOM


Often, when we are engaged with new Office 365/SharePoint Online projects, we may have to create hundreds of subsites within a site collection. unfortunately, we still do not have PowerShell Cmdlets to create SharePoint webs, and we can only create SharePoint Online Site Collections using the New-SPOSite Cmdlet. However, it is definitely possible to create your subsites remotely on your SharePoint Online tenant using CSOM.

To make it more efficient, we are going to create an XML file, store all the subsites info in it, then read the XML file from CSOM to populate your Site Collection structure.

The script below describes all the steps you need to automate your SharePoint Online Site Collection.

XML File

First, let's create a new XML file and call it contoso.xml. The XML will have the URL of the Site Collection and the webs to be created within it (technically you can use the same XML to create multi level subwebs). The file will look like this:

<?xml version="1.0" encoding="UTF-8"?>
<Webs>
<Web>
<Url>https://contoso.sharepoint.com/sites/<Site Collection></Url> 
 <Sites>
  <Site>
   <Name>Site1</Name>
   <Title>Title 1</Title>
  </Site>
  <Site>
   <Name>Site2</Name>
   <Title>Title 2</Title>
  </Site> </Sites> 
</Web>
</Webs>

You can download a sample of the XML document here: contoso.xml

CSOM Code

There are few steps you need to take to get the CSOM code.

First, you need to add references to your SharePoint client assemblies.

Add-Type -Path (Resolve-Path "C:\CreatePublishingSite\Microsoft.SharePoint.Client.dll")
Add-Type -Path (Resolve-Path "C:\CreatePublishingSite\Microsoft.SharePoint.Client.Runtime.dll")
Add-Type -Path (Resolve-Path "C:\CreatePublishingSite\Microsoft.SharePoint.Client.Publishing.dll")

Second, you need to authenticate to your SharePoint Online tenant and load your XML file:

$userName = "[email protected]"
$pwd = Read-Host -AsSecureString "Please enter your password"

Third, loop through the file and create the sites:

[XML]$Import = Get-Content "C:\CreatePublishingSite\PageList-min.xml" 

Foreach ($objWeb in $Import.Webs.Web)
    {      

    Write-Host $objWeb.Url -BackgroundColor Green

    $ctx = New-Object Microsoft.SharePoint.Client.ClientContext($objWeb.Url)
    $ctx.Credentials = New-Object Microsoft.SharePoint.Client.SharePointOnlineCredentials($userName, $pwd)

    if (!$ctx.ServerObjectIsNull.Value)
    {
        Write-Host "Connected to SharePoint Online site: '$siteUrl'……" -ForegroundColor Green   
    }
    else
    {
        Write-Host "Could not connect to SharePoint Online site: '$siteUrl'" -ForegroundColor Yellow
    }

    $rootWeb = $ctx.Site.RootWeb
            $ctx.Load($rootWeb)
            $ctx.ExecuteQuery()
   
    $groups = $rootWeb.SiteGroups
            $ctx.Load($groups)
            $ctx.ExecuteQuery()

    Foreach ($objSubWeb in $objWeb.Sites.Site)
        {
                       
            Write-Host "Creating Sub Site…." $objSubWeb.Title -ForegroundColor Yellow
            $WCI = New-Object Microsoft.SharePoint.Client.WebCreationInformation
            $WCI.WebTemplate = "CMSPUBLISHING#0"
            #$WCI.Description = "SubSite"
            $WCI.Title = $objSubWeb.Title
            $WCI.Url = $objSubWeb.Name.Replace(" ", "-")
            $WCI.Language = "1033"
           
            $subWeb = $ctx.Web.Webs.Add($WCI)       
            $subWeb.BreakRoleInheritance($false, $false);         
            $subWeb.Update() 
            $ctx.Load($subWeb)
            $ctx.ExecuteQuery()
           

            Write-Host "Sub Site Created…." -ForegroundColor Yellow
            }      
    }


Microsoft Forms in Office 365 and SharePoint 2016


After Microsoft announced the deprecation of InfoPath Web Forms in 2014, there has been much speculation as to what would be coming forth to replace InfoPath.  As explained during this announcement, Microsoft was setting itself on a path to develop an integrated forms technology that allows the user to design and deploy intelligent forms across various platforms including tablets, smart phones and PCs all the while providing quick access to the data.  

In April 2016, Microsoft announced Microsoft Forms would be available in its early format in Office 365 but only for the Education module.  There has been some ability to access the preview, and from what can be seen, Microsoft Forms is not a replacement for InfoPath. Rather, it is an excellent tool for forms collaboration across platforms and audiences on both PC and mobile.

Once launched in the preview, Microsoft Forms has a look and feel like any other Microsoft application – top three dots in the top right corner provides the options to provide Feedback, ask for Help, navigate to your Office 365 Account Profile, or sign out. 

The site has integrated the look and feel of Sway with each created form represented by a tile.  If you’re not familiar with Sway, Sway is an application that allows the user to create and interactively share presentations, stories, reports and much more.  Similar to SharePoint Mobile App, Sway has the intelligence to provide suggestions for adding content like images, videos, and tweets that are relevant to your project without you having to exit and search on the web. 

Sway provides an organized and clean view of your forms.  Each form is represented by a tile and each tile clearly shows the title of the form along with its subtitle.  From this page, you have the ability to create a new form by selecting New Form

Once selected, you can begin creating your form by naming your form and providing a subtitle.  You are now ready for the next step – creating the form.  Creating the form is very simple.  You must decide upon the format of the form and there are three styles that you can choose: Choice, Text and Rating

Choice is set up as a question and answer form with choices.  You have the option of adding additional questions to the default two question slots. The form can be customized to an extent.  There is the capability of adding the parameter of “Answer Required” to ensure that the question is answered.  There is also the ability to add a subset question to the main question if more context is needed.  Quite often, the answer for a subset question is one that the responder answers in their own words, and this can be done through the Other option. 

Text is a simple and straightforward question and answer form.  You develop the questions and the responder is provided space to respond with their own answers. Answers can be limited or unlimited in character count. 

Rating forms provide your audience the opportunity to rate something such as skill, applicability, abilities, taste, or satisfaction.  The rating scale is set at either 5 or 10 with the option of expressing the rating with stars or numbers.

Microsoft Forms web app continually and automatically saves your work and once you have finished designing your form, you have the ability to either preview it before sharing or share without previewing.  If you choose Preview, then you will have the opportunity of previewing from two views:  a computer view and a mobile view. 

Once you are satisfied with your form, you can proceed to share it with your audience.  Sharing your form, or quiz, can be as simple as sharing in an email the URL, a QR code or the embed code.  There is also the opportunity to provide additional information to your audience such as whether they need to login to access the questions, whether it is a one-time only quiz or if they can answer the quiz multiple times, and the deadline to complete the quiz. Because this will be launched with the Education module, there is an excellent option that allows you to shuffle the questions when they load.  This is great for administering classroom quizzes. 

Providing a form for a quiz or survey is only as good as the information that can be gathered from it.  Microsoft Forms provides a summary of how your audience has answered the quiz or survey.  Under the Responses tab, one can find the results of the quiz including the number of responses, the average time to complete, whether the form is still active and open for submissions, a visual graph of the responses and the average rating.  Currently, there is the option to download your quiz to your PC with the Open in Excel option. Perhaps in the future, this option will be replaced with Save in OneDrive to maintain consistency with the direction of SharePoint Mobile App and Office 365.   

Though Microsoft Forms for Office 365 and SharePoint 2016 have not been released, it has been released as a preview for the Education Module.  From this preview, we can see that this application provides the user the flexibility to elicit information from a targeted audience, gather analytics, and based on this, provide solutions.  Microsoft Forms is another step towards the direction of integrated, cross platform, collaborative, and mobile applications.