Migrate SharePoint Classic to Modern

SharePoint Online is a dynamic collaborative platform that continues to provide visually pleasing, improved and more streamlined processes and accessibility for the end user. The availability of Modern sites is increasing. A Modern site consists of modern Office 365 group-connected team or communication sites. By combining these with improved functionality, content is presented in a modern user interface that is not only aesthetically pleasing, but provides content in a format that communicates clearly, navigates easily, and puts some controls back into the hands of the end-user.

But what if your organization has classic team sites and lots of them? How do you migrate these to the modern SharePoint Modern site? You can fully transform your classic team site into a modern Office 365 group-connected site with in-place modernization. Modernizing the sites will involve one or more of the following steps:

  1. Maximize and Leverage Modern List and Library: The modern user interface is the most visible aspect of a modern site. In the classic sites, particular pages will appear in the modern user interface, on the condition that modern experience has not been turned off. The pages will appear in the modern user interface include List and Library pages for most lists and libraries, site usage page, site contents page, and recycle bi pages. However, Home page and all other site pages such as wiki pages and/or web part pages, and List and Library pages for certain libraries and lists, will continue to the classic user interface.

    Starting April 1, 2019, it will no longer be possible to restrict an entire organization (tenant) to classic mode for lists and libraries. Refer to Chris McNulty’s Post.

    To transition to a modern user interface from the classic user interface, there are two areas that require attention. The first is transitioning of lists and libraries to the modern list and library experience, basically, the modern user interface. The second is to transform classic wiki and web part pages, your classic pages, to modern client-side pages.

    Planning is the foundation for a successful migration from classic to the modern user interface. Involving key players is an important step towards a successful migration.

    Identify and educate your stakeholders and they will include:

    a. Key business stakeholders – this group will be playing a crucial role in assisting end-users in adopting the modern user interface. Prepare them by working closely with them. Provide direct involvement through access to the play environment so they can become familiar with the upcoming changes. Listen to their needs, their feedback, and their recommendations. Ensure that their business needs are met;

    b. Customization team and developers – this team will need to be available to redesign customization that were built in the past for the classic user interface. Not all customization will be transferable to the modern user interface;

    c. SharePoint administrators – the admins are the ones who will enable the modern user interface to your tenant and sites; and

    d. Change management and governance teams – switching from the classic to the modern user interface will have an impact on users, and an update of internal training materials will be needed. Change management will be important for users who are affected by the switch.

    Analyze your site collections once your stakeholders are involved, educated, and supportive.

    How will you know which site collections are ready to be modernized? How is it determined which site collections are good candidates for this modernization? Luckily, Microsoft has built a scanner to help with transforming site pages, lists, and libraries or connecting sites to an Office 365 group. The SharePoint Modernization scanner will provide a detailed analysis of the readiness of the sites for connecting to an Office 365 group. This analysis will provide a deeper understanding of the compatibility between the modern user interface, lists, and libraries. It will also perform a detailed analysis of the web part pages and wiki pages so you can prepare for page modernization. Armed with the results of the scan, remediation work can begin to prepare the collection sites for modernization.

    a. Incompatible Customization – replace with equivalent ones that work in a modern user interface;

    b. Modernize User Experience – this is done by:

    i. Enabling lists and libraries to show in the modern user interface by replacing customization, remove incompatible columns from the used views, or move data into a modern user interface compatible list type (this should be the last resort);

    ii. Connecting the site to an Office 365 group. By doing so, this will provide your site a modern home page which, in turn, enables the end user to use modern app versions;

    iii. Creating modern client-side pages and configuring them to be “similar” to the key classic wiki and web part pages. For key pages of your site, programmatic page transformations should be done. However, not all pages will require this as it is resource intensive. The usage information can be obtained from the SharePoint Modernization scanner for the web page parts and wiki page; and

    c. Communicate with the End-Users – inform, educate, and prepare your end-users for the modern user interface as the sites will work differently than in the classic modern user interface.
  2. Connect Your Site to an Office 365 Group: Classic team sites are not connected to an Office 365 group. To modernize these sites, they will need to be connected to an Office 356 group. Once connected, the site will be able to access other Office 365 services such as Teams, Outlook, and Planner. Modern team sites are already connected to Office 365 groups.

    How do you connect the classic team site to an Office 365 group? There are two methods to do this. The first is to launch a wizard from the user interface. The wizard will walk the site owner through the process. The second method is to do a bulk operation or a group-connection. With a group-connection, a series of sites can be connected, at one time, to an Office 365 group. With this method, control over configuration, including site classification, alias name, the privacy of the site as public or private, are maintained. For this reason, it is the preferred method for large organizations.
  3. Switch to Modern Tenant-Scoped Branding: Connecting to an Office 365 group results in a modern site home page and it will also allow the use of a modern site theme. The new modern site home page accepts corporate branding on SharePoint team sites. With classic sites, branding was created by using site themes, master pages, and alternate CSS. The latter two are not compatible with the modern user interface, and evaluation of these branding customization will be required to determine their relevancy. Classic site themes can be transformed into the modern user interface. Even so, it is highly recommended to switch to tenant-controlled site themes which will be respected in future modern team sites.
  4. Transform Classic Site Pages into Modern Pages: This is the final step. Even though you have completed the previous steps, your site pages will still appear in the classic user interface. Transforming pages is not an easy or simple process. There is no one-on-one mapping between the functionality of classic web parts and what is offered by client-side web parts on modern pages. As such, it is recommended that only frequently used pages be transformed into modern client-side pages.

Migrating SharePoint Classic to Modern experience entails several steps and engages several audiences. Successful transition and migration of the classic user interface to the modern user interface require planning, remediation, analysis, and prioritizing sites and pages that are to be transformed into the modern user interface. Without a doubt, there are many positives to switching from the classic user interface to the modern user interface.
Office 365: Classification and Retention Labels

As part of the Advanced Data Governance (ADG) suite of tools, Office 365 labels help you keep the data that is needed in your organization and disposes of information when it is no longer needed. Classifying content across Office 365 services entails the use of Office 365 labels. These labels are used for records management and follow governance rules as laid out by the organization and by legal authorities.

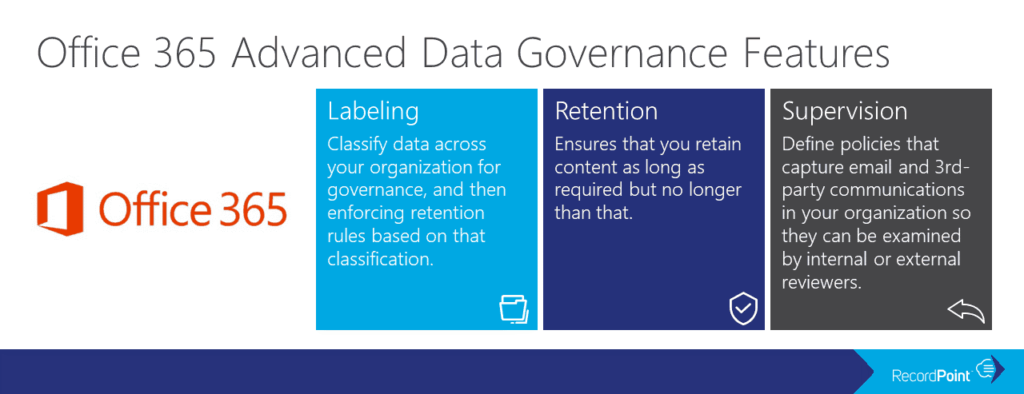
Three components comprise Advanced Data Governance:

Labels: fall under two types: sensitivity labels and retention labels (both originally were called classification labels but with the updated Office 365 UI, they have been renamed). These are used to classify the information for governance purposes. A retention policy can be associated with a label.

Retention: policies to ensure that data is not prematurely deleted but rather, once the content has reached the end of its retention period, one of three actions are triggered. Actions include: no action, delete content, or initiate a process for data review.

Supervision: assigns specific individuals to review and monitor email and third-party communications for the organization.

Office 365 Labels and Retention
Credit: www.recordpoint.com

As collaboration is not rooted to a single location or with one source, organizations are relying upon security and compliance to ensure that data remains secure, especially when it roams with collaborators. With Office 365, this can be accomplished through the use of labels.

Sensitivity labels allows sensitive content to be labelled and protected without hindering productivity and collaboration between users from different organizations. Sensitivity labels can be used to:

  1. Enforce protection settings, including encryption and watermarks, on labelled content;
  2. Protect Office app content across platforms and devices;
  3. Prevent sensitive data from leaving your organization on devices running Windows;
  4. Extend sensitivity labels to apps and services of third-parties; and
  5. Classify content without using protection settings.

Sensitivity labels classify data across your organization and enforce protection settings based on that classification.

How does a sensitivity label work? It operates similarly to tags in the sense that they are customizable, are presented in clear text, and are persistent.

Being customizable, different levels of sensitive content can be defined as categories. These include Public, Personal, General, Confidential, and Highly Confidential. Third-party apps and services can read the clear text, allowing them to apply protective actions as dictated. Once applied to content, the sensitivity labels persist in the metadata of the document or email which means that the label travels or roams with the content. The label becomes the basis for applying and enforcing policies as it includes the protection settings.

Protection settings for sensitive labels include:

  1. Encryption on email and/or documents whereby specific users or groups can be granted permissions to perform actions and for how long;
  2. Marking content through the use of watermarks, headers, or footers to documents or emails. Watermarks are confined to 255 characters and can only be applied to documents. Headers and footers are restricted to 1024 characters, with the exception of Excel with only 255 or fewer as it depends on what the workbook contains;
  3. Prevent data loss with endpoint protection which works with all Windows devices; and
  4. Automatically apply labels to sensitive data content as opposed to manually applying labels. With manual application, users are prompted to apply the recommended label whereas with auto-apply, the criteria will determine the label that is automatically applied.

When creating the sensitivity labels, it is important to list them in the right priority sequence. The most restrictive sensitivity label should appear at the bottom with the least restrictive at the top. For example, the top sensitivity can be Public with the last one being Highly Confidential. This list determines what is a lower classification should a user change the sensitivity label.

Creating Office 356 labels is a two-step process. The first step is to create the actual label which includes the name, description, retention policy, and classifying the content as a record. Once this is completed, the second step requires the deployment of a label using a labelling policy which specifies the specific location to publish and applying the label automatically.

To create an Office 365 label, following these steps:

  1. Open Security and Compliance Centre;
  2. Click on Classifications;
  3. Click on Labels;
  4. The label will require configuration including: name your label (Name), add a description for the admins (Description for Admins), add a description for the users (Description for Users);
  5. Click Next once the configuration is completed;
  6. Click Label Settings on the left-hand side menu;
  7. The Label Settings will need to be configured. On this screen, you can toggle the Retention switch to either “on” or “off”. If you choose “on”, then you can answer the question “When this label is applied to content” with one of two options. The first option is to Retain the Content. From the pick boxes, you can choose the length of retention and upon the end of the retention, the action that will take place. The three actions are to delete the data, trigger an approval flow for review, or nothing can be actioned. The second option is to not retain the data after a specified amount of time or based on the age of the data; and
  8. The label has now been created.

Upon completion of creating the label, the next step is to create a label policy. Sensitivity labels are published differently than retention labels. Sensitivity labels are published to users or groups and will appear in Office apps for users and groups. Retention labels are published to locations such as Exchange mailboxes.

With label policies, you can:

  1. Choose the users and groups who will see the labels, including Office 365 groups, distribution groups, and email-enabled security groups;
  2. Apply a default label, which becomes the base level of protection for all content, to all new documents and emails created by the groups and users that are included in the label policy;
  3. Require justification for changing a label when a user wants to either remove the label or replace it with a lower classification. The admin will be able to review these justifications;
  4. Mandatory labelling can be enforced to all users to sent emails or saved documents. The label can be manually assigned by the user, assigned by default (see above), or assigned automatically based on criteria; and
  5. Help Link directing to a custom help page can be added for users.

To create a label policy, follow these steps:

  1. Open Security and Compliance Centre;
  2. Click on Data Governance, Retention;
  3. Choose Label Policies box at the top of the screen; and
  4. There are now two options. The first is to Publish Labels. If your organization wants its end users to apply the label manually, then this is the option you would choose. Note that this is location based. The second option is to Auto-apply Labels. With Auto-apply, you would have the ability to automatically apply a label when it meets the specified criteria.

Sublabels can also be defined and these sublabels will be seen by the user. Sublabels are a simple way of presenting labels to users in logical groups. Sublabels do not inherit any settings from the label they are under.

What if a sensitivity label is deleted from the Security and Compliance Center? Deleting the sensitivity label from the Security and Compliance Centre will not remove it from the content. The protection settings continue to be enforced on the content.

What if a sensitivity label is edited in the Security and Compliance Center? If a sensitivity label is edited in the Security and Compliance Center, the version of the label that was applied to the content will continue to be enforced. It will not change to the new settings.

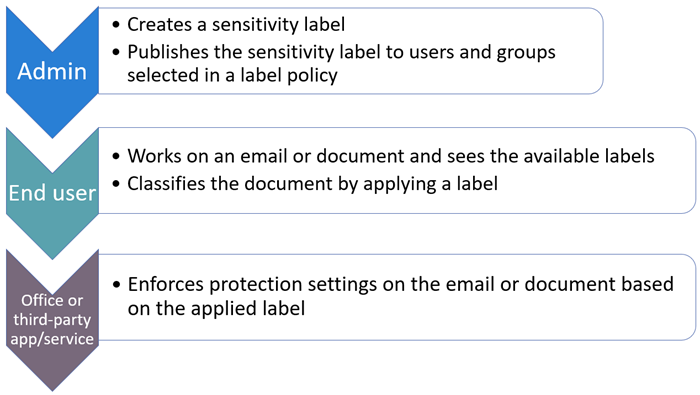
Visually, this is the basic flow process for the admin, user, and Office app for using sensitivity labels:

Creating labels is a straight forward and easy process that provides detailed and complex information for the classification and retention of data, whether this data is static or dynamically roaming with collaborators. With increased mobility of collaboration, data integrity and security continue to be a focus. With Office 365 labels, classification and retention are steps that can be taken to ensure the security of data, including its deletion upon the end of its retention.

Office 365 Enterprise Mobility and Security

Cybersecurity has never been more on the forefront of global technological advancement as it has been now, especially for mobile security. Cyber threats have morphed into aggressive and complex attacks, and Microsoft’s mission is to empower every person and every organization to shut down cyber threats before they become attacks by providing first defenders the tools to do so with Microsoft 365’s core component Office 365 Enterprise Mobility + Security.

Office 365 Enterprise Mobility + Security (EMS) leverages artificial intelligence to provide intelligent mobility management and a security platform by increasing the security features in Office 365 and extends them across the entire environment, including third-party investments. Not only does EMS empower your employees with mobile flexibility but it secures your organization and protects its data.

The face of cyber threats and attacks change daily, resulting in challenges that are faced in securing the data environment. The first is the creativity and complexity of attacks that are now being formulated. These are more complex than the simple, identify theft that we are familiar with, though this is the step of how they gain access to your data. Digital access is global, and users can tap into information wherever they are, including stationary at a desk to moving in a car. The vastness of the digital real estate, by itself, is difficult to secure. Though we are advancing with faster, more trustworthy, and more intelligent technology, it is still expensive and time-consuming to manually correlate actions on threat and attack signals.

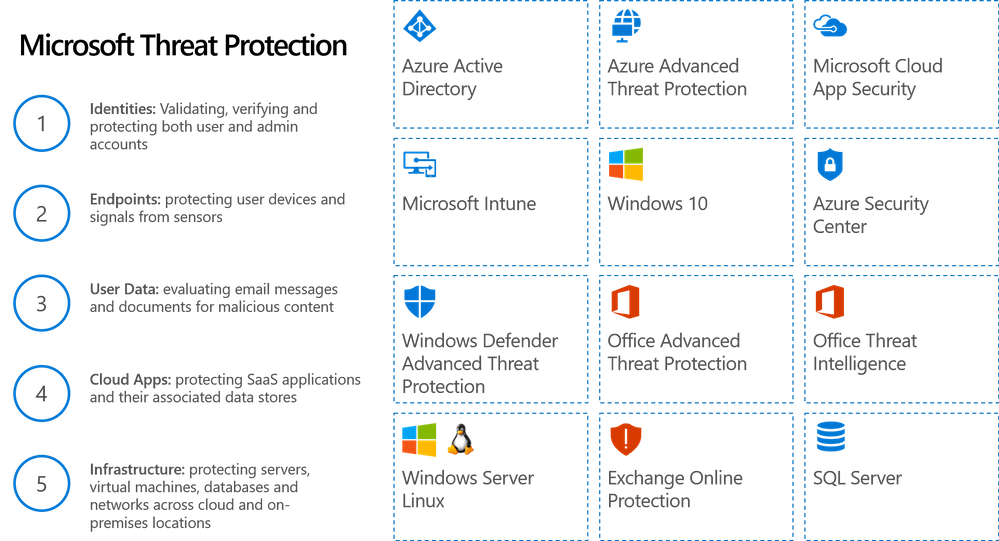
Office 365 EMS consists of five groups with actions to provide enterprise mobile security. These five core groups are:

  1. Identity and Access Management;
  2. Information Protection;
  3. Threat Protection;
  4. Unified Endpoint Management; and
  5. Cloud Access Security Broker.

Identity and Access Management

Identity theft is one of the many methods to breach data security. With EMS, there are several ways to help reduce the possibilities of data breaches with tighter requirements for identity to gain access. Access management can be enforced through several venues, including:

Securing Authentication: The one-word password for authentication no longer provides secure and guaranteed access as it once did. With the advancement of technology, the methodologies for cyber threats have also advanced. Combining software, artificial intelligence, and science, there are new ways of managing access to secured data. These include:

  1. Going Without a Password utilizes biometrics for authentication;
  2. Multi-Factor Authentication keeps user identities safe, the current rate at the time of publication is 99.9%;
  3. Password Protection in Azure AD bans password lists and provides smart lockout features to help safeguard credentials; and
  4. Windows 10 – Secure Identity and Access provides control access to mitigate credential theft in Windows 10.

Govern and Protect Access:  Microsoft’s “Never trust, always verify” is an apt motto when it comes to protecting and governing access. With Azure AD conditional access, Zero Trust can be delivered:

  1. Enable Secure Productivity by controlling data access based on the location of the user, the device, applications that are offline, and proactively determining the risk of the environment. Access modes can be secured in SharePoint Online, Microsoft Cloud App Security, and Exchange Online;
  2. Secure and Manage Endpoints through Azure AD conditional access, Microsoft Intune and Windows Defender ATP. Working together, Azure AD and Microsoft Intune ensure that only managed and compliant devices are allowed access to Office 365 services, email, SaaS apps, and on-prem apps;
  3. Secure Administration with Azure AD with Privileged Identity Management which secures admin accounts across Office 365 and Azure; and
  4. Azure AD Identity Governance ensures the identity, access, and admin lifecycle governance.

Obtain Comprehensive Identity Protection: Prevent identity attacks by implementing Microsoft Cloud Security, Azure AD Identity Protection and Azure ATP by:

  1. Securing Identity Infrastructure by following these five steps: strengthen your credentials, reduce your attack surface, automate threat response, increase your awareness, and enable end-user self-help;
  2. Identity Security Insights obtained with Azure AD Identity Protection detects risks and provides you the opportunity to define policies for remediation. Once an upcoming attack is spotted, the doors of access can be locked by using the What-If Tool, implementing Conditional Access, customizing and accessing the Security Dashboard, defining Identity Protection and generating security reports;
  3. Hybrid Identity Forensics combines the security measures in Azure ATP and Microsoft Cloud App Security, guarding against threats on-prem and in the cloud; and
  4. Long term security is a peace of mind with Identity in Microsoft Secure Score which provides the latest guidance on new threats that evolve on daily.

Information Protection

Protect Your Data: Whether being shared or being toted on the go, protect your sensitive data everywhere by controlling how a file is being used by:

  1. Identifying, Understanding and Discovering sensitive data across all apps, devices, and services including cloud and on-prem;
  2. Customizing Information Protection Policies by classifying and labeling documents based on sensitivity labels that you define. Configure protection actions such as access restrictions, visual markings, and encryption;
  3. Analyzing How Users Access and Share Sensitive Data in cloud services. By gaining insight, access to protected files can be revoked while policy violations and risky behaviour can be monitored; and
  4. Accelerating the Path to Compliance by enhancing privacy and security in compliance with the General Data Protection Regulation (GDPR) and other regulatory requirements.

Threat Protection

Integrate and Automate Security by:

  1. Protecting Against Threats by detecting and investigating compromised identities, advanced threats, and malicious actions across cloud environments and on-prem; and
  2. Securing identities so that malicious logins are blocked and threats are locked down, securing email, apps, documents, and data with the help of analytics to prevent phishing and 0-day attacks, securing endpoints with automated investigations to alerts and execution of remedial actions to threats, and securing the hybrid cloud infrastructure by safeguarding information, data, and servers from attacks by quickly detecting and blocking malicious activity running in the cloud or on-prem with advanced analytics.

Unified Endpoint Management with Microsoft Intune

  1. Support diverse mobile ecosystems by streamlining and automating deployment, provisioning, app delivery, updates, and policy management to iOs, macOS, Android, and Windows devices;
  2. Attain IT efficiency in the cloud through leveraging insights and baselines for security policies and configuration settings in a scalable globally distributed cloud service architecture; and
  3. Protect data with or without device enrolment continues on mobile devices through granular control over Office 365.

Microsoft Cloud App Security – Cloud Access Security Broker (CASB)

  1. Multimode Microsoft Cloud App Security integrates with leading Microsoft solutions to provide simple deployment, innovative automation, and centralized management; and
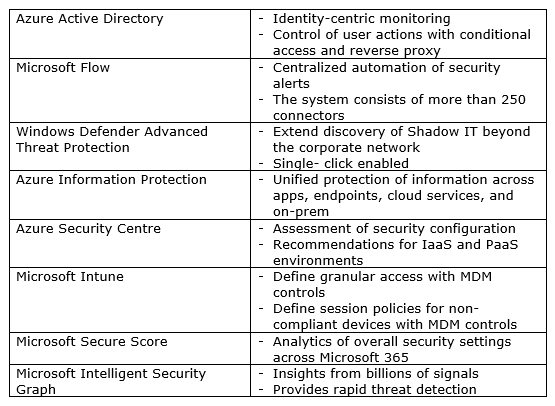
  2. CASB consists of the following:

Specialized Products in Office 365 EMS

  1. Azure Active Directory – protects user credentials while allowing users to connect to apps in a secure method;
  2. Microsoft Intune – cloud-based unified data protection, access management, and endpoint management;
  3. Azure Information Protection – cloud-based data classification, protection, encryption, and tracking;
  4. Microsoft Cloud App Security – a multi-node CASB providing behavioural analytics, data protection, risk management, discover, and threat protection;
  5. Microsoft Advanced Threat Analytics – protection against advanced and targeted attacks and insider threats for on-prem; and
  6. Azure Advanced Threat Protection – cloud-based solution to identify, detect and investigate compromises, threats, and malicious actions.

There is no one single software that can provide extensive and complete defences for increasingly complex forms of cyber threats and attacks. A tight defence requires a combination of several services that provide solutions to possible penetrations points, thereby working synergistically to provide full protection. Each group of solutions provides protection from different attack vectors, providing maximum coverage for security. With Office 365 Enterprise Mobility and Security, a comprehensive, end to end and fully integrated enterprise solution is provided for mobile security on devices, in the cloud, and on-prem.

Microsoft Search and SharePoint Search

Sharing of information and knowledge is the basis for a collaborative environment, but the collaborative environment is only as powerful as the capabilities built into the software that provide the abilities for the user to search for this information. Without strong searching capabilities, navigating to find specific information would be a major struggle, working against the whole premise of collaboration.

Microsoft Search is the powerhouse for bringing together search results from several data sources in Office 365 including SharePoint, OneDrive for Business, Teams, Groups, Yammer, and more. Driven by Bing’s search engine and leveraging AI, Microsoft Search brings data from within your organization and from the web in a single experience. Worry-free security authenticates users to ensure that only users allowed to access corporate content will receive the content by de-identifying search queries and logs, thereby separating these from public Bing search traffic. Microsoft Search is fully customizable allowing you to add your logo, use branding colours, company name, and more. This can all be accessed through the Microsoft 365 admin center.

With Microsoft Search, you have the flexibility to target specific groups of information to be shared with. Finding answers to questions, like troubleshooting, policies resources, can help support wise resourcing and decrease support costs by allowing users to become more independent in finding the answers that they are seeking.

The key admin features of Microsoft Search include the following:

  1. Enterprise Bookmarks: find information including sites and tools within your enterprise;
  2. Enterprise Q&As: here, you will find answers to the most frequently asked questions in your organization;
  3. Import and Export Bookmarks and Q&As: bulk importing, exporting and editing streamlines the creation and updating process;
  4. Location: on a map, locate your organization’s buildings, workspaces, and offices;
  5. Management: create content, configure, and define search keywords and phrases;
  6. Users and Permissions: both the Microsoft Search administrator and the Global Administrator will be able to authorize and add admins to manage the Microsoft Search configuration, editors who can create content, and end-users who can have access to Microsoft Search; and
  7. Analytics: provision of data of how your organization is using Microsoft Search.

What benefits will the end-user receive? These are a few of the key features for end-users:

  1. People: find people, understand their company role, projects they assigned and working on and contact information;
  2. Organizational Charts: a visual depicting a person’s place in the hierarchy of the organization, their peers, management and direct reports;
  3. Files: find relevant and contextual files on SharePoint and OneDrive for Business;
  4. Office 365 Groups: Find a group by its name, or by a member name, explore groups that a person belongs to, and browse shared content;
  5. Resources and Tools: find the information you need with links to internal and external resources;
  6. SharePoint Sites: search a site by name or see results for a group or person;
  7. Teams and Yammer Conversations: from public and group conversations, you can find contextual and relevant results;
  8. Locations: find the address and map results for buildings, campuses and offices; and
  9. First-Run Experience: for first-time users. With an initial sign in to Microsoft Search and Bing, they will receive information about using it including the types of work results they will find when they search.

SharePoint Online provides both a classic and modern search experience. Even though both experiences differ, they have one commonality and that is they use the same search index to find search results. With a modern search experience, your results shown are based on your previous activity in Office 365 and are very personal. Two users can use the same search parameters, but different content will be presented due to previous searches. Visual, intuitive and easy to navigate, the modern search experience provides ease of access and use for your users.

Because the modern search results page is not built with web parts, the modern search experience cannot be customized. However, the classic search experience can be customized and some of these customizations will have a limited impact on the modern experience. The following classic search settings will also apply to the modern search experience:

  1. Search Schema: this determines how content is collected in and retrieved from the search index. This will affect both experiences with the exception of the Sortable, Refinable and Company Name Extraction schemas which only apply to the classic search experience;
  2. Default Result Source: in the modern search experience, the results displayed are from the default result source only. If the default result source is changed in the classic search experience, it will also impact the modern search experience
  3. Remove Search Result: temporarily removing a search result will remove it from both experiences; and
  4. Promoted Result: users in both experiences will see organizational level promoted results. For the modern search experience, users will need to navigate to the All tab on the search results page and have searched across all of SharePoint to see the promoted results.

Whether you use the classic or the modern search experience, it is important to:

  1. Make sure that content can be found. Content will only be searchable once it has been crawled and added to the search index;
  2. Make the search results look amazing. Choose and create the right presentation format so that is it easy for your users to understand, access, and navigate;
  3. Show relevant search results. These can be customized by managing the search schema, query rule, query suggestions, result sources, result types, search dictionaries, authoritative pages, and with the export and import of search settings as well as using query transforms; and
  4. Check your analytics including logs, limits, and reports. These will provide information on whether the crawler has added content to the search index and if users are finding what they are searching for.

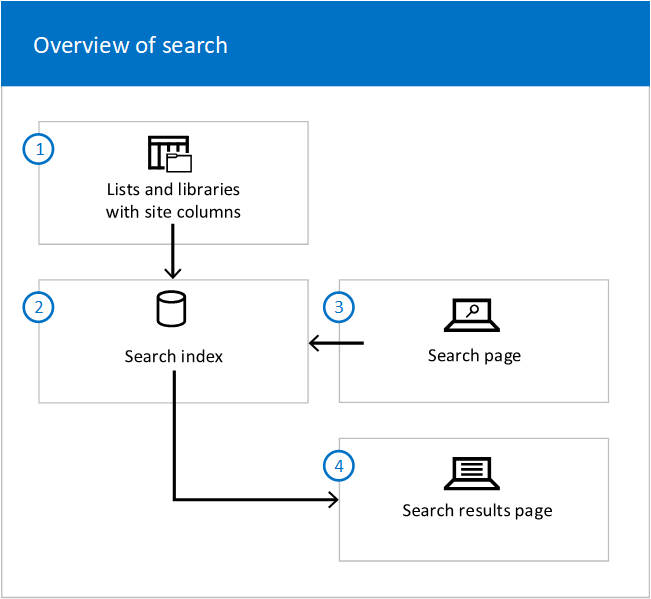
This all sounds great, but how does SharePoint Online search work? A simple explanation is that each document’s detailed information is stored within the site columns in the lists and libraries. The search follows this path and is graphically depicted:

  1. Crawling: Search crawls the lists and libraries. Site columns and their values are added to the search index;
  2. Search Index: in the search index, site columns are mapped to manage properties;
  3. Query Entry: the query that the user enters in a Search Box Web Part is sent to the search index; and
  4. Results: matching results are found by the search engine. These are then sent to a search results page and displayed in Web Parts.

By using the power of Bing’s AI search engine, Microsoft Search provides the powerful capability of searching for contextual content across several Office 365 platforms and the web to bring results to your organization and its users. Microsoft Search drives SharePoint Search, thereby providing your users the ability to search for content that is relevant to their projects, knowledge base, and skill sets across platforms and the web. Collaboration has never been easier and intuitive.

SharePoint 2019 New Features

The new features in SharePoint 2019 are based on three themes. These themes involve the users’ experience that is developed through SharePoint Online, content engagement across all platforms, and powerful scaling security and compliance capabilities.

What is new for SharePoint 2019? SharePoint 2019 will have many new and added features that enhance the “modern experience”, making it flexible, mobile, compelling and easier to use, especially for on-prem users. These new features include:

  1. SharePoint Home Page: The home page will provide users with the ability to easily find and access SharePoint sites within the organization. Additional information will include the news from the sites that they are following as well as from suggested sites. If the administrator has given the user permission, the user will have the ability to create new communication sites from the home page. There are three out-of-the-box templates available:

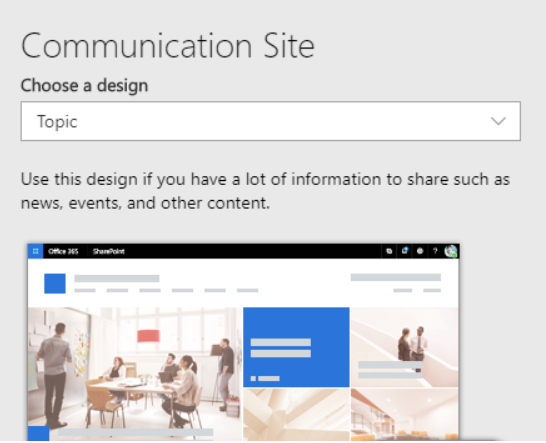
      Topic which consists of four default web parts (Hero, News, Documents, and Events);
      Showcase leverages the default Hero and Image Gallery web parts to visually highlight products, events, and people; and
      Blank which provides a clean canvas so that you can customize with your own modern web parts;

  2. Modern Lists and Libraries: Bringing List and Libraries in parallel with SharePoint Online, the modern experience is now the default for team sites, though Classic is still supported. Users will be able to copy and move files using the command bar as well as add files as links, filter and sort easily, pin documents, and apply column formatting including adding columns and rows to SharePoint Lists with JSON markup.

    By combining the powers of SharePoint 2019 and OneDrive, Libraries has a modern sharing experience with an updated and intuitive UI. Previous syncing and integration issues are now solved so that tasks, like creating new folders, saving documents, and uploading files in SharePoint and/or OneDrive, can be done at any time and from anywhere;
  3. New Team, Site Pages: As the communication site, users and teams can share messages, news, broadcasts and they can also display stories. With the new Hero web part, five items with text, image, and links can be displayed, drawing attention to the most important content;
  4. New Pages: Comprised of web parts, new pages are fully customizable to the needs of the user. Users will have the ability to add Word, Excel and PowerPoint documents, images, feeds like Yammer, site activities, and embed videos;
  5. Modern Search Experience: Using intuitive logic, the modern search experience will suggest relevant content before the user enters a keystroke. The results update as the user types in the criteria. The search results page shows an overall of search results and is grouped by type;
  6. Lists: The modern lists simplify how users and teams create, curate, and interact with the information. Individuals and teams will be able to share, access, and collaborate around structured data. Additionally, information from other systems can be leveraged into SharePoint to support business processes.

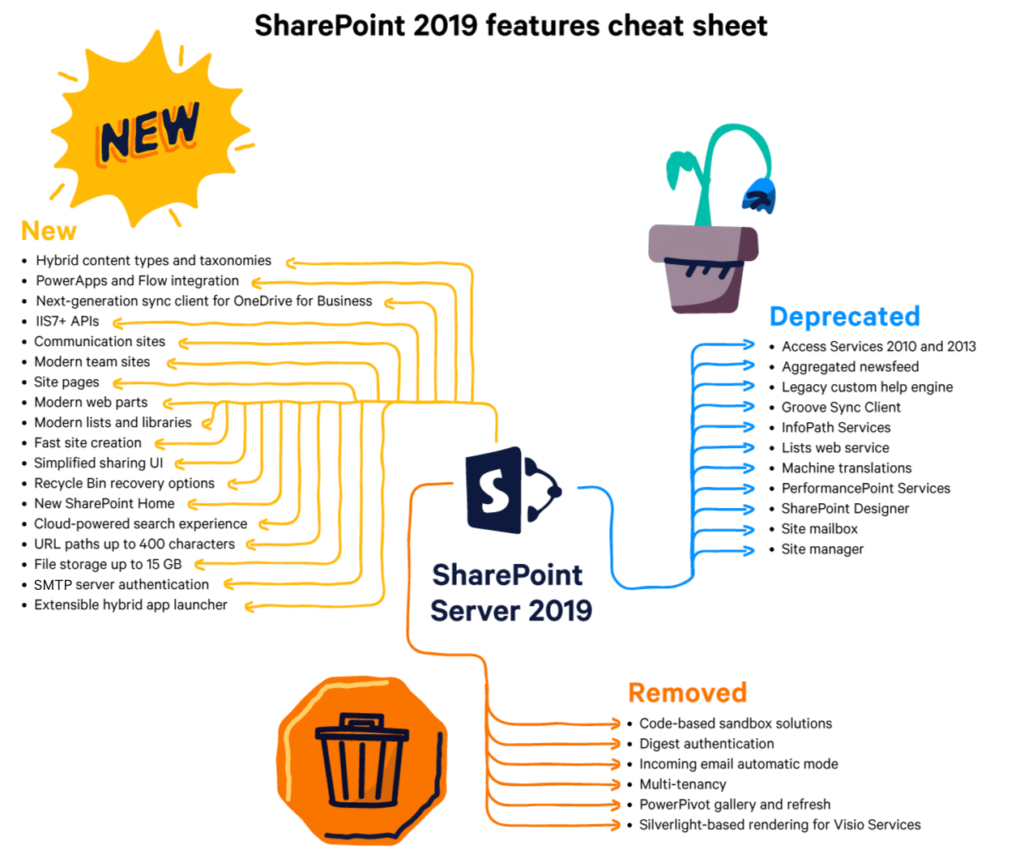
True to its purpose, SharePoint continues to support collaboration between teams and individuals in their organizations. As SharePoint updates to 2019, there will be some features in 2016 and 2013 that will be deprecated and these six features will be:

  1. Aggregated Newsfeed: The tile in the app launcher and the option to implement the newsfeed capability will be removed. The existing aggregate newsfeed will become read-only. The suggested solution is to use communication sites and Microsoft Teams;
  2. Custom Help: The existing engine in SharePoint will be removed in the future. For the Microsoft legacy on-prem SharePoint help engine, it will be updated and will synchronize with O365;
  3. SharePoint Designer 2013: SharePoint Designer 2013 will continue to function with SharePoint Server 2019 until 2026 where support will officially end. Alternatives include PowerApps and Microsoft Flow and both are available via the on-prem data gateway;
  4. Multi-Tenancy: Inline with migrating services to the cloud, multi-tenancy capabilities are building dependencies on cloud technologies, and for on-premises environments, these capabilities are not available. Due to costs and complexities of providing on-prem alternatives, multi-tenancy will no longer be available;
  5. Visio Services: Rendering based on Silverlight will no longer be supported effective October 12, 2021. Switching to PowerBI is the recommended solution; and 6. Code-based Sandbox Solutions: These customization packages deployed at the site collection level have already been removed from SharePoint 2013 and SharePoint Online. They will be removed from SharePoint 2019. SharePoint add-ins are the suggested alternatives.

Summarizing the added new features and the deprecation of others, is a handy cheat sheet below:

Credits: ShareGate.com

The Modern Experience is not only here to stay, but it is being integrated into SharePoint 2019. If an older version of SharePoint on-prem is being used, it is highly recommended that the upgrade to SharePoint 2019 be implemented. With nearly all the modern functionalities available, it will bring on-prem up to par with SharePoint online. With SharePoint 2019, user experience and collaboration become modernized with greater ease of access and use for individuals and teams. 

About Me

About Me

Welcome to my Office 365 blog and thank you for taking the time to get to know me better.

I am a Microsoft Office 365 MVP with 24 years in Information Technology consulting, 16 years of this experience with expertise in SharePoint and the Microsoft Content Management System.

I am an active member of the SharePoint Community and have been a guest speaker at numerous events, including SharePoint and corporate events, functions, and conferences at local, regional, national, and international levels.

As a Cloud Solutions Architect, I provide Office 365 and Azure services including architecture planning, migration, and governance for medium to large-scale organizations. My designs, architecture, and implementation for Office 365 solutions include Teams, SharePoint, Content Services, Collaboration, Power Platforms, and Search.  

Our community of SharePoint members is a collaborative team, and I am fortunate that I have opportunities to meet and work with many talented colleagues. I hold great respect for their passion and dedication and am proud to be an active member of the Microsoft Office team specializing in SharePoint technology.

My articles contain valuable, up to date information and should you have any questions or have inquiries as to services that I can provide you, please click on the Contact Me button at the top right and complete the form. I will be happy to connect with you and answer your inquiries.

SharePoint Online: Site Design and Site Scripts

Administrators of SharePoint Online can create and upload custom site templates with the use of the Site Designs and Site Scripts features. These two features are supported for SharePoint Online subscribers and for the Modern Team and Modern Communication Sites. With Site Designs and Site Scripts, users will be able to use these customized templates during their site creation process.

Why use site designs and site scripts? Standardizing and maintaining branding consistencies are two examples of why site designs and site scripts should be used. These features automate the provisioning of new or existing modern SharePoint Online sites with custom configurations when new sites are created by users within the organization.

How do Site Designs Work?

A Site Design is very similar to a template as it can be applied each time a new site is created so that a consistent set of actions occur. Site Designs can be applied to existing Modern Sites, especially to connected groups in Team and Communication Sites. Site Design can include various actions such as setting the site theme, creating lists, sending a tweet, or recording the new site URL to a log (these are just a few examples).

Site Designs can be created and then registered in SharePoint Online to either the modern template Team Site or the modern template Communication Site. This can be done by:

  1. Go to the SharePoint homepage on your developer tenant;
  2. Choose Create Site;
  3. Two options will appear: Team Site and Communication Site;
  4. Choose Communication Site; and
  5. Choose one of the three default Site Designs that appear in the Choose a Design box. The three options are Topic, Showcase, or Blank. For each site design, there is a title, description, and image.

SharePoint creates the new site based on the site design that is selected. As it creates the new site, site scripts are ran in the background that provide the details for the site design. Details might include theme colors that match corporate branding, a color scheme that works with branding, or the creation of new lists. The site creator can click on the notification bar to view the status of the actions being applied.

Once the site scripts are completed, the notification bar message will change, offering options for the site creator to either refresh the page to see the results of the applied scripts, or to view the site script details.

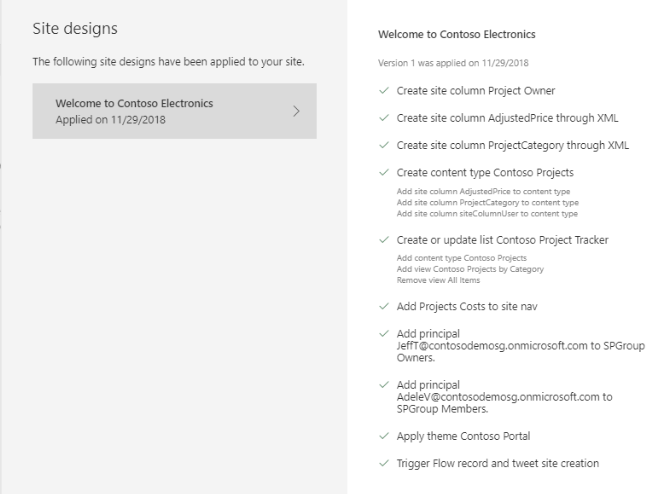
In December 2018, with roll out to be completed worldwide by early 2019, the site design information panel can be invoked by a site owner to see what site designs have been applied to the site. This can be invoked at any time. Script details will also be available plus new or updated site designs can easily be applied through the panel.

SharePoint will display the detailed results of the actions in the scripts in a progress pane once the actions are completed. An excellent point to note is that site design can be applied to previously created modern site collections!

What is a Site Script?

What composes a site script? Site scripts are JSON files that specify an ordered list of actions to run when creating a new site. The orders are ran in the order that they are listed. We could delve into the anatomy of a JSON script file, but we will leave that for now. Instead, understanding what a JSON script file consists and its schema will suffice.

Each action in a site script is specified by a verb value in JSON. Actions that are available include: creating a new list or library, modifying the default list or library that is created with the site, creating site columns, content types and configuring other list settings, applying a theme, setting a site logo, adding navigation, triggering a Microsoft Flow, installing a deployed solution from the app catalogue, setting regional settings for the site, adding principals such as users and groups to SharePoint roles, and setting external sharing capabilities for the site.

After provisioning, Site Scripts can be re-run. Re-running the Site Script will not cause any damage to the script. It will simply ensure the site matches the configuration in the script. There is a new limit of 100 site scripts and 100 site designs per tenant. Site designs and site scripts can also be created by using PowerShell or the REST API.

Triggering a Microsoft Flow

Microsoft Flow can be triggered by a site script, which provides the flexibility of specifying any custom action that is required beyond the native site scripts.

Microsoft Flow can be integrated with site designs if the PnP provisioning engine is used to automate site creation. All existing provisioning scripts can be maintained, and new custom provisioning scripts can be created by using this technique. How does this work? The process works like this:

  1. The script instantiates your Microsoft Flow using an URL with additional details;
  2. The Flow sends a message to an Azure storage queue that you have configured;
  3. The message triggers a call to an Azure function that you have configured; and
  4. The Azure function runs the custom script to apply the custom configurations. An example of the custom script is the PnP provisioning engine.

Targeting or Scoping

To ensure that only people that are intended to see the site see it while excluding others, site designs can be configured for specific groups or individual people in the organization. When a site design is created, the default is to allow everyone to view it. Your target group or individuals, your scope, can be applied by using the Grant‑SPOSiteDesignRights cmdlet or the GrantSiteDesignRights REST API. The scope can be specified by user or a mail-enabled security group.

With Site Design and Site Scripts, site owners can ensure consistent and standard values to Modern Team and Communication Sites that users in the organization are creating. These automated actions run in the background and provide assurance that users will create new sites that will reflect the organization’s branding and will also ease the process of creating new sites. New sites can be scoped for specific groups, or individuals, to ensure that only the users who need access to view and use will have it while excluding others.

SharePoint: Modern List Column Formatting

Column formatting provides the ability to customize how columns or fields are displayed to the end users and is available within SharePoint List and Libraries. It provides fast, informative, and visual information to the end user. To achieve this, a JSON object describes the elements that are displayed when a field is included in the list view, and it also specifies the styles to be applied to those elements. Column formatting will not affect the data in the list item or file. The column formatting only changes how this data is presented to the users who browse the list. Those who have permission to create and manage views in a list can access column formatting to configure how the view fields are displayed.

The following on the left is an example of a List without any column formatting:

However, if fields are customized with column formatting, then the appearances of the fields Effort, Assigned To, and Status can convey the information graphically and quickly, as shown in the graphic on the right.

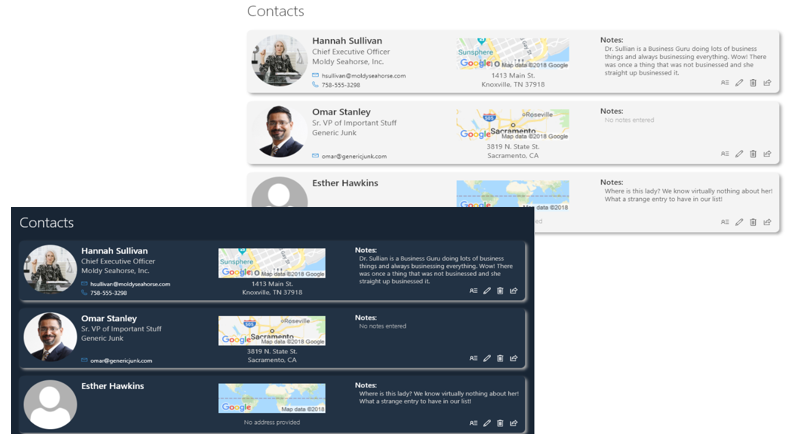
The GitHub repository (link: GitHub repository),  dedicated to open-sourced column formatting definitions, provides numerous examples and samples. Column formatting can be simple like the one above, or it can become quite complex whereby each field is customized, including colour themes as shown in the graphics below.

How to Apply Column Formatting

There are three opportunities to apply column formatting. You can apply column formatting to:

1. A Site Column. This then provides the flexibility to apply the same column formatting to multiple lists which use the site column or content type;

2. An existing column. Select the Column drop-down. Choose Column Settings and then Format this Column; and

3. A new column. When creating a column, apply the column formatting by editing the properties of the column.

Column Formatting versus Field Customizer

It is important to note that column formatting is not the same as the Field Customizer. Though both provide the ability to customize how fields in SharePoint lists are displayed, their applications are different.

The Field Customizer is more powerful than column formatting as it allows you to write code to control how a field is displayed. This includes dynamic action links, such as active hyperlinks that invoke custom scripts when clicked on, as well as arbitrary data visualizations.

Column formatting is less flexible as it does not allow custom code. Instead, it allows for predefined elements and attributes, which makes it much easier for users who are not JSON experts. Data visualizations supported are simple and these can be expressed using HTML and CSS. Action links, such as active hyperlinks, are not supported. There is only support for static hyperlinks that do not launch a script.

Column formatting is much easier and quicker and is the suggested method of customizing column fields. For advanced scenarios where column formatting does not provide support, then one could use the Field Customizer.

Column Formatting

  1. Open the column formatting pane;
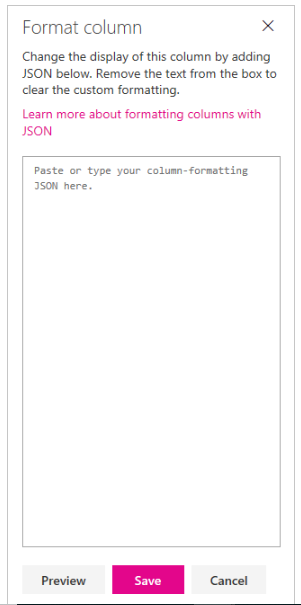
  2. Click on the drop-down menu under Column. Choose Column Settings and then Format this column;
  3. In the box, enter the column formatting JSON.

    If a field has no specified formatting, then the default rendering will be applied.

    Unless you are experienced in JSON, it is suggested that for the column formatting, you go the SharePoint GitHub repository and find an example or sample that closely resembles what you want the column to look like. Once you find the sample, copy the JSON column formatting. Paste this into the box.

    Edit the lines to customize to your needs.

    This is simpler and quicker than writing the code from scratch;
  4. You can Preview your formatting before Saving your changes;
  5. Once you are satisfied with the column formatting, choose Save to save your column formatting.

    Once saved, users who view the list will see the customization that you applied.

What can you do with Column Formatting?

With column formatting, you can do the following:

  1. Display basic field values;
  2. Apply conditional formatting;
  3. Apply advanced conditional formatting that is based on the value in a choice field or text;
  4. Apply formatting based on date ranges;
  5. Format items based on arbitrary dates;
  6. Compare a date/time field against another date constant;
  7. Create clickable actions:
    a. Turn field values into hyperlinks;
    b. Add an action button to a field;
  8. Create simple data visualizations:
    a. Format a number column as a data bar;
    b. Show trending up/trending down icons; and
  9. Create a button to launch a Flow.

Because not all column types are supported for column formatting, it is important to remember which ones are. The supported columns include single line of text, number, choice, person or group, yes/no, hyperlink, picture, data/time, lookup, and title (in Lists).  Column types that are not supported include managed metadata, filename (in Document Libraries), calculated, retention label, and currency.

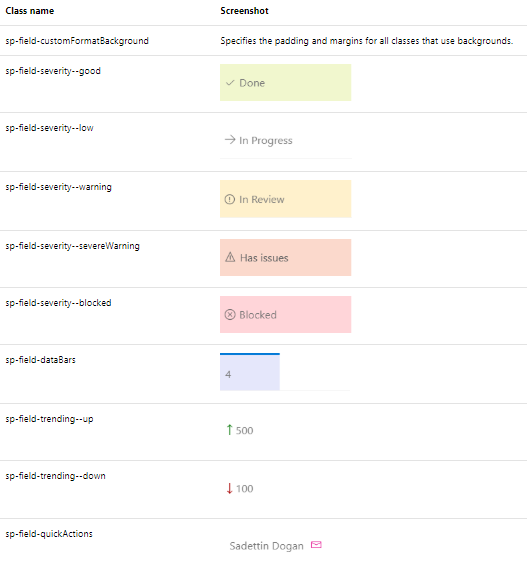
To simplify things further, predefined classes exist in the style guidelines. The predefined classes are explained in the adjacent graphic.

Note that the icons for the sp-field-severity classes are not a part of the predefined class. These can be added by using the iconName attribute. Only the background colour is included for these classes.   Alternately, you can use predefined icons from Office UI Fabric.

What if I Want to Write My Own JSON?

Whether you are an expert with JSON or you are new to it but have an understanding of its schema, you can create and write your own custom JSON.

Creating your own custom JSON for column formatting has been made simple by following these steps:

  1. Download Visual Studio Code (it is free!);
  2. Create a New File;
  3. Save the empty file with the extension .json;
  4. Copy and paste the following lines of code into your empty file: 
    { “$schema”: “https://developer.microsoft.com/json-schemas/sp/column-formatting.schema.json”  }

This provides validation and autocomplete to create your JSON. You can now start adding your JSON after the first line that defines the schema location. Visual Studio Code will offer suggestions for properties and values. Simply select Ctrl + Space at any point.

With the versatility and flexibility of column formatting, you can visually communicate relevant information to the users. It is simple, quick, and with the help of the GitHub repository, one can access hundreds of samples and examples of various JSON objects to achieve the field customization that one wants. And for those who are well versed with JSON, you also have the option of writing your own to customize the column formatted fields.

SharePoint and Microsoft Flow – Part 3: Creating a Custom Flow Template Gallery

New flow templates can be created from existing flow templates located in the Flow Template Gallery, or one can create a new flow template from scratch. If using an existing flow template, the flow template can either be downloaded from the Microsoft Flow Template Gallery (a public gallery) or from your organization’s Custom Flow Template Gallery (a private gallery). Once downloaded, the template can be easily modified to meet your business automation needs.

There are many different types of flow templates that are organized into collections that are based on the purpose of the flow. We reviewed the five types of flows in a previous instalment, SharePoint and Microsoft Flow: Automating Business Processes.

Sharing your newly created template to your organization’s Custom Flow Template Gallery is simple and straightforward:

  1. Create your flow template either by creating from scratch or modifying an existing template from your organization’s Custom Template Gallery or by importing a template from the Microsoft Template Gallery;
  2. Go to https://flow.microsoft.com/en-us/ and sign in. Note that there is no Office 365 tenant level to share templates with other users; hence, sharing must utilize the Microsoft Flow website;
  3. Click on the My Flows tab;
  4. Choose the flow that you would like to submit;
  5. Click the ellipses on the right-hand side;
  6. Choose Export (in the Microsoft Flow Resource Community, there is a step by step guide on how to Export);
  7. Once you choose Export, the flow will be turned into a zip template file;
  8. Name the Flow with a descriptive name so it clearly explains what it does;
  9. Under Package Content, there are two options for import set up. The default option is Update where an existing flow will be updated. The second option, which is chosen when creating a new template, is Create. Once you have completed these steps, choose Save;
  10. Choose Export on the next screen. This will now package and download it as a zip file;
  11. Return to the Template Page. Click New and then Item under the Submit New Flow Template. This will now load a custom power apps form that is automated to alert approvers that there is a new submission for the Gallery. Provide the name of the Flow, an accurate description, attach the zipped file, and then choose Save.

    You will be redirected to the Submit a New Flow template page. Your template has now been submitted for review and approval by your organization’s Flow Approval Team. Depending upon volume, it may time some time before the Approval Team is able to review your template.       

    If the Approval Team rejects your submission, they will have the opportunity to provide a brief explanation as to why it was rejected. Once rejected, it will be automatically removed from the list to eliminate any confusion as to whether the flow is being reviewed, pending, or rejected. If it is approved, it will be made available to the users in your organization in the Custom Flow Template Gallery. Being a very collaborative system, it can be downloaded, copied and used by corporate users as is or they can modify to their needs.

It is important that the Approval Team automate a flow to notify them when a new submission is sent. Without this, it will be difficult to track the submissions. It is also highly suggested that a flow is used to delete rejected flows from the list to keep it clean.

Sharing in the Public Microsoft Flow Template Gallery

Creating a new template or modifying an existing template follows the same steps as described previously.

Submitting the new flow template is the same process as well, but the difference between the Microsoft Flow Template Gallery and your organization’s Custom Flow Template Gallery is that when you submit to Microsoft’s Gallery, the template is routed externally, not internally, to Microsoft’s Flow Approval Team.

Sharing Microsoft Flow Templates in a Customized Gallery

It may not be optimal to share flow templates in the public Microsoft Flow Template Gallery, but sharing internally within your organization, without compromising data security or exposing proprietary connections, is preferred to encourage collaboration. A Custom Flow Template Gallery in SharePoint Online addresses these issues.

By integrating Microsoft Flow with SharePoint, many business functions can be automated to help eliminate repetitive tasks but by creating new or modifying existing flow templates from a gallery and sharing these with either the world or within your organization, processes can become more streamlined, efficient and accurate.  By creating, supporting, and encouraging a self-service resource community of users with access to resources, knowledge, and training, the users will learn, create and implement flows in a collaborative environment.