Hybrid BCS – Part 2 – Create an OData Source


The BCS hybrid scenario supports connecting only to an Open Data protocol (Odata) source. If your external data already has an OData service endpoint, then you can skip the creation of an OData service endpoint portions of this procedure.

Using Visual Studio 2013, create an empty ASP.NET web application calling it NorthwindWeb, and follow these steps:

Add an ADO.NET Entity Data Model


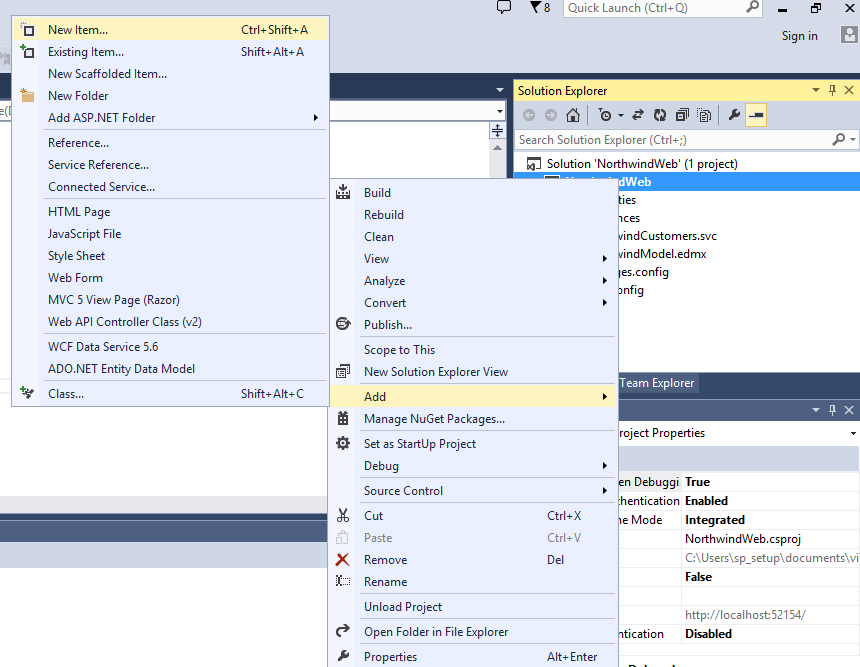
  1. Right click on the project and choose Add >> New Item
  2. Select Data under Visual C#
  3. Select ADO.NET Entity Data Model
  4. Call it NorthwindModel.edmx
  5. Click Add
  6. Select Generate from database in the Entity Data Model Wizard
  7. Click Next
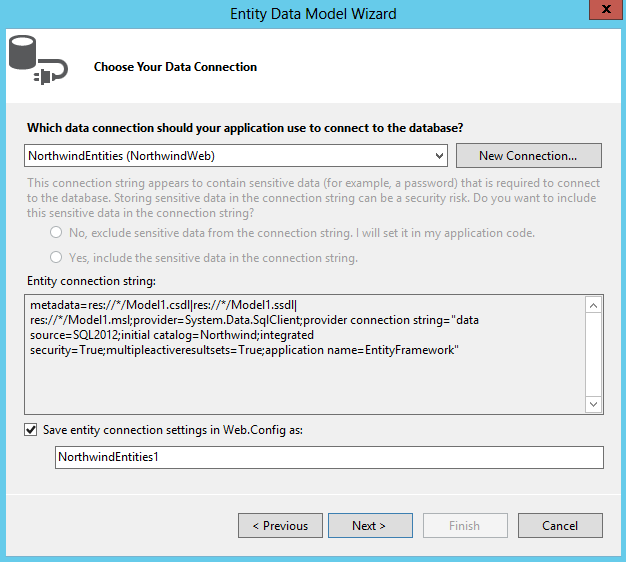
  8. Choose New Connection if you do not have an existing connection, or connect to an existing one
  9. Click Next
  10. Select Entity Framework 5.0
  11. Select all the tables
  12. Click Finish
  13. Compile the project.

Add a WCF Data Service

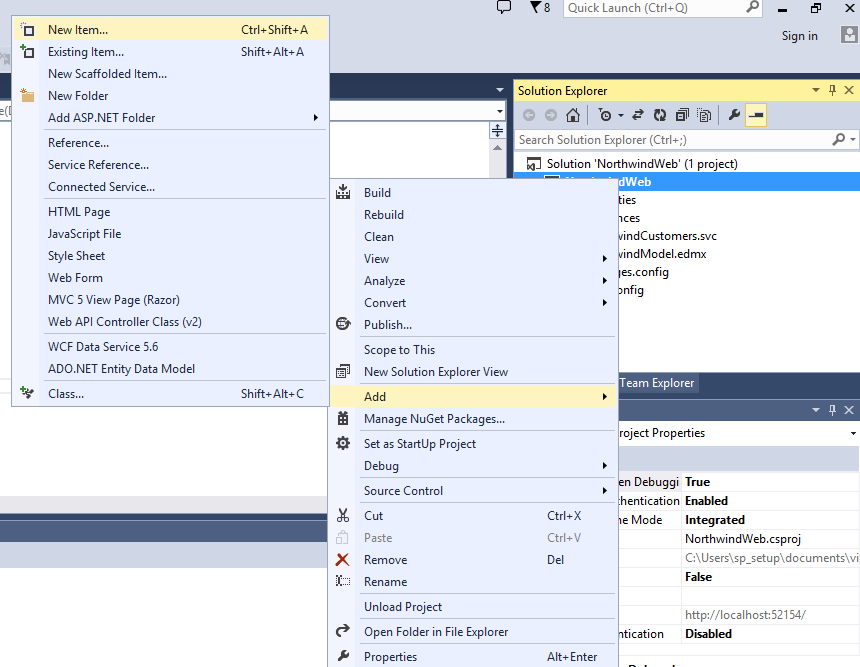
  1. Right click on the project and choose Add >> New Item
  2. From the Web node choose the WCF Data Service 5.6 item
  3. In the Name text box, enter Northwind
  4. Click on Add
  5. Edit the code for Northwind to update the following: 


    1. public class NorthwindCustomers : DataService <NorthwindEntities>
    2. Replace the comments in the InitializeService event handler with the following: config.SetEntitySetAccessRule(“*”, EntitySetRights.All);
  6. Compile the project.

This should be for creating an OData Source.

<< Prevoius – Part 1 – Introduction to Hybrid BCS Architecture

>> Next – Part 3 – External Content Type Configuration

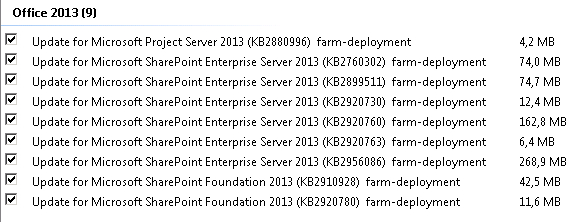
SharePoint Patches are now part of Windows Update

Starting with the February 2015 CUs, all SharePoint updates will be part of the Windows Update.

In a blog from Stefan Goßner, he indicates the changes will start with this months' CU.

SharePoint February 2015 CU

What does this mean to you?

1. Should I configure my server for auto update?
No, it is always best practice to schedule your windows server update. Change your Windows update configuration to notify you when there are updates ready to be installed, or schedule a manual check of your Windows Update. This way, you can coordinate your updates on all your servers in your farm at the same time.

2. Should I run the Windows Update on all the servers?
Yes. If you run your Windows Update on one server in the farm, then you will have to run it on all servers in the farm, so all servers have the same patch level.

3. Should I run the Configuration Wizard after the Windows Update?
Yes. You have to run with Configuration Wizard every time you have a Windows Update that includes a SharePoint patch.

In a nutshell, you need to plan your Windows Update for your SharePoint farms the same way you have done it in the past. What have changed is the patches are now pushed down to your server and it is up to you to manage it according to Microsoft's recommended approach. Always apply your patches in your Development and Pre-Production Environments before applying them to your Production farm. Make sure you do your homework from testing perspective and backups before applying any patches.

However, it is always recommended to apply the latest security updates to your environment as they contain important fixes to the platform.

Branding your public facing site

SharePoint 2013 has made life much easier for developers to create a responsive website without much efforts and all done with no customization required. With the introduction of the design manager, you can easily brand your SharePoint publishing site from your HTML composites​ files. This can be done either with SharePoint on-premise farm or SharePoint Online.

This post will walk you through how you can create your master page and brand your site in few hours.

First, you need to create a Publishing Site Collection. Design Manager only works with a site collection.


Navigate to the site collection you have created, click on Site Settings icon then select Design Manager.


In the Design Manager page, you have few options to choose from, but in this post we are going to focus on 3 sections only that will allow us to brand a SharePoint site based on existing HTML5/CSS3 composites.

In the Quick Launch Navigation, click on Upload Design File.

This will show you a URL that you need to map the network drive to it:


Go ahead and map your network drive to the URL, in my case it is http://sp2013/_catalogs/masterpage

The picture above shows you how your SharePoint Site Collection Catalogs list shows up in File Explorer.

Now, Drag the folder that contains your HTML5, CSS3, JS, Images, etc… into the \_catalogs folder. Note that you need to drag and drop the entire folder and not only the files individually. I suggest to keep them all under the same folder, so you can better manage them within SharePoint.

As you can see, my HTML composites that I received from my designer are copied into my \_catalogs folder:

Next, go back to the Design Manager web page, and click on Edit Master Pages.

Click on the link that says Convert an HTML file to a SharePoint master page. Select your HTML file that you just upload. This will convert your HTML file to a master page, add all the necessary controls, and will fix the reference links to your JS, CSS, and Images locations. This will also create your master page. If you navigate to your \_catalogs list, you should see your master page has been created automatically.

You might have warnings and errors in the status of the conversion; click on the link that says warning and errors. The page will show you where are the errors. SharePoint 2013 validates your HTML5 structure, to make sure it is written properly. For example in my case, the HTML code did not have an empty space in one of the tags.

To fix it, open the HTML file from the \_catalogs list on your site. Go to your file explorer where you mapped the catalogs list, and open the HTML, NOT the master page in any HTML editor. You do not need to use SharePoint Designer. I personally prefer NotePad++, but you can chose any other HTML editor such as DreamWeaver, Eclipse, etc…

When you have corrected all the errors in the HTML, your master page associated with your HTML file is ready to be used as your default master page. Before doing so, you may want to add some dynamics controls to your master page, such as Top Navigation, Vertical Navigation, Search box, etc…, or you can add your own custom controls.

To do so, click on the Snippets links located on the Master Page preview. Note that this is the only place where you can find the Snippets link.

Clicking on each snippet will give you the code you need. Copy the code and paste it in the appropriate place in the HTML file. For example, you want to replace your static HTML navigation with the Top Navigation snippet to make it dynamic.

When you are done, you may want to clean up your converted HTML file to remove all the static content and replace them with either nothing, or placeholders for your Publishing HTML fields used in your page layouts.

When you are satisfied with your master page, you can publish it. Note that you need to publish your HTML page; this will automatically publish your master page.

At this time, you can start using your new master page as your default branding template.

SharePoint 2013 Search Crawl Timeout Issue

​Implementing SharePoint 2013 in a secure zone as an extranet application might be challenging, if you are deploying your farm in a zone with many restrictions.

Recently, I deployed a large SharePoint 2013 farm in a DMZ zone for a regulated portal. Regulated data in my case meant the following restrictive rules in the network and on the servers in the farm:

  • Strict GPO Policies
  • WFE, Application, Search, and SQL servers are hosted in different subnet zones
  • Everything is blocked on the firewall unless specific ports are requested to be open
  • Outbound internet access is disabled on all servers.

Configuring SharePoint in this environment was not a straight forward exercise. After disabling some GPO policies to allow the creation of the IIS web applications, we had to map out the communication between all the servers so the firewall ports are open, allowing each server in the farm to talk to each other.

To get a better understanding of the ports required in your farm, you can follow this TechNet article. It explains the details of each port and its use.

Configuration SharePoint was successful; everything worked, the portals are up and running, content is being populated, User Profile Service Synchronization is working, and the Search Service Application is up and running.

However, I was faced with a very challenging issue when crawling content. Crawling the SharePoint content source always returned a "timeout" error in the logs. Resolving this issue took a lot log monitoring, custom code to monitor the traffic, and long nights.

This means that the search crawl is sending an HTTP request to your portal, but it is not receiving an answer back. The authentication is fine, security is OK, but there is no HTTP trip back to the crawl server.

There are my suggestions to a Search Crawl Timeout issue; one of the following suggestions might resolve your issue:

  1. Make sure you disable the loopback on the crawler server. In my case, this did not help at all.
  2. CRL Check: Most DLL assemblies are digitally signed.  Each time signed assemblies are loaded, default system behaviour is to check with the owner of the root certificate that the cert with which the assembly was signed is still valid. SharePoint 2013 search checks few certificates, like crl.microsoft.com or *.akamaitechnologies.com. To resolve this issue, open the outbound internet connection . If this is not doable, then install the crl.microsoft.com certificate on the server, or add an entry to local server host file like this: 127.0.0.1 crl.microsoft.com. This way certificate checks does not need to validate the certificate over the internet;
  3. Add exceptions on the firewall to allow traffic for the certificates; or
  4. Open Internet; or
  5. Revisit the firewall rules.


I suggest to first looking into the firewall rules again. 9 out of 1, it is the firewall that is doing funny things to block traffic between the servers. In my case, the security team were using Cisco Smart Care firewall, which is an advanced firewall and it does not only look at the ports' rules. You will have to create exception for applications, because it detects SharePoint and it automatically blocks it if SharePoint as an app is not listed as one of the trusted apps.


SharePoint 2013 Distributed Cache Logon Token issue

​Distributed Cache Service (DCS) is a customized version of Windows App Fabric deployed in SharePoint 2013.

The Distributed Cache service provides caching functionality to features (not to be confused with site features) in SharePoint Server 2013. The Distributed Cache service is either required by or improves performance of the following features:

  1. Authentication;
  2. Newsfeeds;
  3. OneNote client access;
  4. Security Trimming; and
  5. Page load performance.

For more detailed about managing and deploying DCS, you can visit this TechNet article.

While implementing a SharePoint 2013 farm, I encountered some errors loading newsfeed, and a decrease in the farm performance.

While examining through the ULS logs, I immediately noticed a lot of dozens of DCS errors logged every 60 seconds. The error was:

Unexpected error occurred in method 'GetObject' , usage 'Distributed Logon Token Cache' – Exception 'Microsoft.ApplicationServer.Caching.DataCacheException: ErrorCode<ERRCA0018>:SubStatus<ES0001>:The request timed out


The Distributed Logon Token Cache stores the security token issued by a Secure Token Service for use by any web server in the server farm. Any web server that receives a request for resources can access the security token from the cache, authenticate the user, and provide access to the resources requested.

Tracing through the logs, I saw that when a user accesses a page, SharePoint attempts to authorize the user to ensure access can be granted. SharePoint stores the user’s token in the user's browser session and in the DistributedCacheLogonTokenCache container. When SharePoint tried to retrieve the token from distributed cache, the connection would time out or a connection would be unavailable and the comparison would fail. Since it couldn't validate the presented token SharePoint had no choice but to log the user out and redirect them to the sign in page.

In general, the problem might cause failures or performance problems of the following:

  • Authentication: Users will be forced to authenticate for each Web front end in a load balanced environment;
  • Search web parts;
  • Social comments;
  • Newsfeeds;
  • OneNote client access;
  • Security Trimming; and
  • Page load performance.

After further research, I found out that Out of the box, AppFabric 1.1 contains a bug with garbage collection and this impacts the SharePoint 2013 farm with the March 2013 CU.

Resolution

  1. Apply the AppFabric CU 4, or a later CU on all of your servers in the farm;
  2. Restart the AppFabric Service on all servers;
  3. Restart DCS service on the servers where the service is running; and
  4. Perform an IIS reset.

Missing Content Search Web Part

In SharePoint 2013, all the content can now be surfaced using search.  The Search driven  web parts have their own Querying Builder user Interface which makes it very easy to select, filter and display the data that you want. However, content Search Web Part is only available in SharePoint 2013 Enterprise Edition. If you are using the Enterprise CALs, then you should see the search driven web part in your web part gallery.

But, this is not always the case if you have played around with the licensing in the farm. SharePoint 2013 provides a new feature called SharePoint User License Enforcement (SPULE) that a lot of people may not be aware of.  SPULE means that we can have a mix of different licenses in a single farm.  What this means, is that Enterprise features can be made available to those who need it, and Standard features to others.  This can save an organization a substantial amount related to cost of Client Access Licenses.

If for some reason you ran this command line: Set-SPUserLicensing, this will actually disable all your search driven web parts. Note that by default, the SPULE is not enabled.

To get an overview of the SPULE in your farm, run this command: Get-SPUserLicensing. If true is returned, this means that the SPULE has been enabled on your farm.

What you need to do is to disable the SPULE, and the Search driven web parts will appear again. Run this command Disable-SPUserLicensing, and voila! Your web parts are back in the gallery!

Note: You can set the SPULE based on different AD groups, and you can set it for different type of licenses. This TechNet article will explain to you how you can manipulate different SPULE in your farm.

SharePoint 2013 Search with SharePoint 2010 Farm

 Many customers are excited about the new features that SharePoint 2013 brings to the table. Small or large organizations who have implemented any SharePoint implementation project size hesitate to upgrade for many reasons, but they want to take advantage of some the new features of 2013.

Recently, I ran into a similar situation where I am working with a client who prefers to stay on SharePoint 2010 for content and collaboration, but instead of implementing FAST for SharePoint 2010, they decided to use SharePoint 2013 for search.
As we all know, F4SP is part of the 2013 platform now and it is not a standalone product anymore. For this reason, my client’s vision was to better off use SharePoint 2013 for search, rather than F4SP then go through the headaches of migration F4SP to 2013 or any future release of the product.
The introduction of the Service Applications in SharePoint 2010, made life easier to implement scalable architecture and to create large multi-tenants farms, where you can share and publish service applications across different SharePoint farms. The same architecture is carried to 2013, and now we have the ability to publish service applications from 2013 to 2010, allowing customers to take advantage of some new features of the 2013 platform.
Note that 2010 can consume 2013 service applications and not the other way around.
Here is a list of the service applications that you can publish in 2013 and consume in 2010:
1.     User Profile Service
2.     Search Service
3.     Managed Metadata Service
4.     Business Connectivity Services
5.     Secure Store Service
In my case, I will be providing details on how to publish the Search Service Application in 2013, and consume it in 2010 using the Search Center.
First Step: You need to establish a trust relationship between the two farms:
1.    Export the Farm and STS certificates from the SharePoint 2010 farm:
$rootCertificate = (Get-SPCertificateAuthority).RootCertificate
$rootCertificate.Export(“Cert”) | Set-Content C:\Certificates\2010FarmRoot.cer -Encoding byte
$stsCertificate = (Get-SPSecurityTokenServiceConfig).LocalLoginProvider.SigningCertificate
$stsCertificate.Export(“Cert”) | Set-Content C:\Certificates\2010FarmSTS.cer -Encoding byte
 
2.    Export the Farm certificate from the SharePoint 2013 farm:
$rootCertificate = (Get-SPCertificateAuthority).RootCertificate
$rootCertificate.Export(“Cert”) | Set-Content C:\Certificates\2013FarmRoot.cer -Encoding byte
 
3.    Import the SharePoint 2013 certificate into the SharePoint 2010 farm:
$trustCertificate = Get-PfxCertificate C:\Certificates\2013FarmRoot.cer
New-SPTrustedRootAuthority “2013 Trust”-Certificate $trustCertificate
 
4.    Import the SharePoint 2010 into the SharePoint 2013 farm:
$trustCertificate = Get-PfxCertificate C:\Certificates\2010FarmRoot.cer
New-SPTrustedRootAuthority “2013 Trust” -Certificate $trustCertificate
$stsCertificate = Get-PfxCertificate C:\Certificates\2010FarmSTS.cer
New-SPTrustedServiceTokenIssuer “2013 Trust” -Certificate $stsCertificate
 
Second Step: You need to publish the Search Service Application and set the permissions:
1.    Go to Central Admin à Manage Service Applications
2.    Click on your Search Service Application
3.    Click Publish; make sure you select the checkbox next to “Publish this Service Application to other farms”
4.    From the SharePoint 2010 farm, run the following command to get the Farm ID:
$farmID= Get-SPFarm
$farmID.Id
 

5.    From the SharePoint 2013 farm, run the following commands:
$security=Get-SPTopologyServiceApplication | Get-SPServiceApplicationSecurity
$claimprovider=(Get-SPClaimProvider System).ClaimProvider
$principal=New-SPClaimsPrincipal -ClaimType “http://schemas.microsoft.com/sharepoint/2009/08/claims/farmid” -ClaimProvider $claimprovider -ClaimValue [FarmID]
Grant-SPObjectSecurity -Identity $security -Principal $principal -Rights “Full Control”
Get-SPTopologyServiceApplication | Set-SPServiceApplicationSecurity -ObjectSecurity $security
 
6.    From the SharePoint 2013 SSA, give the SharePoint 2010 Farm ID “Full Control” permissions
From 2010, you can connect to the 2013 SSA by providing the 2013 SSA published servive URL. 
Now, go into your 2013 SSA, add a SharePoint 2010 content source and run a full crawl. Once the crawl is completed, you will be able to search the content using your 2010 Search Center.
Note: If you need to take advantage of the results preview feature, you will need to install and configure Office Web Apps 2013 against your SharePoint 2013 farm.


Create and Extend SharePoint 2013 Search with PowerShell

Create the Search Service Application

In the first section of this article, I am going to show how you can create SharePoint 2013 Search Service Application Using PowerShell. This list of commands will allow you to name your own database, instead having a GUID based database name for search.

The architecture and design of search in SharePoint 2013 have changed a bit. There are more added components and more flexibility for high availability search farm, allowing the farm to index more than 100 million items.

There are several steps involved in the creation of a Search Service Application and defining the Search Topology. The steps are:

  1. Creating the Search Service Application
  2. Creating the Search Service Application Proxy
  3. Creating the Search Components
  4. Creating the Index


Instead of using Central Admin, I will be showing PowerShell commands to create SSA:

# Define the variables

$SSADB = “SharePoint_Demo_SearchAdmin”

$SSAName = “Search Service Application”

$SVCAcct = “mcm\sp_search”

$SSI = get-spenterprisesearchserviceinstance -local

 #1. Start the search services for SSI

Start-SPEnterpriseSearchServiceInstance -Identity $SSI

 #2. Create the Application Pool

$AppPool = new-SPServiceApplicationPool -name $SSAName”-AppPool” -account $SVCAcct

 #3. Create the search application and set it to a variable

$SearchApp = New-SPEnterpriseSearchServiceApplication -Name $SSAName -applicationpool $AppPool -databaseserver SQL2012 -databasename $SSADB

 #4. Create search service application proxy

$SSAProxy = new-SPEnterpriseSearchServiceApplicationProxy -name $SSAName” Application Proxy” -Uri $SearchApp.Uri.AbsoluteURI

 #5. Provision Search Admin Component

Set-SPEnterpriseSearchAdministrationComponent -searchapplication $SearchApp -searchserviceinstance $SSI

 #6. Create the topology

$Topology = New-SPEnterpriseSearchTopology -SearchApplication $SearchApp

 #7. Assign server(s) to the topology

$hostApp1 = Get-SPEnterpriseSearchServiceInstance -Identity “SPWFE”

New-SPEnterpriseSearchAdminComponent -SearchTopology $Topology -SearchServiceInstance $hostApp1

New-SPEnterpriseSearchCrawlComponent -SearchTopology $Topology -SearchServiceInstance $hostApp1

New-SPEnterpriseSearchContentProcessingComponent -SearchTopology $Topology -SearchServiceInstance $hostApp1

New-SPEnterpriseSearchAnalyticsProcessingComponent -SearchTopology $Topology -SearchServiceInstance $hostApp1

New-SPEnterpriseSearchQueryProcessingComponent -SearchTopology $Topology -SearchServiceInstance $hostApp1

New-SPEnterpriseSearchIndexComponent -SearchTopology $Topology -SearchServiceInstance $hostApp1 –IndexPartition 0

 #8. Create the topology

$Topology | Set-SPEnterpriseSearchTopology

 Extend the Search Service Application

Once SSA is created, we will need to clone the topology to be able to extend to other servers in the farm. In this script, we will be replicating all the Search components onto two servers in the farm, also creating 2 indexes. Here are the steps:

#1. Extend the Search Topology:

$hostApp1 = Get-SPEnterpriseSearchServiceInstance -Identity “AppSearch1”

$hostApp2 = Get-SPEnterpriseSearchServiceInstance -Identity “AppSearch2”

Start-SPEnterpriseSearchServiceInstance -Identity $hostApp1

Start-SPEnterpriseSearchServiceInstance -Identity $hostApp2


#3. Keep running this command until the Status is Online:

Get-SPEnterpriseSearchServiceInstance -Identity $hostApp1

Get-SPEnterpriseSearchServiceInstance -Identity $hostApp2

 #4. Once the status is online, you can proceed with the following commands:

$ssa = Get-SPEnterpriseSearchServiceApplication

$active = Get-SPEnterpriseSearchTopology -SearchApplication $ssa -Active

$newTopology = New-SPEnterpriseSearchTopology -SearchApplication $ssa

#Assign components to the hosts

New-SPEnterpriseSearchAdminComponent -SearchTopology $newTopology -SearchServiceInstance $hostApp1

New-SPEnterpriseSearchCrawlComponent -SearchTopology $newTopology -SearchServiceInstance $hostApp1

New-SPEnterpriseSearchContentProcessingComponent -SearchTopology $newTopology -SearchServiceInstance $hostApp1

New-SPEnterpriseSearchAnalyticsProcessingComponent -SearchTopology $newTopology -SearchServiceInstance $hostApp1

New-SPEnterpriseSearchQueryProcessingComponent -SearchTopology $newTopology -SearchServiceInstance $hostApp1

New-SPEnterpriseSearchIndexComponent -SearchTopology $newTopology -SearchServiceInstance $hostApp1 –IndexPartition 0

New-SPEnterpriseSearchAdminComponent -SearchTopology $newTopology -SearchServiceInstance $hostApp2

New-SPEnterpriseSearchCrawlComponent -SearchTopology $newTopology -SearchServiceInstance $hostApp2

New-SPEnterpriseSearchContentProcessingComponent -SearchTopology $newTopology -SearchServiceInstance $hostApp2

New-SPEnterpriseSearchAnalyticsProcessingComponent -SearchTopology $newTopology -SearchServiceInstance $hostApp2

New-SPEnterpriseSearchQueryProcessingComponent -SearchTopology $newTopology -SearchServiceInstance $hostApp2

#Below is creating another index on host 2. If you want to replicate the index to the second server, then you don’t need this step.

New-SPEnterpriseSearchIndexComponent -SearchTopology $newTopology -SearchServiceInstance $hostApp2 –IndexPartition 1

 #5. Activate the topology:

Set-SPEnterpriseSearchTopology -Identity $newTopology


The above scenario is creating a search topology over 2 server farm. For larger search topology, you can just add more hosts to the topology and select which components to run on them.

SharePoint 2013 Missing Patches – Configuration Wizard error

​I recently ran into some issues applying KBs on a SharePoint 2013 farm. My farm consists of 6 servers:

  1. 2 WFE servers;
  2. 2 Application servers (hosting Central Admin); and
  3. 2 Search servers

As usual, I installed all the KBs on all servers first, starting with the application server, then I started running the SharePoint Configuration Wizard on all the servers. The wizard successfully completed on the 2 Application Servers, but failed on the rest of the servers.

The error I was getting was:

“Error: Some farm products and patches were not detected on this or other servers. If products or patches are missing locally, you must quit this program and install the required products and patches on this server before starting this wizard. If products or patches are missing on your servers, you must install the required products and patches on the specific servers, and you may then click the Refresh button to perform the status check again.”

I have tried rebooting the servers and running the psconfig -cmd installcheck -noinstallcheck, but this did not help. I was getting the same error through the script. The farm thinks that the servers did not get the required KBs.

After further investigation, it turns out that the application registry on the servers needed to get refreshed. I ran the following PS command (as administrator):

Get-SPProduct –local

This will force a refresh of the server. You will need to run the command on all of the affected servers before you can run the configuration wizard again.