SharePoint Online External Sharing


One of my favorite topics in Office 365 is external sharing. Sharing and collaboration not only occur within your corporation, but it also involves external customers, clients, suppliers, or vendors. Sharing and collaboration can be achieved with the use of External Sharing in SharePoint Online.

By default, External Sharing for SharePoint Online is turned “On” for the entire environment, which includes all site collections. It is highly suggested to turn this “Off” globally until you have the permissions plan detailed and site collections organized and before users access the sites.

SharePoint Online has the capability for external sharing tenant-wide (global) and at site collection level. The global setting overrides any setting at the site collection level and affects OneDrive.

Types of External Users

An external user is outside of your corporation’s Office 365 subscription and with whom you are sharing content from one or more sites, files or folders. The two types of external users are:

Authenticated Users: these users have either a Microsoft account or they have a school or work account from another Office 365 subscription. Sites and documents are shared in the same manner as you would with internal users with permissions and groups working in the same manner as they would for internal users. However, collaboration tasks are limited to basic tasks as they do not have a license to your Office 365 subscription. The basic collaboration tasks for an authenticated external user include the performance of tasks on a site consistent with the permission level they are assigned, viewing and editing documents can be done in Office Online, and depending on the permissions they have been given, they will be able to see other types of content on sites. They will be able to navigate to subsites within the site collection and will be able to view site feeds

Anonymous Users: these are recipients who have received a shareable link to a folder or document but not sites. They can view or edit the document, be able to upload the folder (depending upon the type of link), and these are all specific to the link sent. This is done without having to log in with a username or password. The links are valid until they are disabled or have expired based on the expiration date. It is important to note that these links can be freely passed around between users.

Sharing Options

The following basic sharing options for tenant and site collection are:

No External Sharing: users with Office 365 subscription can internally share sites and documents

Sharing Only with External Users in Your Directory:  external users who are already in your Office 365 user directory will have access to sites, folders, and documents that are shared with them. These external users may include those users who have previously accepted an invitation, those who you have imported from another Office 365 subscription or a tenant from the Azure Active Directory

Sharing with Authenticated External Users:  sites can be shared with external users who have either a Microsoft account, a work or school account from another Office 365 subscription or an Azure Active Directory Subscription. A one-time code is sent to the user to verify their identity when folders or documents are shared, and they are not required to log in to a Microsoft, work or school account.

Sharing with Anonymous Users: documents and folders can be shared with an anonymous link. Anyone with the link will be able to view or the document and will be able to upload to the folder. Sites cannot be shared with anonymous users.

These options range from the most restrictive to the least restrictive settings. The restrictive setting can still be applied alongside those with fewer restrictions. For example, you can continue to share with authenticated external users, users already in your directory, and internal users while allowing anonymous sharing.

Managing Security Risks

Most corporations will have confidential information that is not to be externally shared. For this type of information, it should reside in one or two site collections with External Sharing turned “Off”. If additional confidential information site collections are required, then create a new site collection and ensure that External Sharing is turned “Off”.

Sharing a Site or Document – What happens?

What happens is dependent upon what type of External Sharing you are executing. There are three scenarios:

Sharing Sites with Authenticated External Users – an email invitation with a link to the site or document is sent to the external user. Clicking on the link will prompt them to log in to their Microsoft account or their work or school account. Once logged in, they are added to the users list in your Office 365 subscription and then given access to the site or document. In the users list, they are listed with #EXT# in their user name. They can now be granted access to additional sites or documents without being sent additional invitations. To discontinue sharing with this external user, you can either remove their permissions from the site or, you can remove them from the user list in Office 365.

Sharing Files and Folders with Authenticated External Users: an email is sent to the authenticated external user which contains a link to the site or file. Each time the file or site is accessed, they are emailed a time-sensitive code that is used to verify their identity. The code must be entered to gain access to the folder or file. To discontinue sharing with them, simply delete the link that was sent to them.

Sharing with Anonymous Users: anonymous users can be granted permission to edit, view, or upload a document to a folder. Links to view and edit are created separately, and each can be disabled with a time expiration. Anonymous user links can be reused and passed around, allowing anyone with this link access to the document or folder.

External Business Partners – How to Collaborate with Them

A SharePoint Online extranet site is a site that is a dedicated site collection for business to business collaboration with a vendor or partner. This site can be locked down so that only site owners can invite external users and only external users from specific domains can be invited. These are quick to set up and are more cost-efficient than on-prem extranet sites.  

External Sharing with SharePoint Online is not only easy and functional, but the ability to create extranet sites for external partners is a flexibility that provides feasibility with the least impact on budgets while ensuring external users have access to content that they require to fulfill their parts of the project.
List Template Duplicate Field


Many of us have saved custom lists as templates in SharePoint Online or on-premises, to be re-purposed in the future, as an easy way to re-create the same list, with the same content types, metadata and structure. This is a an easy way for developers to give the end user a prepackaged custom list, rather than developing a provisioning tool to create a unique list. This added benefit to this method is the ability to allow the end-user to quickly create their own list based on a specific template, without the need to ask IT to do it for them.

In some rare cases, if you are trying to created a list from a custom list template, you may end up getting an error of a duplicate field name. The exact error will be "A duplicate field name was found". The list template has been created in the same site collection and you cannot find why and where is the other duplicate field name.
 

Cause

There are 2 possible causes to your issue:

  1. Your list template is referencing the same field twice
  2. Your list template is referencing a field tat already exist in the site collection but with a different GUID

Resolution

In my case, the second cause was my issue. The resolution for both issues is similar. Here are the steps:

Step 1 – Editing your template

  1. Save your template.tsp to your desktop
  2. Rename your template.tsp to template.cab
  3. Extract your template.cab to a specific location
  4. Edit the manifest.xml
  5. Look for the duplicate field name and delete the node.

This will do it for there are 2 nodes for the same field name. If this is not the case, then the GUID is your issue, and you will need to change the GUID in your template with the right GUID from your site collection. Remember that when you create a list from a custom template, if the any column already exist in the site collection, the GUID of the list template must match the GUID of the site column in the site collection.

Proceed with the following steps to resolve your issue:

Step 1.1

  1. Run the following PowerShell command to find the GUID of your site column
    $web = Get-SPWeb http://portal
    $columnName = "Your column name"
    write-host $web.Fields[$columnName].Title -nonewLine
    write-host " " $web.Fields[$columnName].Id
    $web.dispose
  2. Replace the GUID in the list with the GUID from the PowerShell. In most cases the GUID exists in 2 places in the list template
  3. Save the manifest.xml
     

Step 2

Now this is the fun/tricky part. You will need to assemble your manifest as a cab again. Run the following steps:

  1. Run command prompt and browse to the folder where your manifest.xml is
  2. Run the following command: makecab manifest.xml templatename.cab
  3. Rename your templatename.cab to templatename.stp
  4. Upload your new stp file to your list templates library

Problem solved!


OneDrive Part Two: Additional Ignite 2017 Announcements


At Ignite 2017, many new and innovating announcements were shared, but most notably, were the many new features for OneDrive. In my previous article, OneDrive Part One: Files On-Demand, we examined the many new features and advantages of Files On-Demand. In this article, we will review the many other new features that were announced.

These new features include silent sync auto-account configuration with ADAL, Microsoft 365 powered device with OneDrive, multi-geo, updated OneDrive Admin Center, support for workflows via Microsoft Flow, simple and secure external sharing of documents without a Microsoft account, support for on-prem customers with Windows and Android App, support for NGSC (next generation sync client) in SharePoint 2019.   

Silent Sync Auto-Account Configuration for OneDrive with ADAL

Silent sync and account configurations for OneDrive are now supported by Microsoft Azure Active Directory Authentication Library. Silent Sync will automatically configure OneDrive during a new device provisioning. In addition to this, for a new user being added, OneDrive is automatically set up without any interaction of the new user. By automatically setting up a new user, there is now insurance that all users will have access and the capabilities to leverage OneDrive.  

Microsoft 365 Powered Device with OneDrive

What is a Microsoft 365 Powered Device with OneDrive?  It is a modern device running Office 365 ProPlus and Windows 10 and is managed with Enterprise Mobility + Security (EMS).

Why is this exciting?  The traditional way of deploying a device was purchasing the device, having it shipped to IT where it is then imaged and prepared for the end user. Once ready, it is then shipped to the end user, which, quite often, took several days. With a Microsoft 365 Powered Device with OneDrive, the device can now be shipped directly to the end user, who can then, with great anticipation and excitement, open the box and take out the laptop/desktop/mobile device, and begin immediately using it for work after answering a few questions after turning it on.  After these questions are answered, Windows Autopilot (integrated with Azure AD Premium and Intune) will automatically configure the new device as a new Microsoft 365 powered device based on unique corporate IT and user needs.  The best part – the end user’s files, apps, emails, and preferences are automatically deployed while enforcing ITs security policy. In addition to all this, the system is always up-to-date with latest security and protection as well as continually updated services which provide a consistent, rich, and valuable content to the end user. All of this is achieved over the cloud, without physical contact between the administrator and device.

A Microsoft 365 Powered Device with OneDrive has taken what took days to deploy to only minutes to deploy – how cool and exciting is that?!?

Support for Synchronization of Encrypted Libraries

Libraries encrypted with Information Rights Management (IRM) or Digital Rights Management (DRM) are fully supported with OneDrive syncing. Why is this important?  Rights Management is the prevention of printing, forwarding, and copying of sensitive information by unauthorized people by restricting permission access. The access and restrictions are enforced, even if the information is received by unintended recipients as the access permission is stored in either the workbook, document, presentation or the email message itself. This access permission must be authenticated against the Rights Management server.  In SharePoint, downloaded files not only must be authenticated, but they are also encrypted and can only be opened by users that meet the requirements of the Rights Management policy that is set in the SharePoint library.

External Sharing without a Microsoft Service Account

The capability to share information externally with those who do not have a Microsoft service account (MSA) can now be accomplished with a simple and secure method.  You can now create and provide a one-time use verification code which grants external users access to specific content.  A limited time, single-use, verification code link is securely emailed to the external recipient. After opening the email, entering, and submitting the verification code, access to files and folders is then granted to the external recipient without the need for them to create and/or maintain an MSA as they have verified that they are the account holder of the email address. As an added layer of security, IT administrators are able to specify how often external recipients must re-verify their email address as well as obtaining a new verification code. 

User Experience Updates

OneDrive Modern Experience

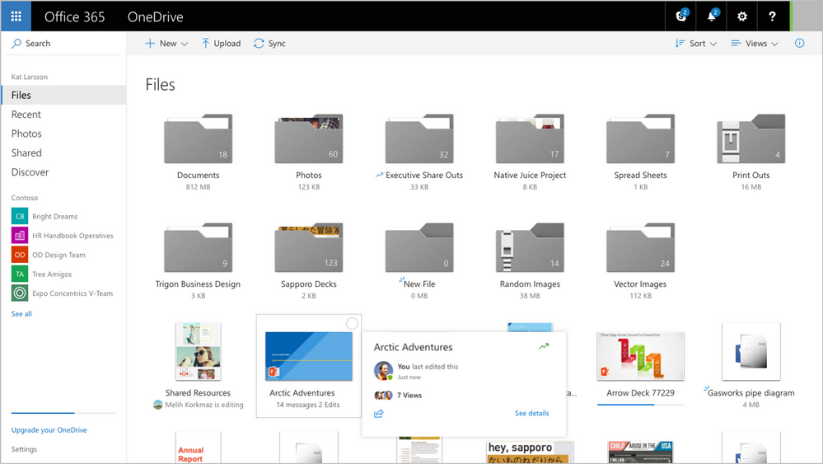
An update to the OneDrive web UI has resulted in delivering visual information quickly and concisely with one glance. If there are documents in the folder, there will now be a slip of paper inside the folder and the folders now sport a number count of items in it.  New items will generate a notification to alert that there is a new item while the hover panel not only provides stats but it now also provides the opportunity to share directly from the hover panel. The People Card and Info Pane quickly provide information as to who has accessed content, what content has been shared, and who has not accessed the content.  OneDrive is now faster, more intuitive, and highly responsive, resulting in a streamlined, efficient and maximized workflow process.


Seamless Sharing in Office, Windows, and Mac

Office 2016 will reflect the updated sharing UI whereby the sharing of Mac, Windows, and the Web have been standardized and will be seamless across platforms. 

Multi-Geo

Multi-Geo addresses data residency and compliance for global companies.  In SharePoint and OneDrive in Office 365, the multi-geo capability will provide a choice of geographical locations to store and manage your data.  One or more satellite geo locations will connect to the main Office 365 tenant, the default location.  In other words, Multi-Geo allows a single tenant to span across multiple geo locations.

Service Level Encryption with Customer Key  

The customer key service is a new layer of security that provides you the control to encrypt and/or decrypt individual encryption keys used to encrypt your cloud storage services for OneDrive and SharePoint in Office 365.  The customer key service encryption allows you to revoke or change access to these keys, effectively preventing Microsoft from accessing this content.  This added layer not only hands you control of your data but also allows you to meet the compliance and specification policies of your company. 

OneDrive Admin Centre

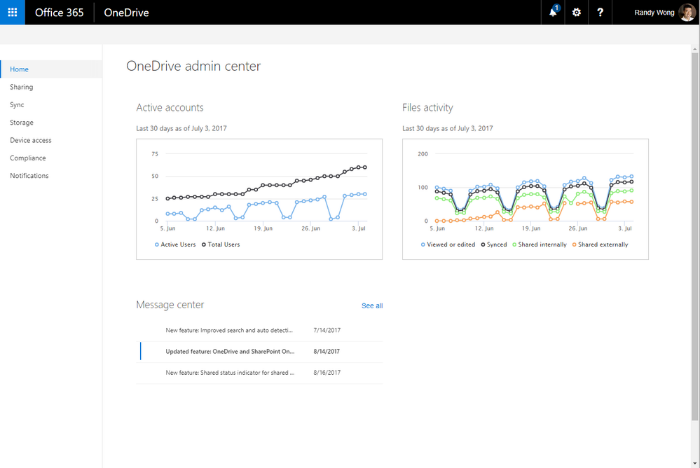
OneDrive Admin Center

In the OneDrive Admin Centre, information regarding active accounts, file activity, and OneDrive Message Centre are all available on the OneDrive admin console. 


Files Restore

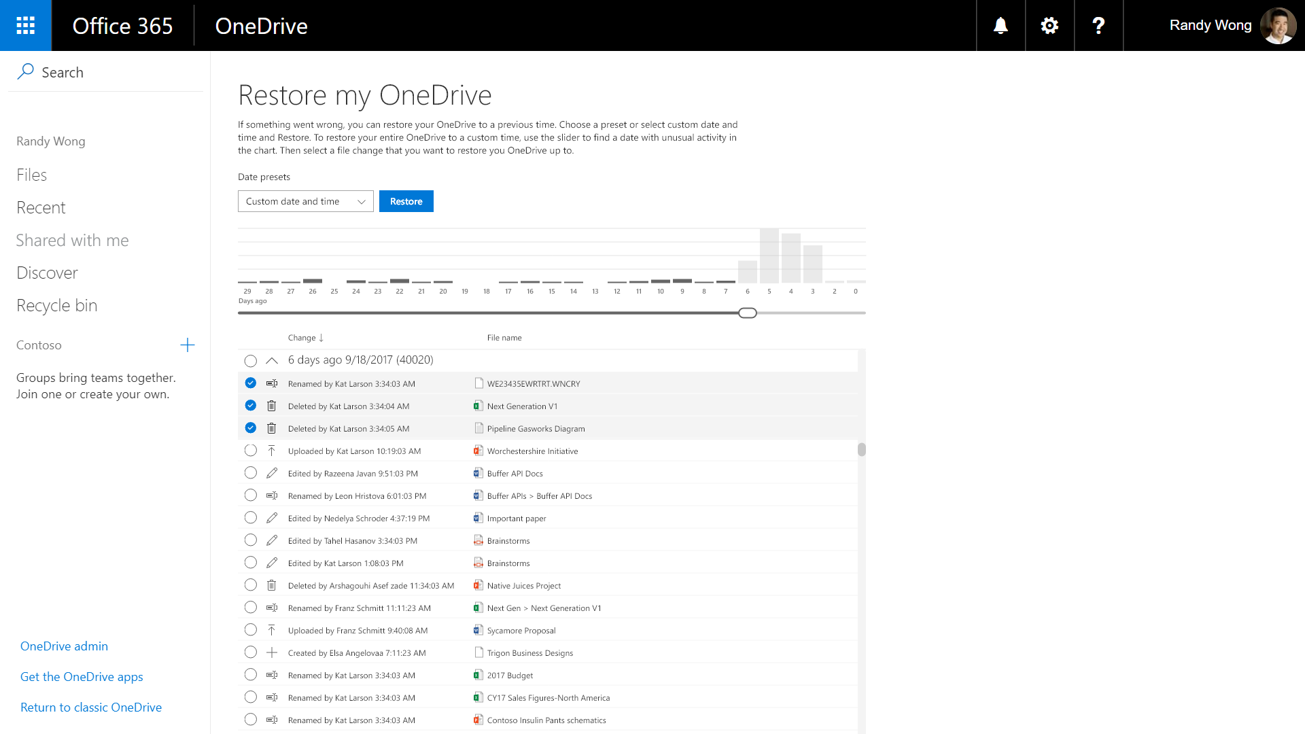
Disaster planning is imperative, and with Files Restore, recovery from disastrous events such as corruption, unexpected data loss or mass deletions, can be performed from this self-service.


OneDrive File Restore

Additional highlights include:  support for workflows in Microsoft Flow in OneDrive; a self service migration toolkit for those who would like to migrate from share drives or other cloud-bases services to OneDrive on their own; implementation of new ux for mobile clients for ease of sharing and managing files on the go; opening a file in OneDrive web or a shared link to a Word or PowerPoint file will now open right into edit mode of that app; support for clients on Android platforms for OneDrive On-Prem clients; zip files can now be viewed on the web allowing you to see what is inside so that you can choose the files you would like to extract; sync client has now been integrated into Mac Office as part of the installation process; and, the OneDrive sync client released for SharePoint 2019 is now supported.

As you can see, Microsoft continually innovates, updates and adds facets to OneDrive, SharePoint and Office 365 that continually provide better cohesion between platforms, stronger collaboration tools and increased efficiency in the workflow for end-users.

OneDrive Part One: Files On-Demand


At Ignite 2017, many exciting and new announcements were shared alongside visuals thrown up on the big screen.  Many of the MS products have been enhanced, and OneDrive is one of them.

These upgraded or new features for OneDrive include Files On-Demand, silent sync auto-account configuration with ADAL, Microsoft 365 powered device with OneDrive, multi-geo, updated OD Admin Center, support for workflows via Microsoft Flow, simple and secure external sharing of documents without a Microsoft account, support for on-prem customers with Windows and Android App, support for NGSC (next generation sync client) in SharePoint 2019.   

OneDrive Files On-Demand

One of the most exciting announcements is the OneDrive Files On-Demand capability.

Turning on Files On-Demand will allow you to see, in File Explorer, thumbnail files without having to download the files.  The ability to access all your files offline is not only convenient, but it also saves storage space on your device.  The creation of new online files, or ones created on another device, will appear as online-only files. Once connected to the internet, these files will be accessible like every other file on your device.

There are additional advantages to Files On-Demand including the flexibility to set files or folders to always be locally available, the ability to see information about files including if it is shared with others, and most importantly, ability to see thumbnails of files even if the required application is not installed to open it (over 270 file types are recognized) are all additional advantages with Files On-Demand. 

A handy visual tag is placed on the bottom left of each thumbnail file which indicates its status of availability in File Explorer. The following chart easily explains each of the scenarios:

Online Only files
  Online-only files


Online-only files don’t take up space on your computer. You see a cloud icon for each online-only file in File Explorer, but the file doesn't download to your device until you open it. You can’t open online-only files when your device isn’t connected to the Internet.

Locally available files
  Locally available files


When you open an online-only file, it downloads to your device and becomes a locally available file. You can open a locally available file anytime, even without Internet access. If you need more space, you can change the file back to online only. Just right-click the file and select “Free up space.”

Available file
  Always available files


Only files that you mark as "Always keep on this device" have the green circle with the white check mark. These always available files download to your device and take up space, but they’re

Using and Turning on Files On-Demand

Files On-Demand works with all files, whether work or personal, that are accessed from either OneDrive or SharePoint Online team sites. Compatible with all current apps, including Windows desktop and Windows Store apps. 

The following steps will turn on Files On-Demand:

  1. Sign into OneDrive on your device;
  2. In the notification area and at the far right of the taskbar, right-click on the white or blue OneDrive cloud icon. Select Settings;


    OneDrive SyncClient with blue cloud and white cloud icons

Missing the blue or white cloud OneDrive icon in the notification area? Click the caret “^” (show hidden icons icon) to show the OneDrive blue or white cloud icon. If it appears, complete steps 1 and 2.

Still missing the blue or white cloud OneDrive icon in the notification area? OneDrive may not be active on your device.  To run OneDrive on your device, select Start on the bottom left corner of your taskbar. In the search bar, type “OneDrive”.  Select OneDrive from the search results.

  1. Next to Save space and download files as you use them on the Settings Tab, check off the box. This will now enable Files On-Demand.  It is important to note that the settings for Files On-Demand are unique to each device and as such, this process will have to be done on each device that you want to have Files On-Demand activated. 

Marking a Folder or File for Offline Use or as Online-Only

  1. On the selected folder or file, right click; and
  2. Choose either Free Up Space or Always keep on this device. Remember that new files or folders that are created online appear as online-only.  Also, files that were created on another device will appear as online-only.  Appearing online-only ensures maximum space is saved.  It is also important to note that a folder marked as “Always keep on this device” will have all files in that folder download to the device as always-available files.  Note that individual folders within that folder can be marked as available if the folder is online-only.  

Hiding Folders on Your Device

For privacy reasons, such as having personal files on your work computer, you may not want a folder to download to certain devices.  In these instances, you will want to hide a folder on your device.  To hide a folder, follow these steps:

  1. At the bottom right of the taskbar is where the notification area is located.  The OneDrive icon is represented by a blue or white cloud. Double click on this icon to open OneDrive;

A screenshot showing the cursor hovering over the blue OneDrive icon on the taskbar, with text that says OneDrive - Contoso.

Troubleshooting:

  • If the OneDrive icon does not appear in the notification area, then click the caret “^” to expand the hidden icons.
  • If the icon appears, complete steps 1 and 2.
  • If the OneDrive cloud does not appear, then this is an indication that your device is not running OneDrive. To initiate OneDrive on your device, select Start on the bottom left corner of your taskbar. In the search bar, type in “OneDrive”.  From the search results, select OneDrive.  Your device will now run OneDrive.
  1. Select the Settings gear in the Activity Centre;
  2. Choose Folders next to the location where you want to choose the folder; and
  3. Find the folder that you do not want to be downloaded onto this device. Clear the checkbox next to this folder. This folder will no longer be downloaded onto this device. 

You will need to repeat the above steps on each device that you do not want the folder to download to as settings for Files On-Demand are unique to each device.  

Search Web Parts – Collab365 Global Conference


Have you heard about the virtual Collab365 Global Conference 2017 that’s streaming online November 1st – 2nd?

Join me and 120 other speakers from around the world who will be bringing you the very latest content around SharePoint, Office 365, Flow, PowerApps, Azure, OneDrive for Business and of course the increasingly popular Microsoft Teams. The event is produced by the Collab365 Community and is entirely free to attend.

Places are limited to 5000 so be quick and register now.

During the conference I'd love you to watch my session which is called : 'Search Web Parts'

Content Search Web Part (CSWP) is one of the great web parts in O365 and on-premises. In this session, Mike will demo how to configure a​nd use the CSWP, and build a dynamic O365 branded portal with CSWP only. In this session, we will review: 1.Creating Queries using Keyword Query Language (KQL) 2.Building dynamic queries 3.Creating and customizing HTML Display Templates​​.​

If you join me, you will learn:

  1. Creating Queries using Keyword Query Language (KQL)
  2. Building dynamic queries
  3. Creating and customizing HTML Display Templates
  4. Building Search Driven Portals

Topic(s):

  1. Office365
  2. SharePoint

Audience :

  1. IT Pro

Time (in UTC) :

  1. Thursday, November 2 2017 5:00 PM

How to attend :

  1. Register here.
  2. At the time listed above go here to watch my session. (you can also add me to your own personal planner from the agenda.
  3. Be ready to take notes!

SharePoint Hub Site Announced at Microsoft Ignite


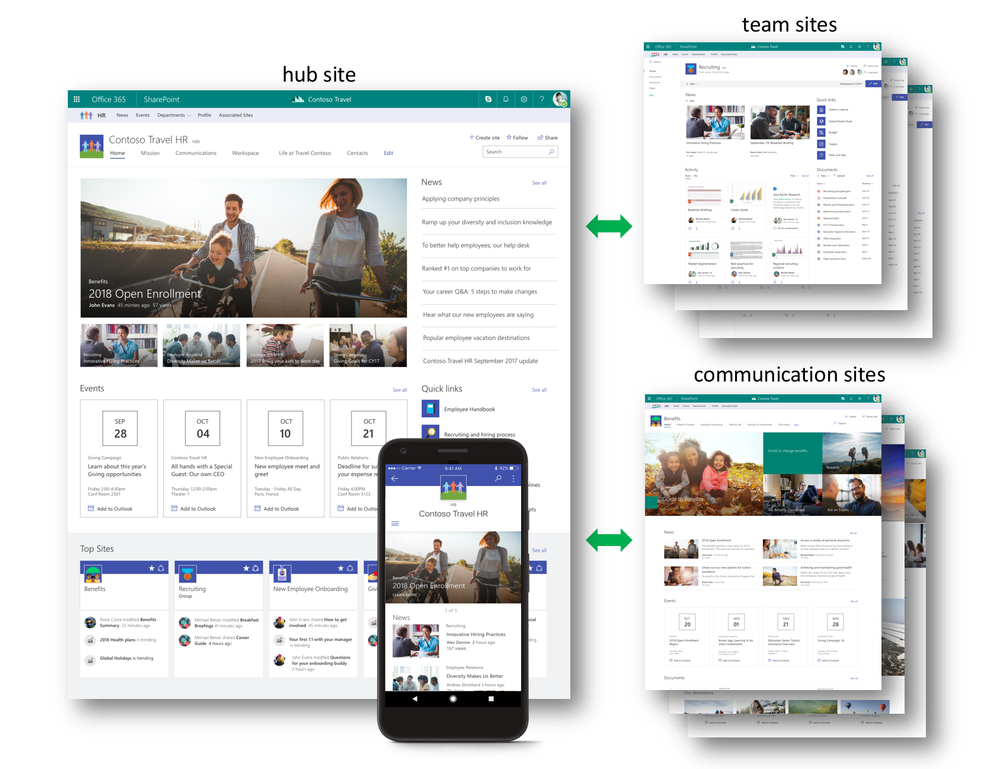
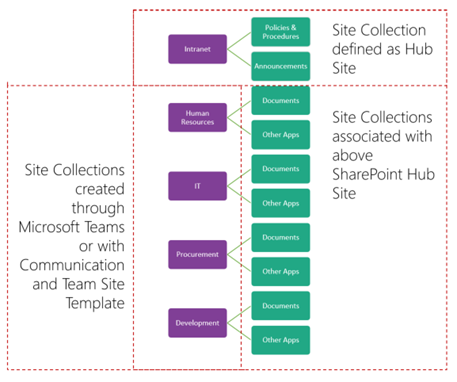
A new SharePoint site, SharePoint Hub Site, was announced at Microsoft Ignite 2017 in Orlando. The purpose of the SharePoint Hub Site is to provide a point of organization for content across SharePoint sites. Hub Sites allow you to associate SharePoint Team Sites and Communication Sites with a parent thereby streamlining and alleviating the issues of locating related content across the organization that appears in other sites. Associating multiple Team Sites and Communication Sites provides the flexibility to model and promote an intranet that reflects the way that your people in your organization organize.  Across associated sites, Hub Sites provide a common navigational structure, look, and feel.  Hub Sites also aggregate news and activities, displaying the roll-up on the Hub Site’s home page. SharePoint Hub Sites can be used to organize content, teams, divisions or resources throughout your business. 

Hub Sites


How do SharePoint Hub Sites work?

Newly created SharePoint Hub Sites propagate the navigation to all the associated sites, creating parent/subsite relationships.  Consistency across sites go from the top down so that all team sites or communication sites inherit common characteristics from the Hub Site. These characteristics include:

1. Navigation: Define top navigation in the hub site that is inherited by associated sites

2. Themes: Define the look and feel of the hub site. This theme remains consistent across all associated sites

3. Logo: The logo is the most important identifier of the site you are visiting.  The logo remains consistent across all associated sites providing the message that says, “You are here, and you have not left”

Hub SiteSharePoint is a tool for collaboration and the sharing of information. Within an organization, there can be numerous project teams working on a variety of projects and it is important to increase awareness, visibility, and discoverability to encompass those who are not part of the core team.  It would be unreasonable to expect your audience to search and drill down for the information, but having access to clear, concise communication that expresses in a broad sense of what is happening with the projects and initiatives would be valuable.  Team sites and communication sites push information and content up to the hub site level with rollup web parts.  These parts can surface content from all your associated sites into one place, allowing the flexibility for you to shift your content and associate it where it makes the most sense, unlike rigid hierarchy.  
Content is pushed up to the hub site level with news aggregation, combined site activities, and scoped search. 

News Aggregation: After creating and publishing a news article on an associated site, the news article will surface on SharePoint home, in the SharePoint mobile apps, and on the hub site’s home page.

Combined Site Activities: Site activities are visible on a team site’s home page as well as on the site’s card on SharePoint home. Site activities will roll up from each associated site, becoming visible on the hub site’s home page. This provides the ability to see what is happening across related sites in one view rather than going site by site.  With this information, you can now prioritize and focus your time.

Scoped Search: Searching content from a hub site will result in content from all associated sites which in turn increases relevance and enhances content discovery.

Creating SharePoint Hub Sites

Hub sites can either be created by Administrators who then associate existing team and communication sites to the newly created Hub Site from SharePoint home in Office 365. You can also create an associated site directly from within the hub site itself.   

The site owner can associate an existing team site or communication site within a hub site by following these steps:

1. Click the gear icon located on the upper right of the site

2. Click Site Information

3. In the Edit Site Information, click Hub Site from the drop-down menu.  Choose the right hub site to join.

It is important to note that team sites and communication sites can only be associated with one Hub Site.

As intranets are dynamic, associations may change as projects come to completion and new projects added. It is easy to un-join a Hub Site as it is to join it, allowing you the flexibility to adapt to the ever-changing landscape of the intranet. 


SharePoint Hub Sites and SharePoint Mobile App

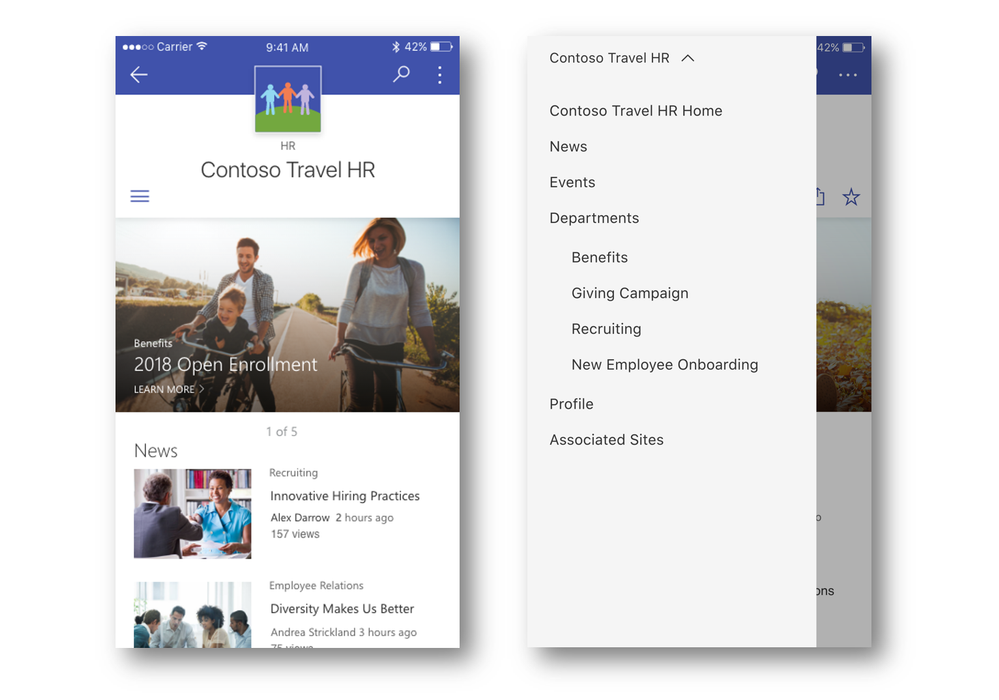
Team collaboration and the sharing of information launched itself off the desktop onto mobile devices and SharePoint Mobile App is being updated to render hub sites, their pages, news, and content with smooth navigation between associated sites and scoped search. SharePoint Mobile App will continue to provide quick access to all your sites, news and team members you work with but now with added, enhanced search for content and people across your organization. 

Hub Site Mobile

The building blocks for your intranet have now expanded from the classic publishing sites and sites for application to include team sites, communication sites, and hub sites.  Sharing, managing, finding content, knowledge, and apps, on any device, is easily accomplished with SharePoint, the solution that connects your workplace with its people.

Big SharePoint, OneDrive and Office 365 Announcements


This year’s Microsoft Ignite unveiled exciting new products and innovations that span across its entire business software and cloud spectrum.  Focusing on empowering the modern workspace, Microsoft has made advancements in management, security, and intelligence as well as recognizing new groups of users. 

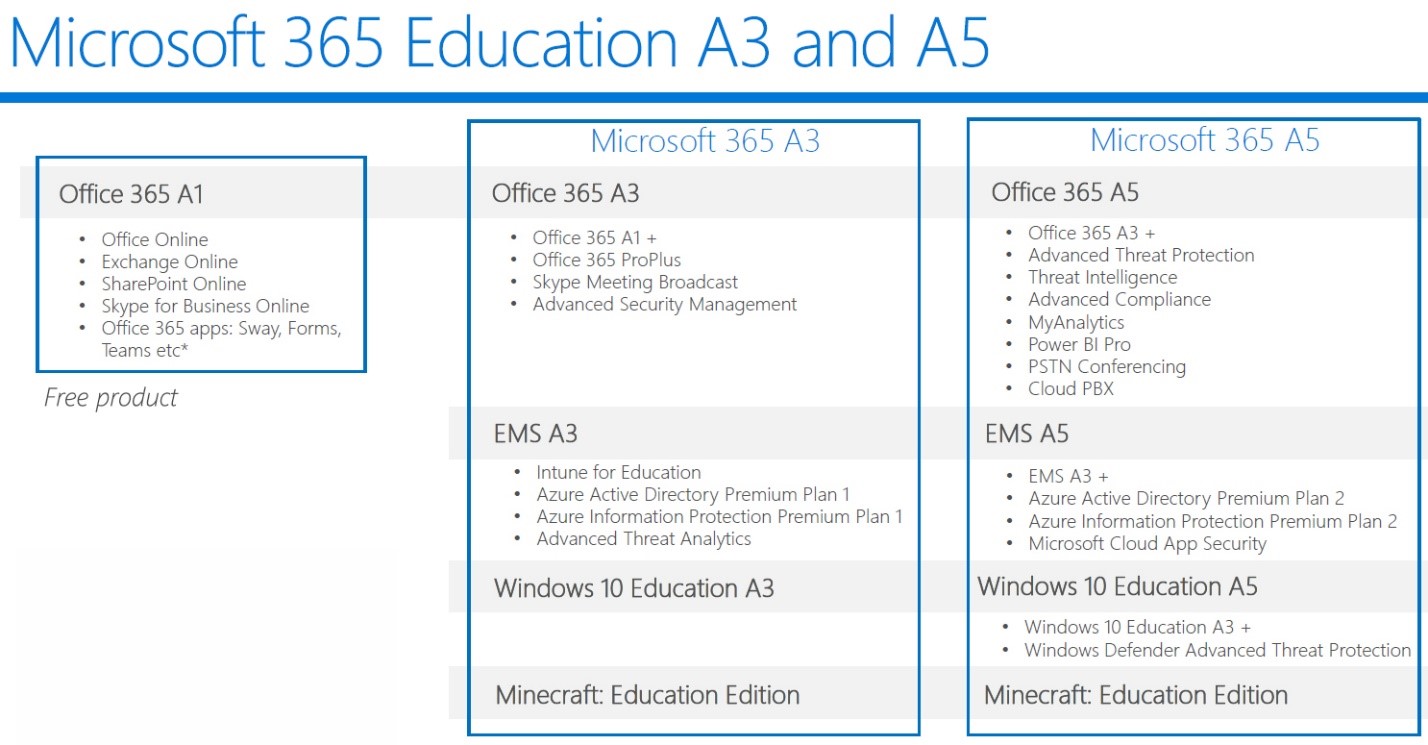
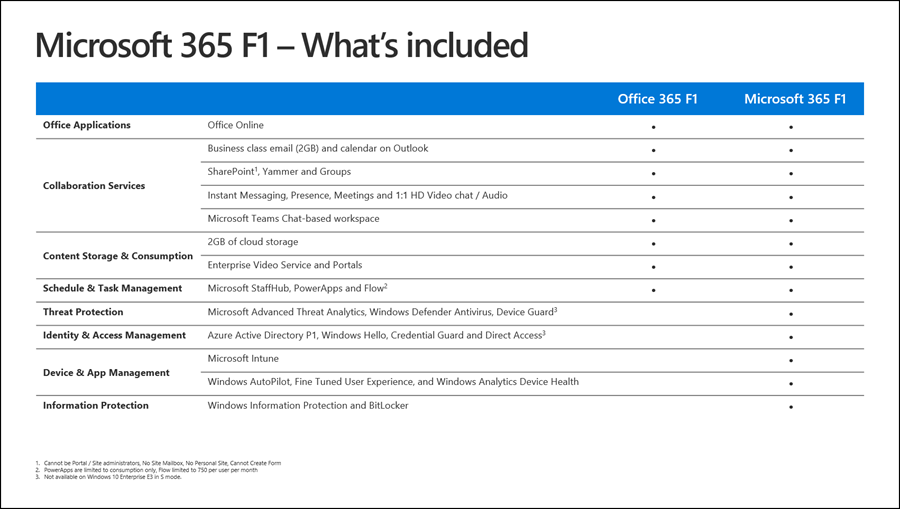
Office 365 targets two new groups of users through its two special packages. The first is for education, Microsoft 365 Education, and the second, Microsoft 365 F1, for first-line workers.

Microsoft 365 Education

Microsoft 365 Education provides the tools for students, faculty, and staff to create and work together securely in the classroom.  Office 365 brings its productivity applications and combined with Enterprise Mobility + Security, Minecraft: Education Edition and Windows 10, students and teachers alike have a powerful system to create, learn and grow together in the classroom.  Microsoft 365 Education is offered in three different plans as Microsoft 365 A1, Microsoft 365 A3, and Microsoft 365 A5.  The fourth plan for non-profit organizations is in the works.  There are price point differences between the plans, and the differences between each are compared below.

Microsoft 365

Microsoft 365 F1

Who are first-line workers?  Any staff who has direct contact with a customer while providing a service or care to the customer is a first-line worker. First-line workers account for nearly 2 billion workers worldwide. Microsoft 365 F1 promotes the growth and development of the community and culture amongst first-line staff. It also trains and upskills employees, digitizes business processes, delivers real-time expertise with minimized risk and cost. Many first-line workers work shift work and to help manage their schedules, Microsoft 365 F1 offers a new feature – StaffHub. Combined with Windows 10, front-line staff is now able to stay connected, automate device deployment and manage single-purpose devices. In response to the need for devices for first-line workers, Microsoft is offering through its OEM partners HP, Lenovo, and Acer, streamlined and secure devices loaded with Windows 10S.  Through its OEM partners, the total cost of ownership is reduced, and these select entry-level devices (HP Stream 14 Pro, available in October, and the Lenovo v330, available in February) will provide cloud-based identity and management for the first-line environment.

Microsoft 365 F1


Office 365 continues to evolve, enhancing and supporting employee creativity.  With the emphasis changing from routine tasks to creative problem solving, Office 365 is adapting, providing users the tools to express their ideas effectively and the ability to build upon the work and expertise of others, resulting in the creation of compelling content. 

The Improved Excel

Harnessing the abilities of AI and combining it with Excel has resulted in a powerful, sleek, and fresh Excel that will understand new data types, beyond numbers and texts that are currently recognized, and augment these new data types based on public and enterprise information.  For example, Excel will now recognize that “India” is a country and the acronym “MSFT” is a stock.  Also, releasing in the spring of 2018, Insights, a service reserved for Office Insiders, will derive insights from complex data using AI to find and recommend patterns. 

Searching with Results

Searching capabilities can now be initiated from SharePoint, Office.com, the Windows taskbar as well as Bing for Business.  From so many sources to initiate your search, it becomes simplified to find your information from across your organization and beyond.  Whether you are searching for a person, content or a site, Microsoft Graph powers the engine and provides consistent and personalized results.

Linking in with LinkedIn

From within Office 365, you can now view LinkedIn profiles in Microsoft apps and services.  Currently rolling out to first release customers, this ability provides rich insights about the people who you work with, whether they are within your organization, or external to your organization.

Threats and Protection

With all the new and enhanced features of Office 365, security and protection have been addressed through advanced threat protection, including features that address phishing, impersonation and domain spoofing. Preventative measures including multi-factor authentication, including third-party access, expansion of conditional access capabilities, encryption of emails and documents when using consumer email services such as Outlook.com and Gmail, protection of information (detect, classify, protect and monitor your data wither it is stored or shared), and applying compliance measures as per regulations.  

SharePoint and OneDrive

The biggest announcement at this year’s Ignite: SharePoint 2019 is coming! Productivity applications include Word, Excel, PowerPoint, and new versions of Skype for Business, SharePoint and more!

OneDrive is a powerful feature which provides the ability to securely share files across Office 365 not only with people who are within your organization but also with those who do not have an account and are external to your organization.  Not only can you share content, but you can now see who has viewed the shared files in OneDrive. Web versions of Office now open faster than ever.  Supported in the desktop version of Excel for Office 2016 is co-authoring.  Thumbnails and previews have been improved along with the ability to connect existing sites to Office 365 Groups.  There is also deeper integration with Microsoft Team. 

The Combined Power of SharePoint and OneDrive

SharePoint and OneDrive are now integrated with PowerApps, Microsoft Flow, Power BI, and Microsoft Form, each of these provides the resources and capabilities to create and share custom forms, applications, and workflows that automate processes. 

Within SharePoint, rich forms can be built from blended data, retrieved from lists with over 160 online and on-premises data sources.  Custom forms with Power Apps provide solution‑creators the tools to build these forms within SharePoint.  The Column Formatter allows power users to add rich formatting and interactivity to data in SharePoint lists and libraries. If your lists are becoming large and unwieldy, Predictive Indexing in SharePoint automatically sorts, queries and indexes your information into workable lists and libraries. Simple forms and interactive visualizations can be added to any SharePoint page with Power BI & Forms web parts.  Finally, you can add PowerApps to any SharePoint page with PowerApps web parts. 

Flow for OneDrive provides you the capability to build and launch Flows directly from within OneDrive to automate processes for your personal files.  Triggering the Flow Launch Panel, an inline panel prompts the user to enter information that is used by the flow.  Routing a document for review and feedback is built in Flow, ticketed as Document/Item Review. Finally, custom processes can be built with Flow with the Custom Approval Action, which requires formal approval check-in and approval before content for libraries can be published.  

Microsoft Teams and Skype

As Microsoft Teams begins integrating voice and video capabilities, along with chat, to become the main workplace communications collaboration app, Skype continues to receive an enhanced infrastructure for improved video and voice communications.  Microsoft Teams now has the added calling features of call transfer, calling to and from external phone numbers and voicemail as well as insights from Microsoft Graph.  Teams will evolve as the primary client for communications in Office 365, and over time, will replace Skype for Business.

SharePoint and Yammer

The question of whether Yammer is a product that will stay or be replaced was partially answered at Ignite this year with the announcement of several new updates.  These include new mobile-ready web part for integrating Yammer conversations into SharePoint Sites, SharePoint documents have an enriched preview and editing experience with Yammer, Yammer Groups connected to Office 365 will have default SharePoint file storage and OneNote services, launching video and voice calls directly from Yammer, and the ability to see Presence straight from Yammer.

In addition to all these great features, there is one last improvement that was announced at Ignite.  This important piece of news is the new building block of the intranet – SharePoint Hub Sites, which we discuss in detail in this article.

Adding, Deleting and Customizing Web Parts for an Office 365 Communication Site – The News, Events, Document and Image Gallery Web Parts


In our previous installments, we have been building on the basics of a Communication Site to understanding how a Communication Site is created and shared. In this installment, we continue with adding, deleting and customizing the last four types of web parts.

Types of Web Parts

There are five different types of web parts, each with a specific function.  These web parts include:  News, Events, Document, Image Gallery and Hero, which was explained in Part 4. 

1.  News Web Part

The News web part that can be added to your Communication Site design. With News, you can engage your audience with interesting stories, important announcements, status updates and more with the use of high impact graphics and rich formatting.

Adding the News web part is very simple:

  1. Click Edit – found at the top right of the page;
  2. Above the News web part, hover your mouse until a line with a circle appears:

Plus sign for adding web parts to a page

  1. Click the + sign in the green circle;
  2. Select News web part. 

Now that your News web part has been added, you can now customize the layout for it. There are three possible layouts:

  1. Top Story:  On the left is a large image space, on the right is space for three additional stories;
  2. Side-by-Side: A two-column list of stories and is the default layout for the Communication Site; and
  3. List:  News posts are shown in a single column. 

To change the layout:

  1. Click Edit – found at the top right of the page;
  2. Click Edit button – found on left side of the News web part; and
  3. In the Toolbox, select the layout you want to use. 

Now that you have added and chosen the layout for your News web part, the next step is to populate it with content by creating news posts.

To create News posts on your published or saved page:

  1. In the empty News box, click +Add to start creating your post.;
  2. Add your headline;
  3. Click +Add to add text and graphics on your page;
  4. Click Publish, found at the top right, when you are done creating your page.  Your story will now appear in the News section as the most recent story. 

Sometimes, we create a new post but then for different reasons, need to delete it.  Deleting a news post is as follows:

  1. Click See All;
  2. Click Manage Posts;
  3. Find the page that you would like to remove;
  4. To the right of the page that you would like to remove, click on the three ellipses (…); and
  5. Click Delete

A unique and useful feature with the News web part is the ability to share your new post via email.  The email will include the link to the news post, a thumbnail preview, a description, and the option to provide a message to one or more recipients.

To send your page via email:

  1. Click Send by Email – found at the top of your page;
  2. In the To box, enter the name of the recipients;
  3. Type a message to your recipients if you want to; and
  4. Click Send

3.  Events Web Part

The Events web part is a great way to actively engage your audience.  As it states, it announces events that pertain to the various projects, launches, and celebrations across the organization. It is a great way to share the successes of all the teams in the organization and helps to team build and boosts morale. 

You can add an Events web part to your Communication Site design by:

  1. Click Edit – found at the top right of the page;
  2. Hover your mouse below or above an existing web part, or under the title region. Click on the + sign in the green circle.  Select the Events web part;
  3. In the Title box, add your own title;
  4. Click Edit Web Part – found on the left to set options.  There are three sections that can be completed:


    1. Events List:  an empty Events list automatically created with the default settings of a Calendar list.  If there is more than one event list on the site, you can select the one that you want;
    2. Category:  if your list has categories, you can filter the events you show by choosing one category;
    3. Date Range:  from a drop-down list, you can filter your events based on a date range.  The default is All Upcoming Events and additional options include This Week, Next Two Weeks, This Month, or This Quarter

After adding the Events web part to your page and having published or saved it, you are now ready to add events.  To add an event:

  1. Click Add Event;
  2. At the top of the page, Name your event.  As an option, an image can be added to the title area.  Click the Add Image button located in the upper left;
  3. Add the dates and times in the When section;
  4. Enter the location and address in the Where section. If the address is recognized, you will have the option of including a map;
  5. If this is for an online meeting, you can enter the information in the Link section.  Place the link for the online meeting in the Address box, then add a Display Name.  If this is not for an online meeting, then leave the information blank. This section will not appear in the event; 
  6. If you want an event to show through filters, then choose a Category such as Holiday, Meeting, Business, Work Hours, and so on.  If you want to enter in a customized category, type it in the space rather than choosing one that is offered;
  7. In the About this Event area, provide a useful description; 
  8. If you would like to highlight people such as special guests, guest speaker or contacts, then you can add their names below the event description.  Note that only users within your organization can be added;
  9. Click Save when you are done. If you require to edit the event, click Edit at the top right of the event page. 

4.  Document Web Part

The Document web part allows you to insert a document file that can originate from Word, Excel, Visio or PowerPoint.  The starting page of the document is seen inside a frame by the user, but the user will be able to scroll down and/or download the document. 

To add a Document web part:

  1. Click Edit – found at the top right of the page;
  2. Hover your mouse below or above an existing web part, or under the title region. Click on the + sign in the green circle.  Select the Document web part;
  3. Insert the document you want by choosing a recent document, browsing for one, uploading one or via a link;
  4. Under the web part, you can add a description, but this is optional;
  5. Set the Start Page you want users to see first by clicking Edit Web Part.  Then, under Start Page, type in the page number you want it to start with.  Click Apply and this will now save and apply the new settings.
  6. Once your document is published, users will have options to either Download a Copy, Print to PDF, and Embed Code for sharing purposes. 

5.  Image Gallery

Share collections of images on a page in the Image Gallery. Images can either appear in tile form or in carousel form, which shows one photo at a time with a new photo replacing the previous on a timer. 

To add the Image Gallery web part:

  1. Click Edit – found at the top right of the page;
  2. Hover your mouse below or above an existing web part, or under the title region. Click on the + sign in the green circle.  Select the Image Gallery web part;
  3. Select the location where your images are stored;
  4. From the panel on the left, you have several options to choose the source of your images. The sources can be recent images, browse from a site, a link to insert the images you want, or you can upload from your device.  Choose one of these sources, then click Open to add the images you have selected;
  5. If you click the Edit button on each image, you will have the option of keying in a title, description, and alternative text;
  6. Add additional images by dragging and dropping, or by clicking +Add to select additional images;
  7. To specify the layout (tile or carousel), click Edit Web Part and choose the layout that you prefer. 

You are now able to determine what type of site to create (Team vs. Communication) based on your audience, create a new Office 365 Communication Site, discern between the five different types of web parts, modify your site with the addition of, deletion of and customization of the web parts on your site, and, finally, share your Office 365 Communication Site with those in your organization.  Through your Communication Site, you will be able to keep those in your organization informed of announcements, upcoming events, celebrations, information sessions, people information and so much more!

Editing and Publishing an Office 365 Communication Site – The Hero Web Part


In our previous installments, The Basics of the Office 365 Communication Site, The Components of the Office 365 Communication Site, and Creating an Office 365 Communication Site, we built upon the basics of a Communication Site to understanding how a Communication Site is created and shared. In this installment, we will now look at how to customize the Communication Site through adding, deleting and customizing the building blocks, referred to as web parts, of your page.

Web Parts – Customizing

As discussed in Part 2 of this series, there are three site designs that are made available when creating the Communication Site.  The three are Topic, Showcase, and Blank.  Each web part can be included, excluded and customized to your needs.   There are four web parts that are included, by default, in both the Topic and Showcase site designs.  With the Blank site design, you choose which web parts are to be included. 

Types of Web Parts

There are five different types of web parts, each with a specific function.  These web parts include:  Hero, News, Events, Document and Image Gallery. 

1.  Hero Web Part

The Hero web part in the Topic site design consists of a five-tile layout, but the number of tiles is customizable and can range from one to five.  In addition to this, links, images, and text for each tile can be changed.

The Hero web part in the Showcase site design defaults to a vertical layout with three layers but can range from one to five layers if customization is chosen.  

Changing the Hero Web Part Layout

To change the layout in the Hero web part for the Topic site design:

  1. Click Edit – found at the top right of the page;
  2. Click Edit Web Part – found at the top left of the page.  Select the layout you want.  As the Topic site design was chosen, you can choose the number of tiles to be displayed and the layout is visually presented under the number of tiles.

Changing the Hero Web Part Layout

To change the layout from a grid to vertical layers in the Hero web part for the Showcase site design:

  1. Click Edit – found at the top right of the page;
  2. Click Edit Web Part – found at the top left of the page.  Select the layout you want.  As the Showcase site design was chosen, you can choose the number of layers to be displayed and the layout is visually presented under the number of layers.
     

Changing the Image, Text, and Links for Each Tile or Layer

To change the image, text, and links for each tile for the Topic and Showcase site designs:

  1. Click Edit – found at the top right of the page;
  2. Click Edit Details – found at the bottom right of the tile or layer that you want to change;
  3. Click Change in the toolbox.  Choose a location from where to get your content:


    1. Recent:  listed here will be your recently opened documents, images, and pages;
    2. OneDrive:  obtain a link for a document or image that you have stored on OneDrive;
    3. Site:  obtain a link for a document, image, or page from a Site that you specify;
    4. Upload:  upload an image or document from a personal device;
    5. From a Link:  manually enter the link to a document, image, or your page from OneDrive for Business or SharePoint Online;
  4. Select your image, document, or page.  Click Open;
  5. In the Toolbox and under Image, select Custom Image or Color Only (this option is available only for the Tiles layout).  An image will automatically be selected from the page or document that you are linking to when Auto-Selected is activated;
  6. For the image, enter in Alternative Text;
  7. Click on Options, and if you decide to, you can show a Call to Action Link by switching the toggle to Yes.  Next, add your Call to Action Text.  The Call to Action link is available only for the largest tile in a tiled layout; and
  8. For the layered layout, there is an option to show a Topic heading.  Click on Options and switch the toggle for Topic Heading to Yes. Key in your Topic Heading Text


Reordering Tiles or Layers

Tiles and Layers can be reordered by moving them where you would them to go:

  1. Click Edit – found at the top right of the page; and
  2. Click and hold the Move Item button.  Drag the tile or layer where you want. 

Columnizing the Hero Web Part

The Hero web part is designed to span across the full width of the page.  If you choose to have the Hero web part span partially across the page, then you would add a column to the page and place the Hero web part into that column. 

  1. Click Edit – found at top right of the page;
  2. Above the Hero web part, hover your mouse until a line with a circle appears:

Plus sign for adding web parts to a page

  1. Click on the + sign in the green circle;
  2. Select One Column under the Section Layout; and
  3. Use the Move Web Part button, found on the left side of the web part, to drag the Hero web part into the column you had just added. 

Adding and Empty Hero Web Part to a Page

You can add an empty Hero web part, even if the page is not a Communication Site page.   

  1. Click Edit – found at top right of the page;
  2. Above the Hero web part, hover your mouse until a line with a circle appears:

Plus sign for adding web parts to a page

Click the + sign in the green circle.  Choose Hero web part;

  1. Click the Edit button for web parts.  Select the type of layout you want. Options include a grid from 1 to 5 tiles or 1 to 5 vertical layers;
  2. Click Select Link for each tile you want to change;
  3. Click Change in the toolbox.  Choose a location from where to get your content:


    1. Recent:  listed here will be your recently opened documents, images, and pages;
    2. OneDrive:  obtain a link for a document or image that you have stored on OneDrive;
    3. Site:  obtain a link for a document, image, or page from a Site that you specify;
    4. Upload:  upload an image or document from a personal device;
    5. From a Link:  manually enter the link to a document, image, or your page from OneDrive for Business or SharePoint Online;
  4. Select your page, image, or document.  Click Open;
  5. In the Toolbox and under Image, select Custom Image or Color Only (this option is available only for the Tiles layout).  An image will automatically be selected from the page or document that you are linking to when Auto-Selected is activated;
  6. For the image, enter in Alternative Text;
  7. Click on Options, and if you decide to, you can show a Call to Action Link by switching the toggle to Yes.  Next, add your Call to Action Text.  The Call to Action link is available only for the largest tile in a tiled layout whereas, in a layered layout, it is available for each layer; and
  8. Under Options, a Topic heading can be added for each layer by switching the Topic Heading to Yes for layered layouts.  Once switched to Yes, add your Topic Heading Text.

The Hero web part is the most configurable and contains the main content that you want to share with your audience. This is where features, announcements, status updates and news are shared.  Combining intriguing headlines and attention-grabbing images, the Hero web part seduces the audience to engage by reading, responding and participating. In our next installment, Part 5:  News, Events, Documents and Image Gallery, we will examine the last four web parts to complete the customization of your Office 365 Communications Site.