SharePoint Everywhere, SharePoint Mobile App


Today, we are more on-thego than we have ever been and access to digital information has never been more critical with on demand immediate access.  Have you ever lost your smart phone or your tablet?  Been in a remote area without any connection?  Felt flustered and lost because you could not reach out to the digital world to grab the information that you require? Have you walked into a meeting ready to “wing it” because the updated information on the project was not accessible once you left the office? SharePoint Mobile App is the solution that has been developed to meet the need of keeping in communication with your corporation’s intranet while you’re on-the-go. 

SharePoint is evolving. Changing. Adapting. Meeting users’ needs.  SharePoint is now available for your smart phone or tablet with SharePoint Mobile App. SharePoint is now available in your pocket while you’re on the go, providing accessibility to your intranet from any location, 24/7 and across on all your personal mobile devices. 

The SharePoint Mobile App works with SharePoint Online in Office 365, on-prem with SharePoint Server 2013 and 2016 and your hybrid environment.  It is cloud based, working synergistically with OneDrive, and is available for iOS as well as Android and Windows (the latter two will be available later this year).  It is driven by Office Graph, a backend tool which facilitates searches across integrated applications in Office 365 including its content repositories and OneDrive.  The artificial intelligence of Graph allows the program to machine learn – analyzing, building and connecting people based on the content that each user accesses the most frequently.  As a result, it provides the most pertinent content, sites, portals, and contacts for given projects within a corporate enterprise with extreme ease of access.  SharePoint mobile has brought intranet corporate collaboration to a whole new level. 

On the Discover screen, one can quickly and easily access corporate news and announcements, most frequented sites, contact list of co-collaborators and search across the corporate structure for digital information through navigation tiles which resemble the Sway environment.  With Graph operating in the background, the tiles will feature the information that is most relevant to the collaborator based on their usage, assignments and hits in SharePoint 2016 and Office 365. 

With early release versions of SharePoint Mobile App, there will be smaller tiles, or tabs, and when touched, will open and provide details and specific information.  Let’s start with the first tab – the Sites tab. By selecting the Sites tab, a list of sites that the collaborator frequents and follows will appear.  The next level will provide additional information including recent activity, files and assets, which also include lists, documents, pages and subsites.  True to the definition of collaboration, these sites can be easily shared. 

As with all Microsoft products, SharePoint Mobile App is linked with other Office apps.  What does this mean for the collaborator?  This means that there is a seamless integration of Office 365, SharePoint Mobile App and other Office programs such as Word, Excel and the remainder of the suite.  For example, when the collaborator is looking at Recent documents and clicks on a Word document, SharePoint Mobile App will take the user directly into the corresponding mobile app so they can readily edit, manage, share or view the document and/or information.   

As SharePoint is an intranet collaboration app, having the ability to see who you are collaborating with and having the ability to communicate with them would be vital for a successful project.  By touching the People tab, you will be able to browse and find colleagues within your network.  By tapping on the individual, pertinent information including their contact information, projects they are collaborating on and team members of these projects will appear.  

Though Graph provides the most frequently used and accessed information on an individualized basis, there are instances when it is still necessary to find digital information manually. This brings us to SearchSearch in the SharePoint Mobile App provides a full enterprise search so that not only can you search for content, but you can also search for people by applying filters such as sites, files and people.  Search crawls across the corporate intranet including the SharePoint team sites, folders in OneDrive for Business, restricted to the ones which you have access to, company portals, and Graph’s recommended content. 

Though individual collaborators will see their recommended content, management requires the ability to make announcements, provide resource information, and provide standardized sites and programs that can be accessed by all members in the company.  Created by the SharePoint administrators in Office 365, the Links tab will provide corporate wide information for all employees. 

SharePoint Mobile App is an extremely powerful tool for on-the-go collaboration.  By integrating SharePoint, Office 365 and OneDrive, Microsoft is reshaping and redefining how intranet collaboration is done, what intranet collaboration should look like and why intranet collaboration is vital to the on-the-go corporate work style. 
Hybrid BCS Part 5 – Validation

Now that you have created an external list or deployed an app for SharePoint in SharePoint Online, you need to test the security you put in place. Every account that will be accessing and manipulating the external data must have three properties:

  1. It must have user or greater permissions to the SharePoint Online site and the external list or app for SharePoint.
  2. It must be a federated account.
  3. It must be a member of the on-premises global security group that you are using to control access to the OData service endpoint. For example, it must be a member of ODataGroup.

In this procedure, you will open the SharePoint Online site and the external list or app for SharePoint with four different accounts.

To validate security on the BCS hybrid

  1. Identify or create one account for each of the account types listed in the following table.

Account

Expected outcome

Troubleshooting step

Account A

  1. Has site/list/app permissions.
  2. Is federated.
  3. Is a member of the on-premises global security group (ODataGroup).

External data displayed and editable.

If the external data does not display or you cannot edit it, check the site permissions, your federation setup, and the membership of your on-premises global security group; for example, the ODataGroup.

Account B

  1. Does not have site/list/app permissions.
  2. Is federated.
  3. Is a member of the on-premises global security group (ODataGroup).

External data does not display.

If the external data does display and you can edit it, check the site/list/app permissions.

Account C

  1. Has site/list/app permissions.
  2. Is not federated (is an Office 365 account only).
  3. Cannot be added to the on-premises global security group (ODataGroup).

External data does not display.

If the external data does display and you can edit it, check your federation setup and membership of your on-premises global security group (Odata Group).

Account D

  1. Has site/list/app permissions.
  2. Is federated.
  3. Is not a member of your on-premises global security group (ODataGroup).

External data does not display.

If the external data does display and you can edit it, check the membership of your on-premises global security group (ODataGroup) and the permissions that you set on the OData service endpoint that you configure in Prepare the SharePoint Online environment for the Business Connectivity Services hybrid scenario


  1. Open (by using In-Private browsing if possible) the SharePoint Online site that contains the external list or app for SharePoint by using each of the accounts in turn. Be sure to completely log out and close your browser in between tests.
  2. If you don’t see the expected outcome, refer to the troubleshooting step in the previous table, fix the issue, and repeat all four tests until you achieve the expected outcome.

If you see the error message:

ResourceBudgetExceeded, sending throttled status code. Exception=Microsoft.SharePoint.SPResourceBudgetExceededException: ResourceBudgetExceeded at Microsoft.SharePoint.SPResourceTally.Check(Int32 value) at Microsoft.SharePoint.SPAggregateResourceTally.Check(SPResourceKind kind, Int32 value) at Microsoft.SharePoint.Client.SPClientServiceHost.OnBeginRequest()


You can either remove the throttling:

$webapp = Get-SPWebApplication -Identity http://<URL of your on-premises farm>
$rule = $webapp.AppResourceTrackingSettings.Rules.Get([Microsoft.SharePoint.SPResourceKind]::ClientServiceRequestDuration)$rule.Remove()


Or change the throttling value:

$webapp = Get-SPWebApplication -Identity http://<URL of your on-premises farm>
$webapp. AppResourceTrackingSettings.Rules.Add([Microsoft.SharePoint.SPResourceKind]::ClientServiceRequestDuration, 150000, 150000)$webapp.AppResourceTrackingSettings.WindowCount = 10$webapp.AppResourceTrackingSettings.WindowSize = [System.TimeSpan]::FromSeconds(30)
$webapp.Update()

Note: 150000 is time in ms (ergo, 150 seconds).


Troubleshooting the hybrid configuration

  1. Verify that the external data source is running and accessible
  2. Verify that one-way outbound or two-way authentication is working
  3. Verify configuration steps presented earlier
  4. Check logs written by the Unified Logging Service (ULS logs or trace logs)

<< Previous – Part 4 – Connect to on-premises services

Hybrid BCS Part 4 – Connect to on-premises services


Setting a hybrid connection between you SharePoint Online and on-premises required communication trusts between the 2 farms. Refer to this article Configuring Hybrid Infrastructure for more details on how to configure your hybrid infrastructure.

Validate external access to reverse proxy

At this point in deploying the BCS hybrid scenario, you should confirm that you can access your on-premises SharePoint 2013 farm that has been configured to receive hybrid calls from SharePoint Online.

To confirm access to external URL:

  1. Copy the certificate to your extranet computer, and then click the certificate. You will be prompted for the certificate password. This adds the certificate to your personal certificate store.
  2. Open a web browser and browse to the externally published URL of your on-premises farm. You should be prompted for credentials. If not, check your browser settings and make sure that your logged on credentials are not being automatically passed.
  3. Provide the credentials of the federated user. This log on must succeed and you should see the published site. If this does not work, contact the administrators who set up your hybrid infrastructure. Do not proceed any further with the BCS hybrid scenario until this issue is resolved.

Prepare your tenant environment

In order to allow your SharePoint Online tenant to connect to your on-premises tenant, you will need to configure your security to allow accepting connection to your services. The following steps are an example of what you need to establish a trust between your Online and on-premises tenants.

  1. Click a service account that will access the OData service endpoint that you have previously configured; this procedure will be called ODataAccount
  2. Create a global security group for your OData service endpoint; this procedure will be called ODataGroup
  3. Add the service account to the global security group

Configure Secure Store target application

  1. Go to your on-premises tenant SharePoint Central Administration
  2. Navigate to Application Management > Manage service applications
  3. Click the Secure StoreI
  4. if you have never used your Secure Store, you will need to generate a new key first
  5. Click on Generate New Key
  6. Enter your Passphrase then click OK
  7. Click on New under Manage Target Applications
  8. Enter the name of your application, the display name, and your email address
  9. Select Group in the Target Application Type
  10. Click Next
  11. Accept the defaults values in the Create New Secure Store Target Application page
  12. Click Next
  13. Enter the Farm Administrator account in the Target Application Administrators, and enter the group name you created for you OData Service Endpoint in the Members section
  14. Click OK
  15. Click OK

Important:

A pass phrase string must be at least eight characters and must have at least three of the following four elements:

  1. Uppercase characters
  2. Lowercase characters
  3. Numerals
  4. Any of the following special characters
    "! " # $ % & ' ( ) * + , – . / : ; < = > ? @ [ \ ] ^ _ ` { | } ~

Important:

The pass phrase that you enter is not stored. Make sure that you write this down and store it in a safe place. You must have it to refresh the key, such as when you add a new application server to the server farm.

For security precautions or as part of regular maintenance you may decide to generate a new encryption key and force the Secure Store Service to be re-encrypted based on the new key. You can use this same procedure to do this.

Caution:

You should back up the database of the Secure Store Service application before generating a new key.

Set Permissions on your Online BCS

Setting your permissions on your Online BDC Metadata store is different than the on-premises tenant.

    1. Open your SharePoint Online administration page
    2. Click on bcs
    3. Click on Manage BDC Models and External Content Types
    4. Under Permissions, click on Set Metadata Store Permissions
    5. Select All users then set the Execute
    6. Select the checkbox to Propagate permissions to all BDC Model
    7. Click OK

Connect your O365 BCS to your on-premises

Unlike BCS in SharePoint 2013, BCS in SharePoint Online requires that you configure a connection settings object (CSO), which contains additional information to establish the connection to the external system and the OData source you have created.

When you create a CSO in your SharePoint Online tenant, you must provide a URL for your on-premises farm (the external URL you have configured in your reverse proxy to connect to your internal SharePoint services). Your SharePoint Online tenant will try to reach out to that endpoint in order to invoke your on-premises BCS and connect to your data source.

Whatever URL you may choose to publish, your CSO must have /_vti_bin/client.svc at the end of the URL in order to work properly.

Before you begin this procedure, make sure you have the following:

  1. Install configuration tools on an on-premises web server.
  2. The ID of the Secure Store target application that you configured.
  3. The Internet-facing URL that Office 365 uses to connect to the service address and that was published by the reverse proxy
  4. The ID of the Secure Store target application for the Secure Channel certificate in Office 365.

To create a CSO to your on-premises tenant:

  1. Open your SharePoint Online administration page
  2. Click on bcs
  3. Click Manage connections to on-premises services
  4. Click Add
  5. Enter the Title and the OData Service Address URL
  6. Under Authentication, select Use credentials stored in SharePoint on-premises
  7. Enter the Secure Store Target Application ID
  8. Under Authentication Mode, select Impersonate Window’s Identity
  9. Enter the internet facing URL you have configured under the reverse proxy; make sure you include /_vti_bin/client.svc at the end of the URL
  10. Click Create

Since your model will be using your Connection Settings object that you create in your SharePoint Online in order to connect to the on-premises data, there are some changes you need to make to it; if you do not do this then your model will not be able to connect to the on-premises data source:

  1. Make a copy of the ECT file that you'll be importing so you don't break the version you have with your OData project
  2. Delete the ODataServiceMetadataUrl and ODataServiceMetadataAuthenticationMode properties from the LobSystem property list in the ECT file
  3. Delete the ODataServiceUrl and ODataServiceAuthenticationMode properties from the LobSystemInstance property list in the ECT file
  4. Add this property to the list of properties for both the LobSystem and LobSystemInstance:  <Property Name="ODataConnectionSettingsId" Type="System.String">yourConnectionSettingsObjectName</Property>

Import your ECT file to SharePoint Online

Similar to the steps for your on-premises tenant, you need to import your new ECT file you have modified in the previous section to your SharePoint Online BCS tenant.

  1. Open your SharePoint Online administration page
  2. Click on bcs
  3. Click on Manage your BDC Models and External Content Types
  4. Click on Import
  5. Navigate to your ECT file locations and import each ECT file; as an alternative solution, you can develop a PowerShell script to import all the files
  6. Click OK

Once your model is uploaded successfully you can create a new External List in SharePoint Online and use that to work with your on-premises LOB data.

Follow this article to create an External List.


<< Previous – Part 3 – External Content Type Configuration 

>> Next – Part 5 – Validation

Configuring Hybrid Infrastructure


Setting up SharePoint on-premises requires that you meet basic SSO deployment requirements and then configure SharePoint 2013 services and inbound requests.

When you set up and enable SSO, users in your organization are able to use their corporate credentials to access the Office 365 service offerings. This removes the burden of managing multiple logon identities and passwords. Without SSO, an Office 365 user would have to maintain separate user names and passwords. For an even better end-user experience, you can create and deploy smart links, which can help speed user sign-in requests by reducing the number of redirects necessary for authentication.

In addition to user advantages, administrators and the organization can also benefit from SSO. For example, configuring SSO helps to enforce the organization’s password policies and account restrictions in both the on-premises directory and the Office 365 directory.

To prepare, you must make sure the environment meets the requirements for SSO and verify that the Active Directory and Azure Active Directory tenant is set up in a way that is compatible with single sign-on requirements. Also, Active Directory must be deployed and running in Windows Server 2003 R2, Windows Server 2008, Windows Server 2008 R2, Windows Server 2012, or Windows Server 2012 R2 with a functional level of mixed or native mode. If you plan to use AD FS as your STS, you will need to do one of the following:

  1. Download, install, and deploy AD FS 2.0 on a Windows Server 2008 or Windows Server 2008 R2 server.
  2. Deploy an AD FS 2.0 proxy, if users will be connecting from outside the company network.
  3. Install the AD FS role service on a Windows Server 2012 or Windows Server 2012 R2 server.

In addition, Active Directory must have certain settings configured to work properly with single sign-on. In particular, the UPN, or the user logon name, must be set up in a specific way for each user.


Configure SharePoint 2013 services

You need to configure the User Profile Service to synchronize user and group profiles from the on-premises Active Directory domain. When federated users access resources in a hybrid environment, the STS makes calls to the User Profile Service to obtain user account metadata, such as the UPN and email property values. This metadata is used by the STS to construct security tokens during the authentication process.

SharePoint Online presents claims to the on-premises SharePoint farm by using the Simple Mail Transfer Protocol (SMTP). To support this, you need to ensure that the SharePoint user profiles for all federated users are populated with the user’s email address by using the correct UPN.

This means that the work email field in the on-premises SharePoint User Profile Store needs to contain the user’s federated email address. For example, if a federated user logs on to the on-premises domain as contoso\karenb and the public domain for the hybrid environment is contoso.com, her federated email address is [email protected].

You must verify that the App Management and Microsoft SharePoint Foundation Subscription Settings services are started and configured. These services must be enabled to support certain configuration procedures, and to help register SharePoint Online as a high-trust application in SharePoint 2013.


Configure SharePoint 2013 for inbound requests

If the hybrid environment is configured for an inbound authentication topology, you must ensure that a single on-premises web application is configured to receive requests from SharePoint Online. This web application is referred to as the primary web application for the hybrid environment, and it accepts requests from the external endpoint URL. No specific web application configuration is required to support a one-way outbound authentication topology.

In a SharePoint Server 2013 hybrid environment, outbound connections can be made from any on-premises web application. A single SharePoint Server 2013 web application must be configured for inbound connections; it is used as the primary web application for accepting inbound connections and configuring services and connection objects for the hybrid features you deploy. You can either create a new web application and site collection or configure an existing web application for this purpose.


Configure SharePoint Online

Setting up SharePoint Online requires that you choose an application authentication topology and make additional configuration choices for the service.


Choose authentication topology

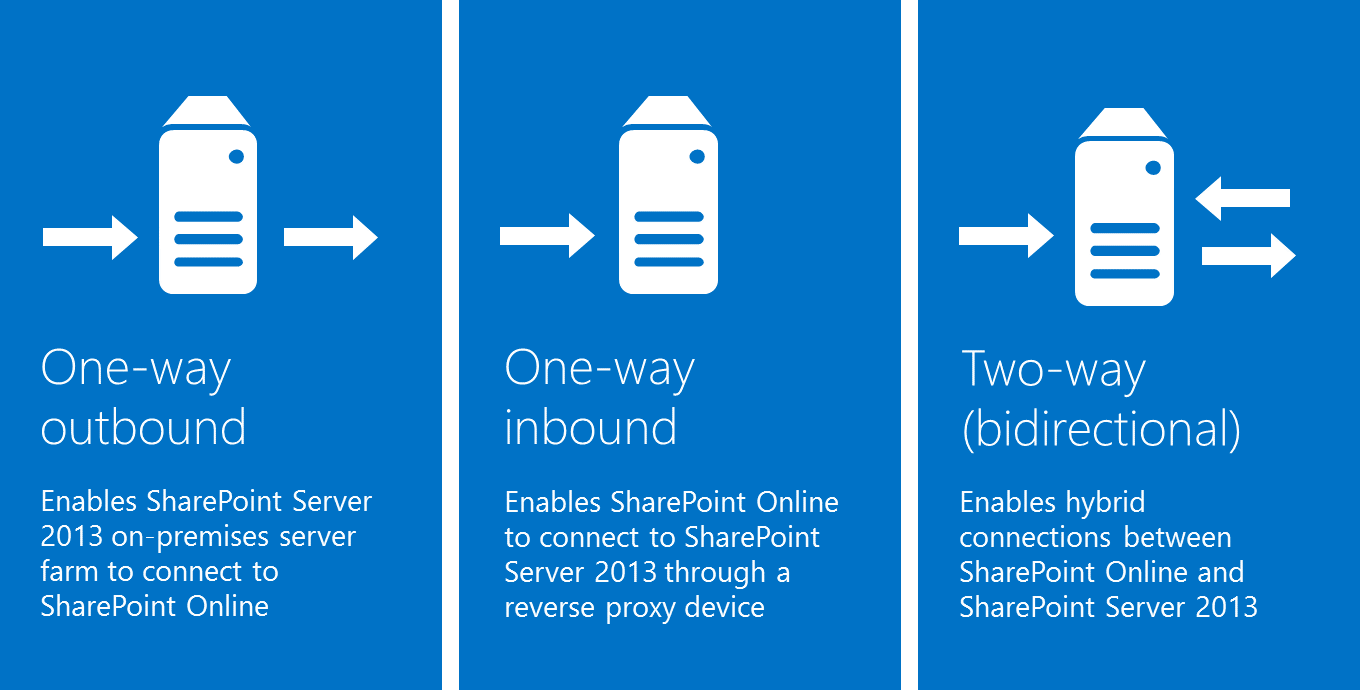
As shown in Figure 1, your choice of an authentication topology determines how certificates are configured and what capabilities are present in the hybrid solution.

Configuring Hybrid Infrastructure

Figure 1: Application authentication topologies

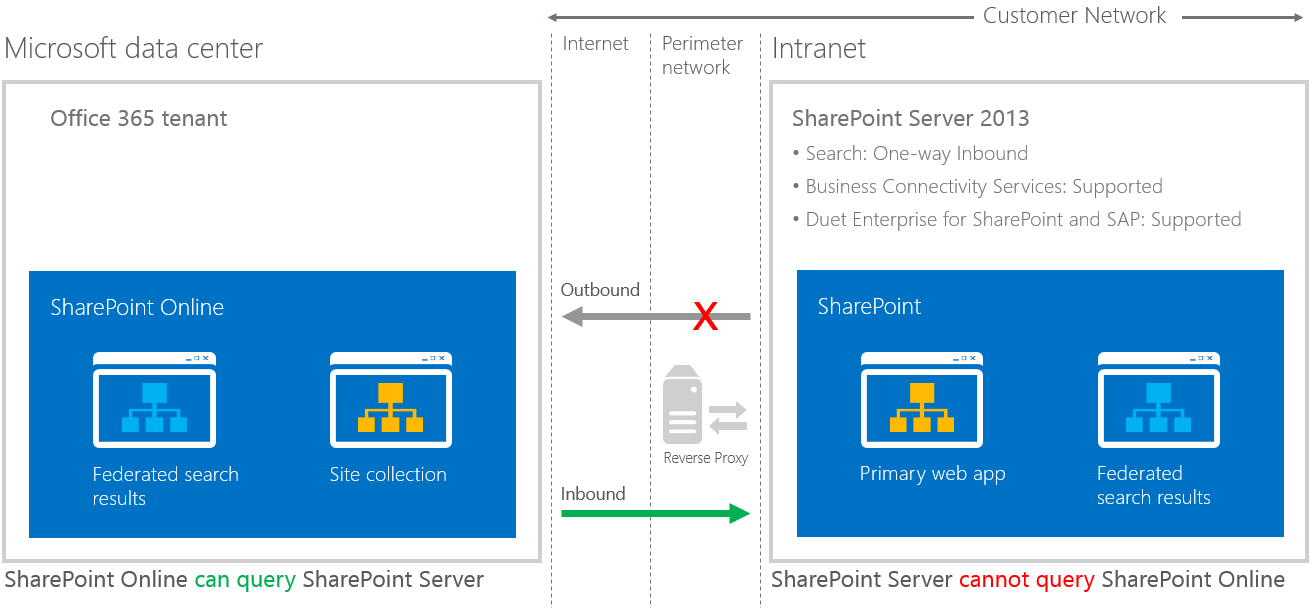
One-way outbound topology

One-way outbound topology is not supported with hybrid BCS. Only one-way inbound and two-way (bidirectional) topologies.

One-way inbound topology

A one-way inbound hybrid topology enables SharePoint Online to connect to SharePoint Server 2013 through a reverse proxy device (Figure 2). For example, users of a SharePoint Online Search portal can see both local and remote search results, but only local results are available in the SharePoint Server 2013 Search portal.

SharePoint Hybrid One Way Trust

Figure 2: One-way inbound topology

A one-way inbound topology can be configured to let users access on-premises SharePoint search results from the Internet, as long as they have access to the intranet through a virtual private network or DirectAccess.

  1. On-premises SharePoint Server 2013 Enterprise Search portal: Local search results are available
  2. SharePoint Online Search portal: Local and remote search results are available
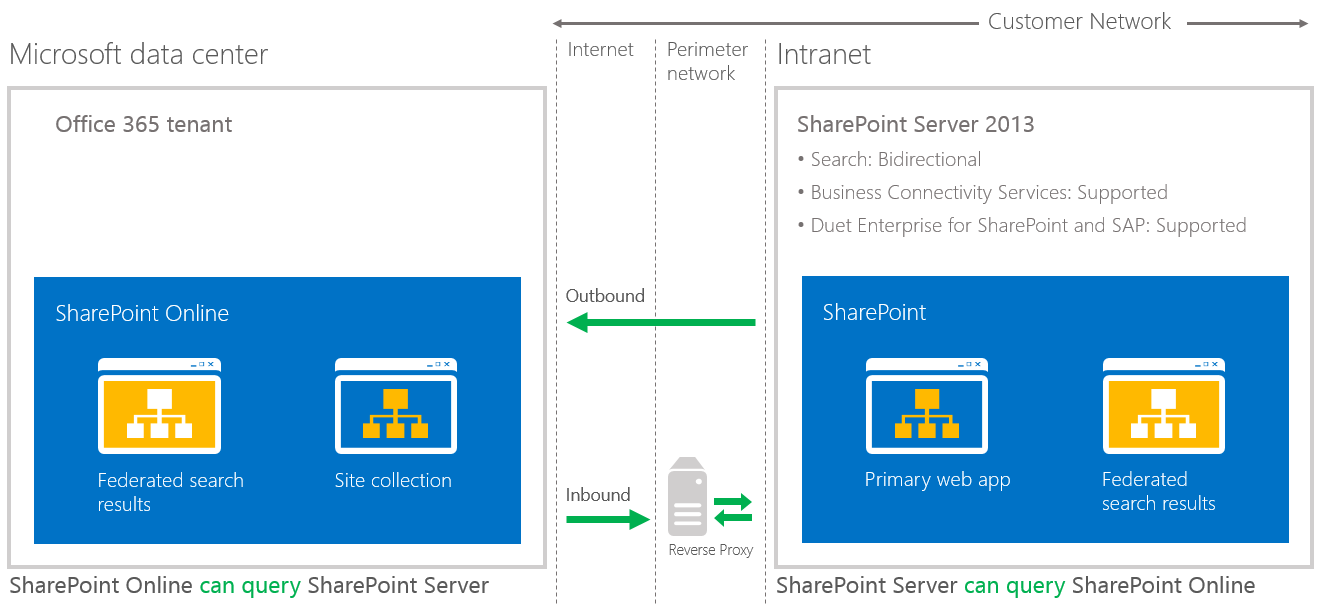
Two-way (bidirectional) topology

A two-way topology enables bidirectional hybrid service integration between the on-premises SharePoint Server 2013 farm environment and the Office 365 tenant (Figure 3). For example, search can be configured to allow federated users to see both local and remote search results in either SharePoint Server 2013 or SharePoint Online Search portals.

SharePoint Hybrid Two Way Trust

Figure 3: Two-way (bidirectional) topology

A two-way topology can be configured to let users access on-premises SharePoint search results from the Internet, as long as they have access to the intranet through a virtual private network or DirectAccess.

  1. On-premises SharePoint Server 2013 Enterprise Search portal and SharePoint Online Search portal: Local and remote search results are available.
  2. If extranet authentication services are configured, extranet users can log on remotely through an on-premises Active Directory account and use all available hybrid functionality.


Refer to these articles to configure your reverse proxy server and how to establish a secure connection between your Online and on-premises tenants.

Link to procedure Description of procedure
Configure a one-way inbound hybrid topology Learn how to configure the infrastructure for SharePoint 2013 hybrid environments that use a one-way inbound authentication topology.
Configure a two-way bidirectional hybrid topology Learn how to configure the infrastructure for SharePoint 2013 hybrid environments using a two-way authentication topology.


Hybrid BCS Part 3 – External Content Type Configuration


Next, you will need to create an External Content Type (ECT) based on the OData source. We need to reiterate here that Hybrid BCS implementation only work with OData source based ECT. The ECT can only be created with Visual Studio and not with SharePoint Designer.

To create an ECT, you need the following requirements:

  1. SharePoint Server 2013
  2. Visual Studio 2013
  3. Office Developer Tool for Visual Studio 2013
  4. OData service that can be accessed from the internet

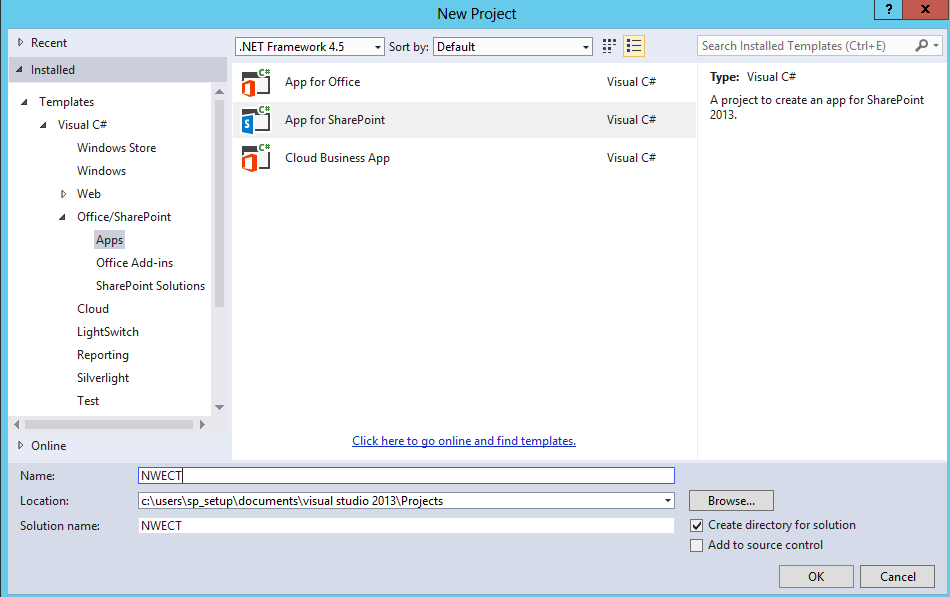
Create new SharePoint App

Using Visual Studio 2013, create a new SharePoint App:

  1. Under the Office/SharePoint templates, select App for SharePoint to create a new projectNew SharePoint App
  2. Name your project and click OK
  3. Select your local on-premises SharePoint URL to debug your project
  4. Select SharePoint-hosted
    Note:
    SharePoint-hosted apps, or apps where all components are hosted on either an on-premises or Office 365 SharePoint farm. SharePoint-hosted apps are installed on a SharePoint 2013 website, called the host web.
  5. Click Finish
  6. In the Solution Explorer, click on Add à Content Types for an External Data Source
  7. Enter the URL of your OData service you have published in the previous Section and choose a Name for it
  8. Click Next
  9. Select the one or more data entity
  10. Click Finish

This process will create the External Content Type for each of the entity you have selected.

Once you have created your External Content Type, you want to add the ECT to your Business Data Catalog (BDC) catalog so you can use it in your site collections.

In the previous section, we explain how you create an ECT, where each entity in the OData source represents a single ECT. However, the entities use a shared name in the ECT file, which will prevent you from uploading more than one entity to the BDC catalog. In order to fix this issue, you need to follow these steps to be able to use the entities in SharePoint:

  1. From Visual Studio, right click on the ECT file, and select Open with. Each entity will have its own .ect file located under “External Content Types\<folder name>”.
  2. Select XML (Text) Editor and click OK
  3. In the top of the document, within the Model element, you will see a Name attribute. This Name attribute is the name you have selected when you connected to the OData source. For example it can look like NorthwindCustomersModel. The value of this Name is the same in all of the ECT files created from the entities, but it has to be unique in order to use it in SharePoint. You will need to change the name based on the ECT you are using. For example, it will be something like Categories Table or Employees Table, etc…
  4. Change the name in each of the ECT file
  5. Change the name of the Namespace in the Entity element (optional)
  6. Save the ECT file

Upload ECT to the BDC Model

Once you have made the changes to all of your ECT files, you can upload all your entities to your BDC model. To do so:

  1. Go to your SharePoint Central Administration
  2. Navigate to Application Management à Manage service applications
  3. Click on your BDC Model
  4. Click on Import
  5. Navigate to your ECT file locations and import each ECT file; as an alternative solution, you can develop a PowerShell script to import all the files
  6. Click OK
  7. Repeat the above steps for all your models
  8. Once you have imported the BDC models, you will need to grant permissions for users to use them
  9. On each of the model, click on the dropdown menu and select Set Permissions
  10. Select the right permission you need to give for each group

<< Previous – Part 2 – Create an OData Source 

>> Next – Part 4 – Connect to on-premises services

Hybrid BCS – Part 2 – Create an OData Source


The BCS hybrid scenario supports connecting only to an Open Data protocol (Odata) source. If your external data already has an OData service endpoint, then you can skip the creation of an OData service endpoint portions of this procedure.

Using Visual Studio 2013, create an empty ASP.NET web application calling it NorthwindWeb, and follow these steps:

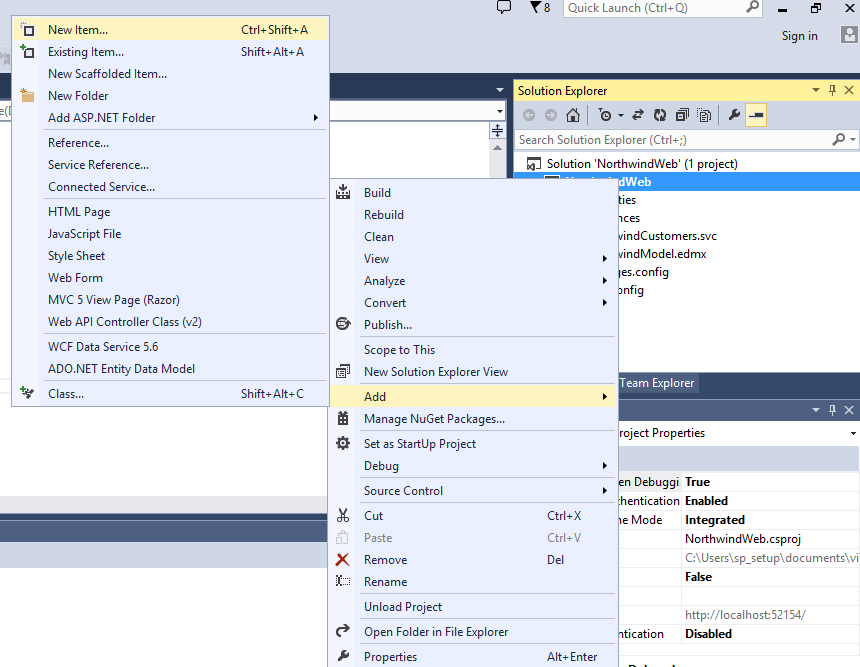
Add an ADO.NET Entity Data Model


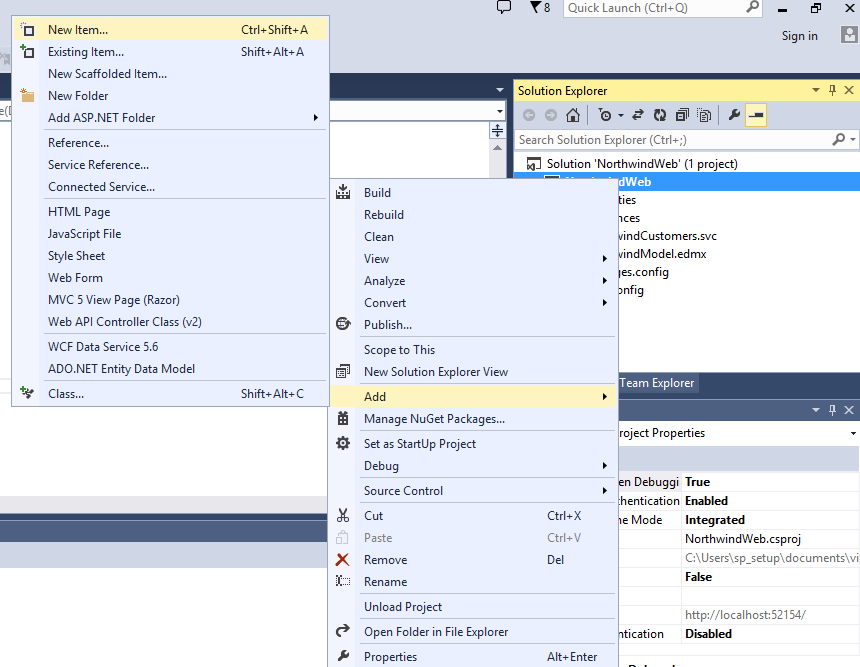
  1. Right click on the project and choose Add >> New Item
  2. Select Data under Visual C#
  3. Select ADO.NET Entity Data Model
  4. Call it NorthwindModel.edmx
  5. Click Add
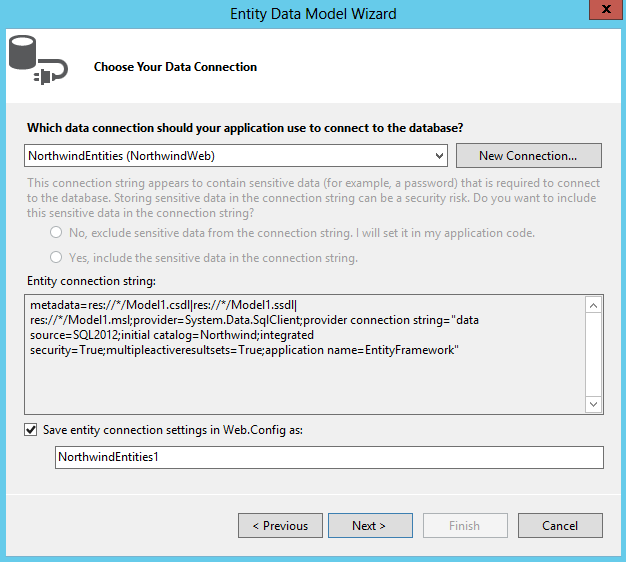
  6. Select Generate from database in the Entity Data Model Wizard
  7. Click Next
  8. Choose New Connection if you do not have an existing connection, or connect to an existing one
  9. Click Next
  10. Select Entity Framework 5.0
  11. Select all the tables
  12. Click Finish
  13. Compile the project.

Add a WCF Data Service

  1. Right click on the project and choose Add >> New Item
  2. From the Web node choose the WCF Data Service 5.6 item
  3. In the Name text box, enter Northwind
  4. Click on Add
  5. Edit the code for Northwind to update the following: 


    1. public class NorthwindCustomers : DataService <NorthwindEntities>
    2. Replace the comments in the InitializeService event handler with the following: config.SetEntitySetAccessRule(“*”, EntitySetRights.All);
  6. Compile the project.

This should be for creating an OData Source.

<< Prevoius – Part 1 – Introduction to Hybrid BCS Architecture

>> Next – Part 3 – External Content Type Configuration

SharePoint Patches are now part of Windows Update

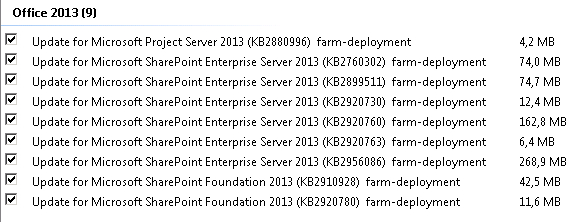
Starting with the February 2015 CUs, all SharePoint updates will be part of the Windows Update.

In a blog from Stefan Goßner, he indicates the changes will start with this months' CU.

SharePoint February 2015 CU

What does this mean to you?

1. Should I configure my server for auto update?
No, it is always best practice to schedule your windows server update. Change your Windows update configuration to notify you when there are updates ready to be installed, or schedule a manual check of your Windows Update. This way, you can coordinate your updates on all your servers in your farm at the same time.

2. Should I run the Windows Update on all the servers?
Yes. If you run your Windows Update on one server in the farm, then you will have to run it on all servers in the farm, so all servers have the same patch level.

3. Should I run the Configuration Wizard after the Windows Update?
Yes. You have to run with Configuration Wizard every time you have a Windows Update that includes a SharePoint patch.

In a nutshell, you need to plan your Windows Update for your SharePoint farms the same way you have done it in the past. What have changed is the patches are now pushed down to your server and it is up to you to manage it according to Microsoft's recommended approach. Always apply your patches in your Development and Pre-Production Environments before applying them to your Production farm. Make sure you do your homework from testing perspective and backups before applying any patches.

However, it is always recommended to apply the latest security updates to your environment as they contain important fixes to the platform.

SharePoint 2013 vs. 2010 – Part 7 – Composite

SharePoint 2013 and Office 15 considerably improve the capabilities for Composite solution development and further empower power users to solve many of their business problems on their own. Here are some of the new and enhance features: New features Enhanced features  

  1. Access Apps: robust way to create and combine a Composite solution and a SharePoint app without code and without even using Visual Studio. By contrast, Access 15 uses SQL Server to store data. This significantly improves the manageability and scalability of Access applications.
  2. Workflow: The new SharePoint 2013 workflow features enable more advanced, robust no-code solutions and include the following:

    1. A redesigned Workflow architecture that supports legacy workflows.
    2. Workflow Stages that enable more complex logic.
    3. Authoring workflows in SharePoint15 declaratively or visually.
    4. Integration of data from SOAP Web Services into workflows.
  3. Business Connectivity Services: Changes in Business Connectivity Services for the SharePoint 2013 expose more of Business Connectivity Services to the power user, and include the following:

    1. Enhancements to external lists
    2. Ability to export to Excel
    3. Workflows and subscriptions
    4. Support for OData sources


SharePoint 2013 vs. 2010 – Part 6 – Mobile Support

​The experiences from SharePoint Server 2010 have been improved to make end users more productive on devices that have a smaller display. Additionally, some new features have been included. Here are some of the new and enhance features: New features Enhanced features

  1. Optimized mobile browser experience: SharePoint 2013 offers improvements to the mobile browser experience. Depending on the mobile browser, end users have one of the following experiences:

    1. Classic view. This view renders in HTML format, or similar markup languages (CHTML, WML and so on), and provides backward compatibility for mobile browsers that cannot render in the new contemporary view.
    2. Contemporary view. This view offers an optimized mobile browser experience to end users. The view renders in HTML5. This view is available to Mobile Internet Explorer® version 9.0 or higher for Windows Phone 7.5, and for Safari version 4.0 or higher for iPhone 4.0.
  2. Office Mobile Web Apps: In SharePoint 2013, Office Web Apps provides browser-based companions to Microsoft Word, Microsoft Excel, Microsoft PowerPoint, and Microsoft OneNote. When Office Web Apps is installed on SharePoint Server 2010, Office Mobile Web Apps is also installed on the server. Office Mobile Web Apps enables users to open documents in the mobile web application by using a mobile browser.

With SharePoint 2013, Office Web Apps is no longer a companion product installed on a SharePoint Server. Instead, Office Web Apps Server is a new stand-alone server product that delivers Office Web Apps functionality on your private network. Although these are now separate products, Office Web Apps Server continues to enable Office Mobile Web Apps, making them available to mobile users who access SharePoint sites.

  1. Mobile browser redirection: To access a site using the optimized mobile browser experience, a new feature called Automatic Mobile Browser Redirection must be activated on the site. When activated and a mobile browser is accessing the site, this feature checks the mobile browser to determine if it is capable of handling HTML5 or not. If the mobile browser supports HTML5, the contemporary view is rendered; otherwise, the classic view is rendered.
  2. Push notifications: SharePoint 2013 supports applications on mobile devices (such as smartphones, tablets, and so on) that should receive notifications from a SharePoint site. Notifications can include events that happen in the site, such as when a user adds an item to a list or updates an item. For mobile devices to receive such notifications, device applications must register with a SharePoint site. Once the device is registered, you can write event handler code to interact with Microsoft Push Notification Service or notification services of other mobile device platforms. Notifications are sent from the server where the application is hosted to the registered mobile device application.