How to Tag SharePoint Modern Pages
Tagging and Metadata – An Overview
In a previous installment, Modern SharePoint Metadata, we discussed the importance of tagging a page with accurate metadata to curate the appropriate information to your targeted audience. Through the use of correct and accurate metadata, or tags or properties, on SharePoint modern pages, your audience will receive targeted, relevant, and important information in their news feed and when they do a search.
What is the Difference Between Tagging: Then and Now
Prior to this enhancement, tagging modern pages was cumbersome and not entirely intuitive. Once would have to add a custom property to a content type that was inherited from the Site Page. Not only cumbersome but from an end-user perspective, it was not easy to set up or configure. Additionally, the property on the page’s content could not be viewed. With this new enhancement, these issues have been addressed and solutions are being implemented to rectify them.
What can be Tagged in SharePoint Modern Pages?
SharePoint modern pages can be tagged based on categories that you would like to use, such as page type for specific end-user groups, business function, target audience, location, and other categories that would enable you to reach and group your end users distinctly from other groups.
How to Tag Modern Pages and Display Based on End-User
Adding the Page Property (or Tag)
The column on a Site Page houses the page properties. To define a new page with new properties, go to the Site Pages page and choose Add Column to the Site Pages Library. Provide a name for this column. The name of the column becomes the Page Property. From this page property column, you can then provide the Description, choose “Choice” as the Type of column, and then choose the “Definition” for the Choice column. The values in the side illustration use options like “News Release”, “Announcement”, or “President’s note” as the choices.


Adding the Page Property to a Page
Once the page properties have been added to the Site Pages library by adding a new column, all new site pages can be tagged with that value from that page property.
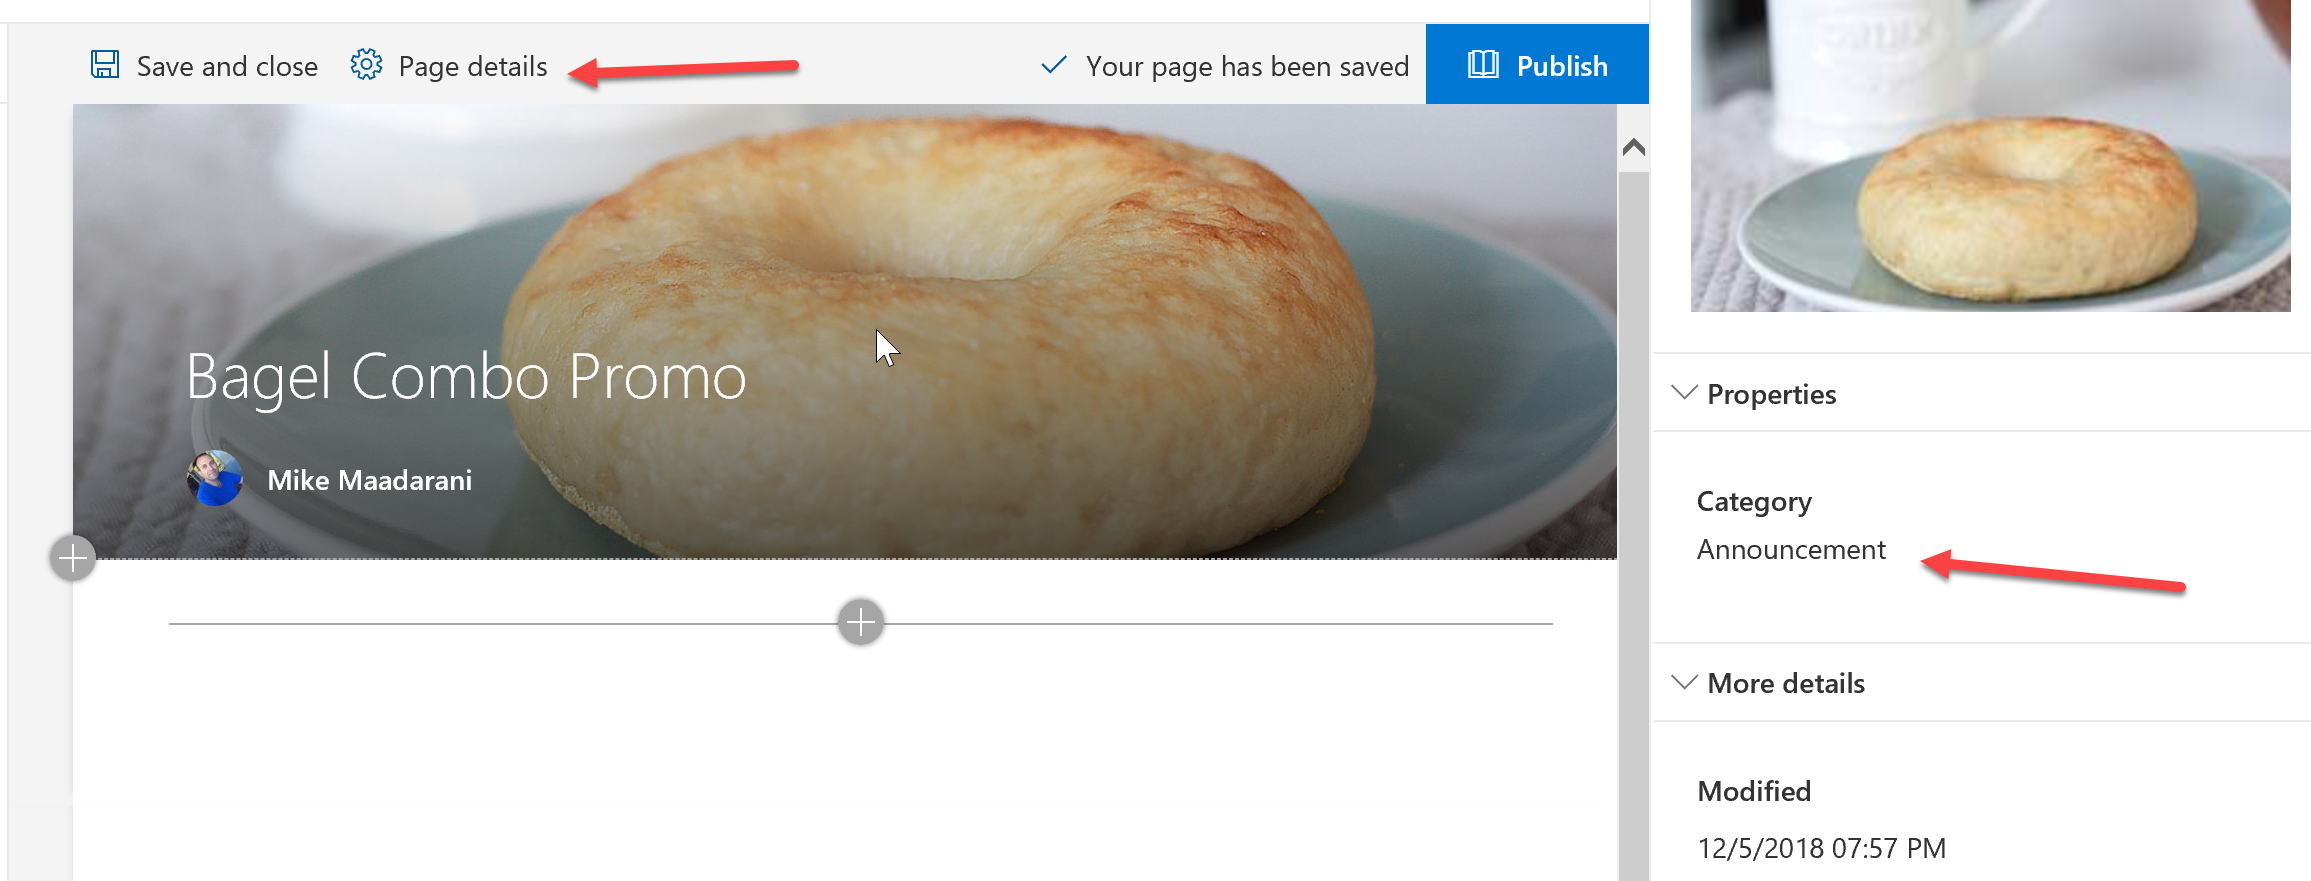
To tag a page, go into edit mode on the page by clicking Edit Page. Then click Page Details located on the top ribbon. This will then open up the page’s property panel. This is the property panel for the new site page that you have added to the Sites Pages library and this is the location where you can edit its property. In the below illustration, then this is where the property category was chosen to be blue. Once the property (column) has been added to the Sites Pages library, all new site pages can be tagged with the same value for that page property. Click Save when done.
Customizing the Page
By following the steps above, one can create more pages with the same properties. You can also customize the look of the page. For the example below, if the property is to group by category, such as announcement, then the header of the page can reflect blue.

If there is a need or desire to show the value of the property on the page, one can do so with the use of web parts. Simply add the web part Page Property, click the Add Properties button. Add the value that you want to be displayed on the page on the right hand sided pop-out panel.
Time Saving Tip
Once your page is set up with all the values and tags that you require, simply create a copy of the page to create a new page. Not only will the content be copied, but also the page property. You can update or change the content as needed.
Summary Page: Creating for Each Category Property
A summary page which displays links for news or pages under one category can provide detailed information of what your targeted audience is seeing and receiving in their news feed.
To create a summary page for each Category property:
1. Create a new Site Page with an appropriate title;
2. Add web part Highlighted Content;
3. Configure properties of Highlighted Content. A property panel will appear on the right-hand side displaying the properties;
4. Set the Source of the content to “The page library on this site”;
5. Choose the Type of source, either Pages or News;
6. If Pages is chosen, then Filter will provide an option for Page Properties;
7. Under Property Name, choose the page property from the drop-down menu; and
8. Options to Select Values will appear in another drop-down menu. Here you can choose the filter that you want the pages to be filtered by.
Once these filters are saved, the Highlighted Content web part will curate and display the results almost instantaneously even though the content has been retrieved based on tags and not solely on filters. The summary page will display thumbnails of the curated pages based on the tagging.
Getting Organized
By adding custom columns to your pages, you can now organize your pages by creating views and grouping them in the Site Pages library. Having the ability to group your Site Pages by a Page Property will provide you an overview as well as greater flexibility in organizing and grouping your pages.
As you can see, accurate metadata and tagging will provide not only appropriate and useful content to your audience, but will also provide the abilities to organize, plan, and scale SharePoint with corporate growth.
 Saturday, June 30, 2018
By : Mike Maadarani
Saturday, June 30, 2018
By : Mike Maadarani
 0 comment