Microsoft Teams


What is Microsoft Teams?
Built on the global secure cloud of Office 365, Microsoft Teams brings together people, content and conversations in a chat-based workspace on the desktop and on mobile, supporting iOS, Android, and Windows platforms.  Microsoft Teams provides immediate, secure, and customizable communication with all team members whether on the go, in the cloud, in the office, a combination of any or all of these scenarios. 

The Four Core Foundation

Microsoft Teams is built on Four Core Foundations, creating a digital workspace for collaborative teams resulting in high performance. 

The Four Core Foundations are:

  1. Chat for Today’s Teams:  Microsoft Teams provides team chat in a persistent and threaded format for all team members.  The default setting provides visibility for conversations for all members; however, for breakout teams, private and smaller group discussions can be created.  Voice and video conferencing are supported with the integration of Skype, which in turn provides the flexibility for collaboration not only from a single site but also from multiple sites that can be in various cities or continents.  Bringing to a member’s digital workspace is the ability to add a personal touch for self-expression is a library of emoji’s, stickers, memes, and GIFs; 
  2. Hub for Teamwork:  Microsoft Teams is built upon Office 365 Groups providing seamless cross-application while preserving the team members sense of context when sharing with others.  Because Microsoft Teams is built upon Office 365 Groups, Word, Excel, PowerPoint, SharePoint, OneNote, Planner, Power BI and Delve are built right in providing the capability to work with Microsoft Office documents within the Microsoft Teams experience.  Microsoft Graph brings the power of intelligence for discovery, relevancy and sharing of the most frequently accessed information for the team and its members;
  3. Customizable for Each Team:  Rich extensibility and open APIs provide each team the ability to customize their experience to their specific needs, which follows Microsoft’s belief that there is no one tool that will fit the needs of every team and its members.  Each team member can customize and organize conversations by topic by creating channels.  Each channel can then be customized with a feature called Tabs.  Tabs provide access to frequently used documents, applications and cloud services such as OneNote, SharePoint, Planner or other third-party solutions such as Zendesk, Hootsuite, and Asana.  Sharing the same Connector Model as Exchange, Microsoft Teams allows for notifications and updates from third-party services like Twitter and GitHub. There is also full support for Microsoft Bot Framework, bringing intelligent first- and third-party services into the team environment.  Microsoft Teams Developer program will allow developers to start building integrations to extend Microsoft Teams; and
  4. Security Teams Trust:  Office 365 customers have a high standard of expectation for data security, and Microsoft Teams delivers with encrypted data in transit and at rest.  Enhanced identity protection with multi-factor authentication provides an additional layer of security.  As with all Microsoft commercial services, the transparent operating model will have no standing access to customer data.  Key compliance standards will be supported, such as HIPPA, ISO 27001, SOC 2 and EU Model Clauses.  As with all Office 365 services, it will be provisioned and managed centrally. 

Join the broadest and deepest portfolio of collaboration apps and services for true team collaboration.  To join, activate Microsoft Teams by going to the Office 365 admin center, clicking Settings>Services & Add Ins>Microsoft Teams.  Welcome to flexible, instantaneous team collaboration from your desktop and your mobile device!
 

SharePoint and Office 365: Patterns & Practices – Part 1: The Basics


What is SharePoint Patterns & Practices (PnP)?

SharePoint Patterns & Practices (PnP) is an initiative that was launched in 2013 with the vision to simplify development by providing an open source, reusable components, and solutions that have been built collaboratively between the community and Microsoft. Through sharing of knowledge of implementation practices in SharePoint and Office 365, Microsoft and the community collaboratively create the starting points for PnP guidance and code samples. 

How does it look like?

There are three levels of engagement.  Imagine a target with 3 concentric circles with the centre of the target being the Core Team.  Encircling the Core Team is the second layer comprised of the Special Interest Groups (SIGs) while the final outer third layer is the Community. 

1.   Core Team:  As the title implies, the Core Team has the greatest direct involvement with the PnP library of code samples and guidance documentation.  Comprised of a small group of individuals from Microsoft and the community, they have been granted permission and direct access to the PnP library to merge approved changes in the PnP library.  By keeping the Core Team small, control can be maintained to ensure proper and appropriate value is added to the PnP library.  


2.   Special Interest Groups (SIGs):  Special Interest Groups are being brought together and are currently being piloted with SharePoint client side development to develop the JavaScript Library.   SIGs meet weekly to exchange thought, processes, and code to build the JavaScript Library.  SIGs do not have access to the PnP library though what they produce will have an impact on the PnP Library.


3.   Community: With the least access to the PnP Library, this group is comprised of both the internal and external community.  Their involvement is through either of the following methods: 


a.    Bi-weekly office hours: hosted by members of the PnP initiative, they review and explain what the Core Team is doing, what they plan to do, and they provide suggestions as to the various areas or topics that could use community contribution.  At the end of the session is an open mic where the community is provided the opportunity to voice suggestions as to what they would like to contribute to the initiative.  These are then pitched to the Core Team, who is then tasked to render the final decisions.    

b.    Monthly Community Calls:   a unidirectional communication informing the community what changes have been proposed, names of members who have been contributing, and names of those who have been doing demos or presentations for the bi-weekly office hours.  Recognition during these calls improves the exposure of members who participate, which in turn, provide endless networking opportunities.  These Monthly Community Calls are held the first Friday of every month.  On every second Tuesday of every month, the community is provided the latest changes in the PnP Library.


What benefits do I receive from PnP?

By becoming an active member and recipient of PnP, not only will you gain a community of peers and experts, but you will also have access to useful libraries and an unfathomable amount of code.  Some of the libraries include the PnP Core Library, which is a NuGet ready to go package, PnP Components, Samples and Solutions, PnP Provisioning Engine, and PnP PowerShell. These are just a few examples of the libraries that you will gain access to.  Under one umbrella, there will be an establishment of common architectural patterns and standardize guidance that is available upon immediate publication of the code.  For those who would like more detailed instructions, there are webcasts available as well as on-line training material.  The best part of joining and participating in the PnP Initiative is that all materials, including videos, presentations, webcasts, are not only available for your viewing, but they are free for re-use in any way that you want! 


How am I supported in the PnP Initiative?

Being an open source community program, there are no sales level agreements (SLAs) for Microsoft support.  As PnP is not a product like Word or MS Office, it is not supported through Premier Support or other official support channels.  Instead, support can be accessed through the SharePoint Developer Group in the Microsoft Tech Community to provide input and/or to ask any questions regarding existing material. 

Microsoft and the community work collaboratively to provide open source code samples with standardized guidance documentation.  Both the code samples and guidance adhere to the PnP guidelines for support and recommended techniques.  These materials are maintained by Microsoft while all PnP implementations are reviewed and approved by SharePoint Engineering.  Most importantly, PnP retains its uniqueness by being supported from within the community by the community.

Microsoft Graph API – Part 3 – Customizing Queries for Results


This is our last article of 3 parts about Microsoft Graph API. In the first article, Microsoft Graph API – An Introduction, we had a quick overview of the Graph API and how it evolved from the Office Graph API. We also talked about what you need to know about setting up your endpoint API and tokens to build your custom solutions.

In part 2, Microsoft Graph API – Bringing it together, we showed you the structure of the Graph API that are composed of four layers: Data, Authentication and Authorization, Development Environment, and Solutions Layers. We also reviewed the importance of Active Directory and how organizations have started to build applications on the Graph API.

In this article, we will go a bit deeper in developing queries and syntax with the platform.


Common Microsoft Graph Queries 

Microsoft Graph API is currently available for preview only with two endpoint versions.  The first addresses users, groups, contacts, calendars, mail, and files.  The endpoint is https://graph.microsoft.com/v1.0 and is available for your production environment.  The second addresses tasks, people, OneNote, Excel, contacts (organization).  The endpoint is https://graph.microsoft.com/beta and is available for preview.  

Microsoft Graph API v1.0

Common queries that can be used to access the Microsoft Graph API is as follows:

Operation

Service endpoint

GET my profile

https://graph.microsoft.com/v1.0/me

GET my files

https://graph.microsoft.com/v1.0/me/drive/root/children

GET my photo

https://graph.microsoft.com/v1.0/me/photo/$value

GET my mail

https://graph.microsoft.com/v1.0/me/messages

GET my high importance email

https://graph.microsoft.com/v1.0/me/messages?$filter=importance%20eq%20'high'

GET my calendar

https://graph.microsoft.com/v1.0/me/calendar

GET my manager

https://graph.microsoft.com/v1.0/me/manager

GET last user to modify file foo.txt

https://graph.microsoft.com/v1.0/me/drive/root/children/foo.txt/lastModifiedByUser

GET unified groups I’m member of

https://graph.microsoft.com/v1.0/me/memberOf/$/microsoft.graph.group?$filter=groupTypes/any(a:a%20eq%20'unified')

GET users in my organization

https://graph.microsoft.com/v1.0/users

GET group conversations

https://graph.microsoft.com/v1.0/groups/<id>/conversations

Source:  https://graph.microsoft.io/en-us/docs

Microsoft Graph API Beta

Queries that are available in the beta version are as follows, but is important to note that they are in beta and it is not suggested that these be applied in the production environment:

Operation

Service endpoint

GET people related to me

https://graph.microsoft.com/beta/me/people

GET files trending around me

https://graph.microsoft.com/beta/me/trendingAround

GET people I am working with

https://graph.microsoft.com/beta/me/workingWith

GET my tasks

https://graph.microsoft.com/beta/me/tasks

GET my notes

https://graph.microsoft.com/beta/me/notes/notebooks

Source:  https://graph.microsoft.io/en-us/docs


Syntax Patterns

For developers, the syntax patterns, at this time of publication, are as follows:

1.  Microsoft Graph API Endpoint:

{Graph Endpoint} https://graph.microsoft.com

2.  Target Service Version: 

{Version} such as v1.0 or beta

3.  Tenant Name or Specific Entities: 

{Tenants} such as users, groups, files

4.  Particular Item from Entity Set: 

{Id} such as single user and file

5.  Specific Property of Particular Object Selected from Entity Set: 

{Property}

Query Parameters

Microsoft Graph API supports the following query options which allow you to specify and control the amount of data that is returned in a response: 

  1. $Select – include in response comma separated list of properties:  https://graph.microsoft.com/v1.0/me/messages?$select=from,subject
  2. $Expand – include in response expanded comma separated list of relationships:  https://graph.microsoft.com/v1.0/me/drive/root?$expand=children($select=id,name)
    Note: maximum number of expanded objects for a request is 20 and if the query is placed on the user resource, the properties of only one child object or collection can be retrieved at a time. 
  3. $OrderBy – include in response comma separated list of properties used to sort order of items in response collection: https://graph.microsoft.com/v1.0/users?$orderBy=displayName%20desc(asc)
  4. $Filter – filters response based on a set of criteria:

    1. By name: https://graph.microsoft.com/v1.0/users/?$filter=startswith(displayName,{Name})
    2. By entity type: https://graph.microsoft.com/v1.0/me/messages?$filter=from/emailAddress/address%{Value}eq%{EmailAddress}%27
  5. $Top – Number of items to return in a result set: https://graph.microsoft.com/v1.0/users?$top={Number}
  6. $Skip – Number of items to skip in a result set:  https://graph.microsoft.com/v1.0/me/events?$orderby=createdDateTime&$skip={Number to be skipped}
  7. $skipToken – paging token used to get next set of results:

    1. https://graph.microsoft.com/v1.0/users?$orderby=displayName&$skiptoken=X%{value}%
    2. To return the next page of users within your organization, the syntax is: https://graph.microsoft.com/v1.0/users?$orderby=displayName&$skipTokes =%{value}
  8. $Count – A collection and the number of items in the collection: https://graph.microsoft.com/v1.0/me/contacts?$count=true
  9. $directReports – Gets user objects, each with up to 20 directReport objects in the directReports collection: https://grap.microsoft.com/v1.0/users?$expand=directReports

By applying custom queries and setting specific parameters, Microsoft Graph API can be customized to provide tailored solutions to your corporation on a platform of your choice, including Android, Windows, and iOS.

Microsoft Graph API is an excellent solution from Microsoft to meet the demands of businesses in today’s world of cloud computer based business.  Flexible, seamless and efficient, Microsoft Graph API is the solution for obtaining aggregate data from various Microsoft cloud-based services including SharePoint, SharePoint Mobile, Office 365, Outlook, Calendar and social media apps such as Twitter and Yammer.


Microsoft Graph API – Part 2 – Bringing it Together


In our first Part, Microsoft Graph API – An Introduction, we reviewed the evolvement of Office Graph into Microsoft Graph API.  We also looked at the reasons as to why a change in process for accessing data was required.  Next, we delved into how the transition of obtaining aggregate data from various cloud services with a complex system of individually specific APIs and multiple tokens became one singular endpoint API and one token.  Customizing app solutions has become easier with a single endpoint API, and the possibility to provide these solutions in Windows, Android, and iOS platforms is becoming a reality with the move to open source developer tools.   

The Structure of Microsoft Graph API Developer Stack

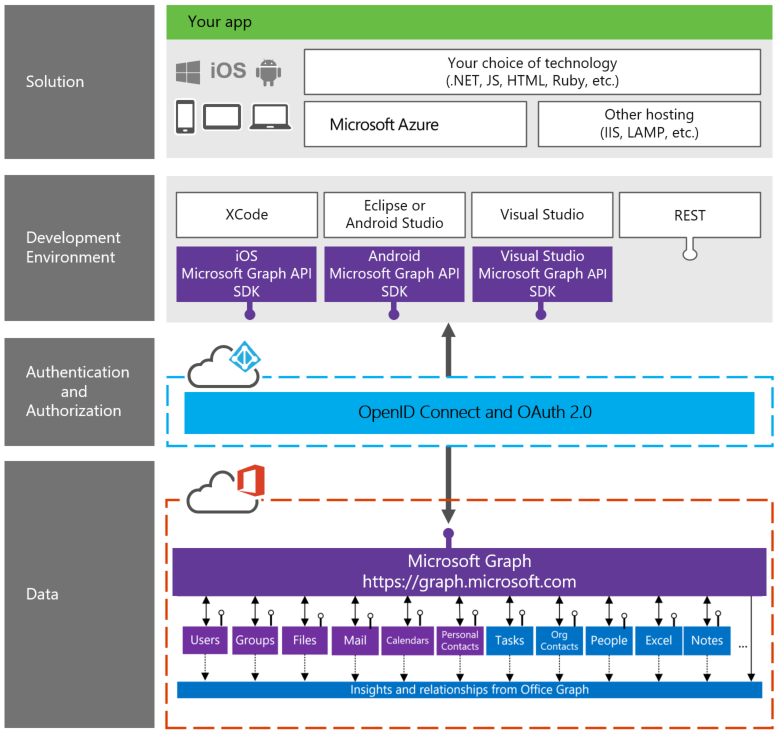
In order to develop applications based on Microsoft Graph API, a basic understanding of the developer stack in needed.  There are four layers:

1.  Data Layer

Office Graph and Microsoft Graph API reside in this layer.  Information regarding people, emails, notes, documents and relationships with each other is delivered from this layer. 

2.  Authorization and Authentication Layer

Authorization and authentication use OpenID Connect and OAuth2.0 to perform these functions.

3.  Development Environment Layer

Software Development Kits (SDK) for Windows, iOS, and Android reside in this layer.  Development tools such as Visual Studio, XCode, Eclipse, Android Studio and REST (Representational State Transfer) are available in this layer.

4.  Solution Layer

Your app or solution is deployed from this layer on either Microsoft Azure or on other hosting platforms such as LAMP and IIS while enabling the developer to use their choice of language such as .NET, JS, HTML, and Ruby depending upon the apps solution that is being targeted (Windows, Android or iOS). 

This is best illustrated in the infographic below (source: https://graph.microsoft.io/en-us/docs).

Microsoft Graph API Developer Stack

Microsoft Graph API Developer Stack – Illustration


The Importance of the Microsoft Active Directory (AD)

Microsoft Active Directory (AD) is a structure used on computers and servers running a Windows operating system.  The primary function of the AD is to store network, domain and user information, such as user accounts, passwords, and profiles, in a single, protected location.

The AD is only as useful as the information that has been submitted and entered.  The importance of having a complete and accurate user profile is the key to successfully accessing user and business information.  For many corporations, the AD is lacking substance and with the lack of key information, collaboration, communication, and efficiency is greatly decreased with collaboration tools such as SharePoint, Delve, and business processes built on flow. Achieving AD compliance has always been a challenge for organizations with the lack of Governance and AD maintenance. This particular issue is being addressed by Hyperfish.   

Recognizing this as a point of need for businesses, Hyperfish was developed to achieve corporate compliance with each user by interactively engaging the user to complete the necessary information fields.  Hyperfish monitors the AD, or the Azure Active Directory (AAD) for missing, incomplete or out of date information.  After analysis, the system will then contact the user at the most appropriate time and method to elicit responses from the user to complete their profile.  The user will be prompted with suggestions which are based on information gathered from email, social media, and other data sources.  An AD that is complete will improve the quality and speed of communication between team members, and can be combined with Workflow, Office 365, SharePoint and SharePoint Mobile to maximize the effectiveness of collaboration. 

The Microsoft Active Directory serves as the hub of corporate user information, allowing administrators to set rules and trusts according to teams and privileges and when populated correctly, provides pertinent information which ensures utmost proficiencies in collaboration and communication.

Our last part will be an in-depth look at the most common Microsoft Graph API queries, syntax standards and parameter settings in Microsoft Graph API – Customizing Queries for Results. 


Microsoft Graph API – An Introduction


What is Microsoft Graph API?

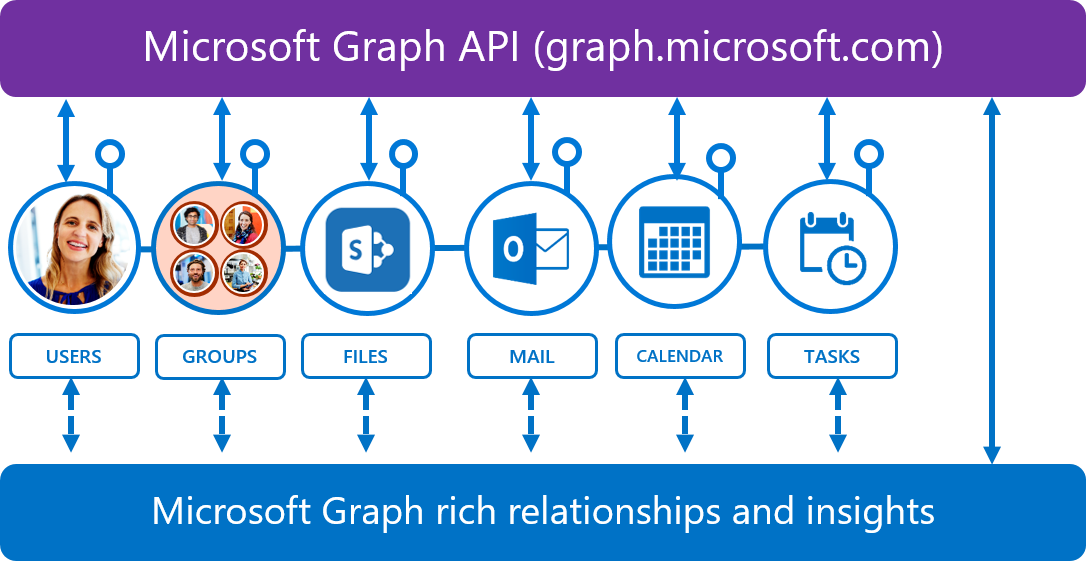
Microsoft Graph API (Application Programming Interface) is the evolvement of Office 365 Unified API into a single stop for a cloud solution by exposing multiple Microsoft cloud service APIs through a single REST (Representational State Transfer) API endpoint. Microsoft Graph API provides seamless navigation between service entities such as users, groups, mail, messages, notes, tasks, and calendar, and Office Graph. Data can be accessed from multiple Microsoft cloud services such as Exchange, OneDrive, SharePoint, OneNote, Planner and Azure Active Directory.

As business and society move towards storing and accessing data in the cloud, the increase in traffic and increase in data volume results in data congestion. This translates into lost productivity, delays in decisions and miscommunication between groups and management. With each step towards cloud-based computing and collaboration, Microsoft is addressing the issue of cloud data congestion with Microsoft Graph API.
 

What is the Difference Between Office Graph and Microsoft Graph API?

When we examine Microsoft cloud services, we can see services that include SharePoint Mobile, Office 365, OneDrive, Outlook, Calendar, Skype, and Yammer. Each of these services is used to manage documents, email, events, collaboration and social interactions. These services can then be viewed as two types of entities: content and communication.

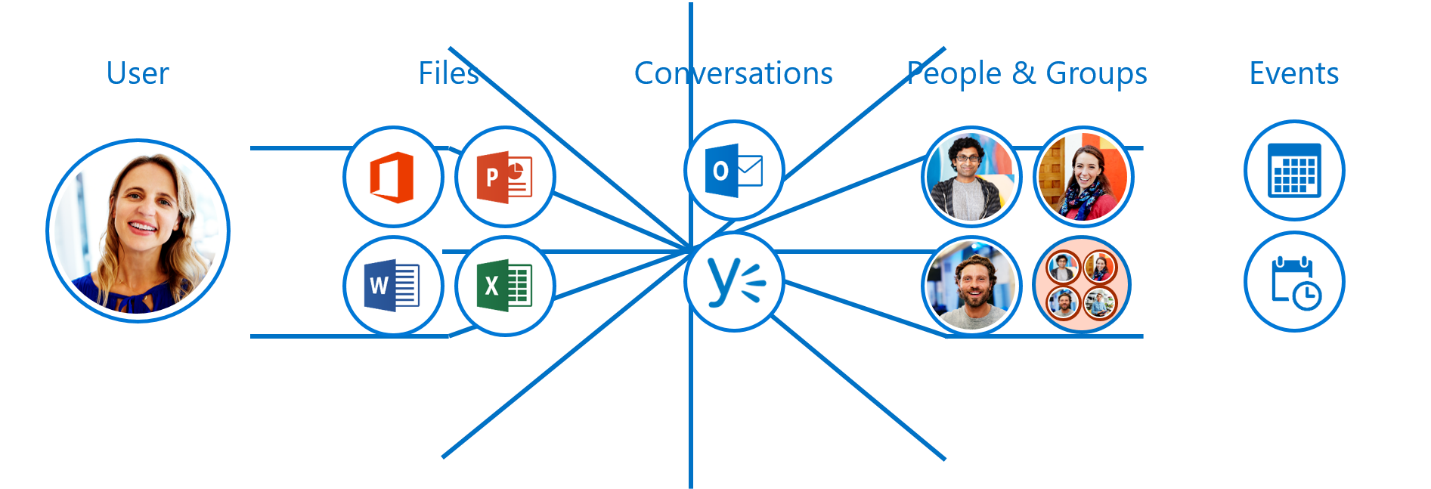
Let’s back up a bit to fully understand how Microsoft Graph API works. Before API, there was Office Graph. Office Graph was developed to link the two entities of content and collaboration together. Imagine the user centrally located on a blank page. As the user connects to various content and communicates with team members, a thin spider web connects the user with each action thus creating a web of all his actions and relationships to users around him. This spider web network shows the direct and indirect relationships the user within his work environment and how he responds and actions out his responses and questions.

With machine learning algorithms built into Office Graph, the user’s daily activity and the relationships between nodes, such as who the user reports to, who the colleagues of the user are, which documents are most frequented by the user, and so on, can be determined. By collecting and analyzing, this algorithm allows Office Graph to learn the user’s most frequented services and bring them to the top of the page for easy access.

With Office Graph, the user has created a web that consists of content and communication. Each piece of content is a node. Each person is a node. Each form of communication is a node. Office Graph connects these nodes together through specific APIs. Each one has its own API. Office Graph creates a small web for each user, whereas, Microsoft Graph API creates a web not only for one user but interlinks related users across an entire organization resulting in a large web of collaboration and communication.

Here is an image that shows how we can use Office Graph to connect and surface data among different areas of the Office 365 and Azure stacks.

Office Graph

The larger the web, the slower the time to access and find data. Microsoft Graph API retained the inherent machine learning capabilities as one of the responses to this issue. By collecting and analyzing, the machine learning algorithm allows Microsoft Graph API to learn the users working relationships and brings to the forefront the most frequented services not only for each individual user but as an organization as a whole by connecting each individual with collaborators and teams.

The single and greatest response to cloud data congestion is that Microsoft Graph API was evolved further so that multiple API exposures from Microsoft Cloud services are handled through a single REST API end point. In other words, there is one endpoint to rule them all!
 

How does Microsoft Graph API work?

In Office Graph, data in Office 365 is filed in individual silos. These standalone silos are labeled users, groups, files, mail, calendar, contacts, tasks, people, Excel and insights and relationships. Each silo has it very own unique API which caused a challenge for developers to access the data and eventually, it became cumbersome due to the complexity of accessing the individual APIs for different types of data and linking them to each other in different services. For example, accessing users and people in Azure Active Directory required one set of rules while accessing users and people in SharePoint required a second set of rules. In addition, separate access tokens had to be created to access data from different data silos. This was time intensive and not clean methodology! And so, Microsoft Graph API was born.

Microsoft Graph API provides access to Office Graph data with a single endpoint to display the data in your cloud app. Gone are the days of multiple tokens. With Microsoft Graph API, only a single access token is required regardless of which Microsoft cloud service that information is being retrieved from. Microsoft Graph API provides sleek, seamless and efficient access to information when you need it and how you need it.

Microsoft Graph API

In short, Microsoft Graph API provides a unified REST API endpoint, https://graph.microsoft.com, for accessing aggregated data from multiple Microsoft cloud services in a single response by using a single authentication token. Yes, it’s that simple.

In Part 2, Microsoft Graph API – Bringing it Together, we will delve into the developer stack and the importance of having a substantial Microsoft Active Directory. In our last Part (3), we will look closely at the common Microsoft Graph API queries in Microsoft Graph API – Customizing Queries for Results.

Cloud Search Service Application


One of the great enhancements in SharePoint 2016 and in the SharePoint 2013 August 2015 CU, is the Hybrid Search using Cloud Search Service Application (CSSA). The new CSSA will allow organizations to take advantage of the new hybrid capabilities, in order to create a unique search experience with one index, with crawled content from Office 365 and On-Premises data. Having one Index is huge step to better enhance the end user experience and making it easier to find results from different sources.


In this article, I will be showing step-by-step how to set up your CSSA . It is a pretty simple process if you follow the steps in order.

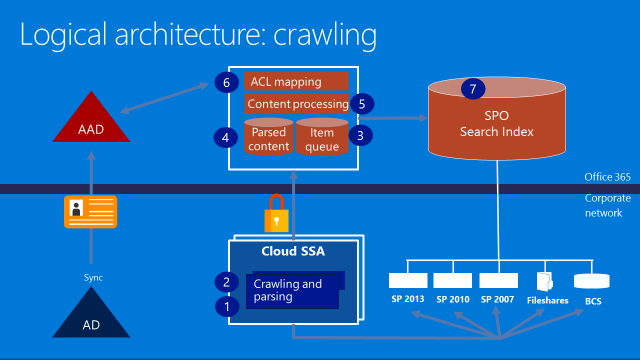
First of all, let's review how the CSSA indexing and crawling works. Picture 1 shows that crawling is initiated from on-premises, but the index is stored on your Office 365 tenant.

CSSA Logical Architecture
Picture 1

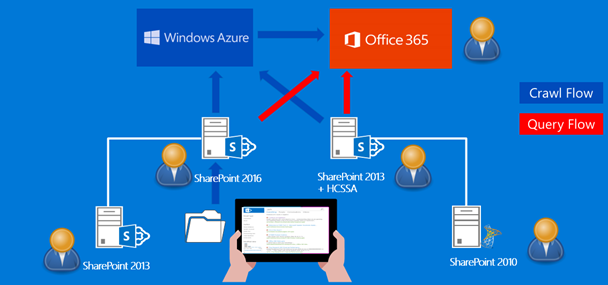
Picture 2 describes the flow of the search queries and the possibilities to send a query from the cloud or on-premises.

Hybrid Search
Picture 2

Mandatory Requirements

The following are mandatory requirements to get your CSSA working:

1.       SP2013 with August 2015 CU or SP 2016

2.       O365 Subscription

3.       Azure Subscription

4.       Synchronize users and groups from on-premises to Office365 Azure Active Directory (DirSync, AADSync, or AADConnect)   

5.       Create cloud Search service application   

6.       Install onboarding pre-requisites

7.       Execute onboarding script

Azure AD (AAD) requirements

  1. Need Azure Subscription (or trial subscription) or Office 365 paid license
  2. Verified domain; xxx.onmicrosoft.com is not enough
  3. On-premises:

    1. AD Server must be 2003 or later
    2. If you want to use password writeback, then you must have Windows Server 2008 with latest SP and KB2386717; otherwise use Windows Server 2008 R2+
    3. Azure AD Connect can be installed on AD or any server part of the domain
    4. If you plan password synchronization is required, then server must be 2008 R2 SP1 or later
    5. .NET 4.5.1 or later
    6. PowerShell 3.0
    7. If you are using ADFS, then SSL is needed x.509 (self-signed is OK in test lab

Step 1 – Synchronize AAD

First you must synchronize your On-Premises AD with AAD. Follow these steps to install and configure your AAD Connect: https://azure.microsoft.com/en-us/documentation/articles/active-directory-aadconnect/

Step 2 – Create your CSSA

You can either use Central Admin or PowerShell. If you are using Central Admin, then you will see a new checkbox for the cloud search option. You must check it to make sure you are creating a CSSA and not a regular SSA. If you are like me, who prefers to use PowerShell, then you will make a small change to your existing script. If you don’t have one, you can download any SSA script, but make sure you add the following variables to the New-SPEnterpriseSearchServiceApplication:

New-SPEnterpriseSearchServiceApplication -Name $SearchServiceAppName -ApplicationPool $appPool -DatabaseServer $DatabaseServerName -CloudIndex $true             

Then you need to set your SSA Property to true by executing this command: $Searchapp.SetProperty(“IsHybrid”,1), before you set your Search Topology.

Your Powershell Script should like similar to this:

SSADB = "SharePoint_Demo_Search"

$SSAName = "Search Service Application SPS Baltimore"

$SVCAcct = "<search Service account>"

$SSI = get-spenterprisesearchserviceinstance -local

#1. Start the search services for SSI

Start-SPEnterpriseSearchServiceInstance -Identity $SSI

#2. Create the Application Pool

$AppPool = new-SPServiceApplicationPool -name $SSAName"-AppPool" -account $SVCAcct

#3. Create the search application and set it to a variable

$SearchApp = New-SPEnterpriseSearchServiceApplication -Name $SSAName -applicationpool $AppPool -databaseserver SQL2012 -databasename $SSADB –CloudIndex $true

#4. Create search service application proxy

$SSAProxy = new-SPEnterpriseSearchServiceApplicationProxy -name $SSAName" Application Proxy" -Uri $SearchApp.Uri.AbsoluteURI

#5. Provision Search Admin Component

Set-SPEnterpriseSearchAdministrationComponent -searchapplication $SearchApp -searchserviceinstance $SSI

#6. Create the topology

$Topology = New-SPEnterpriseSearchTopology -SearchApplication $SearchApp

#7. Assign server(s) to the topology

$hostApp1 = Get-SPEnterpriseSearchServiceInstance -Identity "SPWFE“

$Searchapp.SetProperty(“IsHybrid”,1)

New-SPEnterpriseSearchAdminComponent -SearchTopology $Topology -SearchServiceInstance $hostApp1

New-SPEnterpriseSearchCrawlComponent -SearchTopology $Topology -SearchServiceInstance $hostApp1

New-SPEnterpriseSearchContentProcessingComponent -SearchTopology $Topology -SearchServiceInstance $hostApp1

New-SPEnterpriseSearchAnalyticsProcessingComponent -SearchTopology $Topology -SearchServiceInstance $hostApp1

New-SPEnterpriseSearchQueryProcessingComponent -SearchTopology $Topology -SearchServiceInstance $hostApp1

New-SPEnterpriseSearchIndexComponent -SearchTopology $Topology -SearchServiceInstance $hostApp1 –IndexPartition 0

#8. Create the topology

$Topology | Set-SPEnterpriseSearchTopology

Step 3 – Validate your CSSA

Run the following PowerShell script to validate that your SSA is cloud based.

Add-PSSnapin Microsoft.SharePoint.Powershell

$ssa = Get-SPEnterpriseSearchServiceApplication     

Get-SPEnterpriseSearchTopology -Active -SearchApplication $ssa     

Get-SPEnterpriseSearchStatus -SearchApplication $ssa -Text |ft Name, state,Partition,Host -AutoSize

$ssa.CloudIndex
 

This should return True.

Step 4 – Install On-Boarding Pre-requisites

You must install the following, in order, before you proceed with the On-Boarding script:

1.       Microsoft Online Services Sign-In Assistant: https://www.microsoft.com/en-ca/download/details.aspx?id=28177

2.       Reboot the Server

3.       Microsoft Azure AD PowerShell: http://go.microsoft.com/fwlink/p/?linkid=236297

If you do not install the above, then the next step will not work as it is needed to establish the trust between your Farm/CSSA and your Online tenant.

Step 5- Run On-Boarding Script

The On-Boarding script is a PowerShell, provided by Microsoft, that you must run as your last step to complete your CSSA configuration. You can download the On-Boarding script from GitHub. When you run this script, you will be asked to enter your O365 tenant credentials. The user must be a tenant admin account to be able to execute the script.   

Crawl your content

Once you have completed, you can start adding you content sources to your CSSA. Your content sources can be any SharePoint portal (2010, 2013, 2016, etc.), any folders, exchange, etc. Basically, it is the same content sources you used to crawl with a regular SSA.

When you are completed, then you can navigate to your SharePoint Online, search for a keyword and results should appear from Online and On-Premises.

Create subsites in SharePoint Online with CSOM


Often, when we are engaged with new Office 365/SharePoint Online projects, we may have to create hundreds of subsites within a site collection. unfortunately, we still do not have PowerShell Cmdlets to create SharePoint webs, and we can only create SharePoint Online Site Collections using the New-SPOSite Cmdlet. However, it is definitely possible to create your subsites remotely on your SharePoint Online tenant using CSOM.

To make it more efficient, we are going to create an XML file, store all the subsites info in it, then read the XML file from CSOM to populate your Site Collection structure.

The script below describes all the steps you need to automate your SharePoint Online Site Collection.

XML File

First, let's create a new XML file and call it contoso.xml. The XML will have the URL of the Site Collection and the webs to be created within it (technically you can use the same XML to create multi level subwebs). The file will look like this:

<?xml version="1.0" encoding="UTF-8"?>
<Webs>
<Web>
<Url>https://contoso.sharepoint.com/sites/<Site Collection></Url> 
 <Sites>
  <Site>
   <Name>Site1</Name>
   <Title>Title 1</Title>
  </Site>
  <Site>
   <Name>Site2</Name>
   <Title>Title 2</Title>
  </Site> </Sites> 
</Web>
</Webs>

You can download a sample of the XML document here: contoso.xml

CSOM Code

There are few steps you need to take to get the CSOM code.

First, you need to add references to your SharePoint client assemblies.

Add-Type -Path (Resolve-Path "C:\CreatePublishingSite\Microsoft.SharePoint.Client.dll")
Add-Type -Path (Resolve-Path "C:\CreatePublishingSite\Microsoft.SharePoint.Client.Runtime.dll")
Add-Type -Path (Resolve-Path "C:\CreatePublishingSite\Microsoft.SharePoint.Client.Publishing.dll")

Second, you need to authenticate to your SharePoint Online tenant and load your XML file:

$userName = "username@contoso.onmicrosot.com"
$pwd = Read-Host -AsSecureString "Please enter your password"

Third, loop through the file and create the sites:

[XML]$Import = Get-Content "C:\CreatePublishingSite\PageList-min.xml" 

Foreach ($objWeb in $Import.Webs.Web)
    {      

    Write-Host $objWeb.Url -BackgroundColor Green

    $ctx = New-Object Microsoft.SharePoint.Client.ClientContext($objWeb.Url)
    $ctx.Credentials = New-Object Microsoft.SharePoint.Client.SharePointOnlineCredentials($userName, $pwd)

    if (!$ctx.ServerObjectIsNull.Value)
    {
        Write-Host "Connected to SharePoint Online site: '$siteUrl'……" -ForegroundColor Green   
    }
    else
    {
        Write-Host "Could not connect to SharePoint Online site: '$siteUrl'" -ForegroundColor Yellow
    }

    $rootWeb = $ctx.Site.RootWeb
            $ctx.Load($rootWeb)
            $ctx.ExecuteQuery()
   
    $groups = $rootWeb.SiteGroups
            $ctx.Load($groups)
            $ctx.ExecuteQuery()

    Foreach ($objSubWeb in $objWeb.Sites.Site)
        {
                       
            Write-Host "Creating Sub Site…." $objSubWeb.Title -ForegroundColor Yellow
            $WCI = New-Object Microsoft.SharePoint.Client.WebCreationInformation
            $WCI.WebTemplate = "CMSPUBLISHING#0"
            #$WCI.Description = "SubSite"
            $WCI.Title = $objSubWeb.Title
            $WCI.Url = $objSubWeb.Name.Replace(" ", "-")
            $WCI.Language = "1033"
           
            $subWeb = $ctx.Web.Webs.Add($WCI)       
            $subWeb.BreakRoleInheritance($false, $false);         
            $subWeb.Update() 
            $ctx.Load($subWeb)
            $ctx.ExecuteQuery()
           

            Write-Host "Sub Site Created…." -ForegroundColor Yellow
            }      
    }


Next Generation SharePoint Collaboration


I just got back from an amazing Microsoft Ignite Conference held in Atlanta. A conference where Microsoft shows their latest and great releases of products, features and take the opportunity to hold new announcements. Collaboration is at its peak in this conference, where attendees, exhibitors and Microsoft product groups come together to share their knowledge and experience around the Microsoft technology stack.

So many announcements, releases and features that were presented to us by the product team that is making everyone in the SharePoint and Office 365 world so excited about the future of SharePoint. There are so many technical details on the upcoming features, but I will summarize the major ones in this blog.

This is all started with the Future of SharePoint event that took place in May 4th. You can read about it on my blog post, the Future of SharePoint.

Announcing Team News

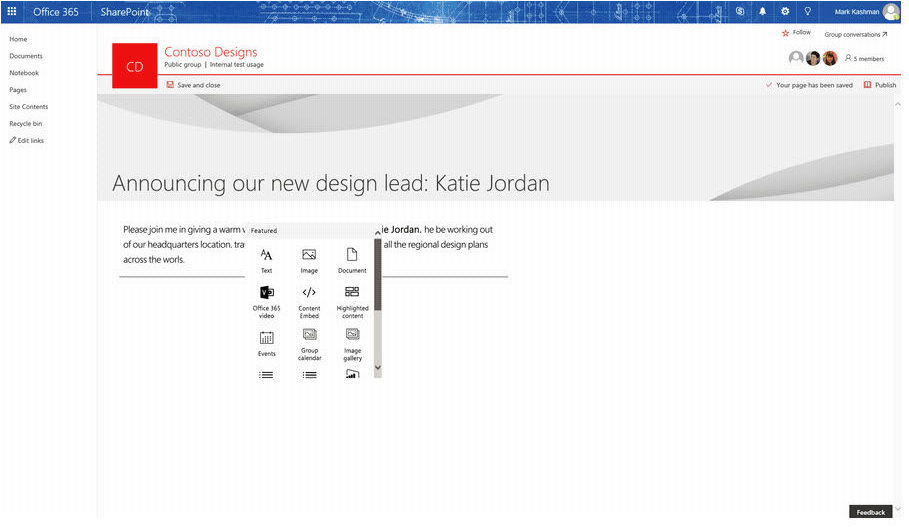
A new feature in SharePoint is Team News. It is pretty much the new "Announcements" for SharePoint, and I call it Announcements web 3.0. you can now create and publish beautifully branded announcements, in a very easy "wizard type" process. The news item will be available on mobile devices the minute you publish it.

SharePoint Team News

For more information on this new feature you can check this Microsoft Office Blog Post.

OneDrive and SharePoint Sync

We can say goodbye to the Groove.exe process, because we have a new Sync technology is on its way. Currently, we are in preview mode and the new Sync technology should reach availability to everyone in 2017.

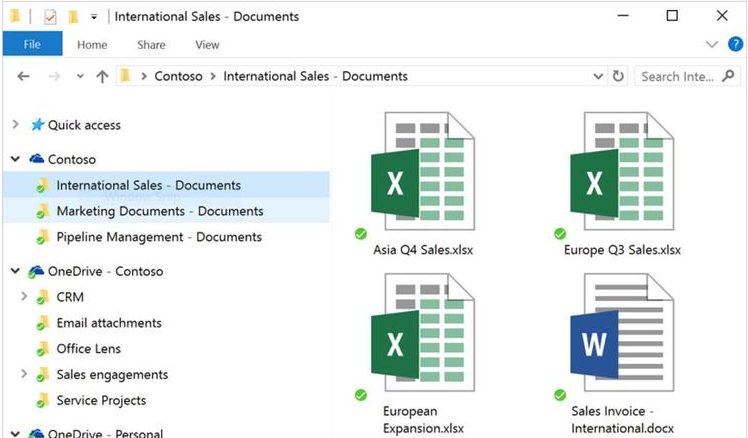
SharePoint OneDrive Sync


SharePoint sync is being added to the OneDrive sync, and should offer superior sync reliability and performance compared to the current process. Through this preview, users will be able to sync SharePoint Online document libraries and OneDrive folders with each other.

We will also have the ability to decide where to store synced file from the OneDrive. The "On-Demand Sync" allows you to choose if you want to keep the offline files in the cloud or locally on your OneDrive for Business sync folder.

New People Profile

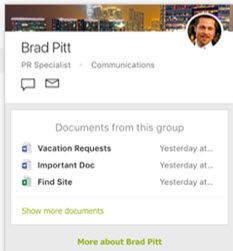
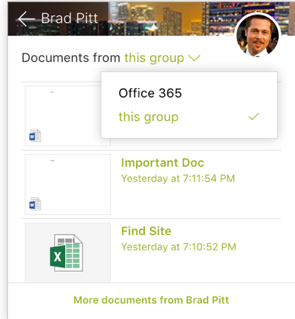
Based on the new Graph API, we are going to tap into a new power with People Profile. People cards will surface profile information and content throughout Office 365 and updates to the Office 365 profile. From anywhere in Office 365, you can click on the user's name and the user's card will pop-out that shows information about the user along with recent collaboration activities the user has participated in.

User CardUser Card Detalis

Office 365 Groups

Every time you create an Office 365 Group, you will get a full site collection. This means the members of the groups will have full control of the content in SharePoint.

Also the Yammer will be moving in with Office 365 Groups. Now users can get into Office Online and SharePoint from within Yammer. You can share documents from Yammer or you can share to Yammer from Outlook.

Other new features

Intelligence Services for PowerPoint where you can build a complete presentation deck based on existing session templates. Can you say build my session in few minutes? This is huge if you want to present a specific topic to a client without the need to create a deck from scratch. The Intelligence Service will build the outline for you.

Machine Learning will be integrating with Excel, as well as co-authoring within the Excel App.

Delve and Mail will be a match made in heaven, where Delve will get into your email and start showing how much you spent in your email or calendar, after hours, during business hours, etc. the MyAnalytics is the new name for Delve Analytics.

And so many more around new canvas experience with team sites, new team site experience, integration of Cortana with OneDrive, the new SharePoint Framework (FX).

I must say, very exciting time ahead of us and we will be seeing the birth of new innovative portals, machine learning applications, and beautiful integration between all Office 365 applications and Azure Services.


SharePoint and PowerApps


PowerApps is a powerful tool aimed at power users.  Since teams use SharePoint lists to access, share and collaborate around structured data, PowerApps utilizes SharePoint lists as the data source.  By bringing PowerApps,  Flow and SharePoint together, capturing data and producing useable business apps is a natural progression for cross platform data integration.

PowerApps can be created on mobile (PowerApps Mobile), on the web (PowerApps Studio) or on-prem (On-Premises Data Gateway) and can be published on the web or on mobile.  Not only can data be derived from SharePoint lists, but the data can also be derived from Excel files, Dynamics CRM record, custom APIs, Dropbox, Azure Blob, Azure Service Bus and a host of other sources.  As with Flow, PowerApps does not require any coding on your part.  PowerApps supplies a variety of templates which are customizable to your business needs.  The business apps that you build can use the device’s capabilities such as the camera, pen control and GPS. 

There is a major difference between Forms and PowerApps.  The functionality and purpose of each is very different.  Forms, which is currently under preview in the Education module, behaves very much like a questionnaire whereby the creator poses questions and the user will answer the questions in multiple choice style.  For more details of how Forms works, please refer to my article Microsoft Forms in Office 365 and SharePoint 2016

PowerApps, on the other hand, is not a questionnaire, but a business application which provides the user information that is derived from actual data via an app that is created with PowerApps and SharePoint lists.  For example, from the SharePoint list view menu, you will have an option to create a PowerApp for this list.  By initializing the Create PowerApp option, the PowerApps web designer will open in your web browser and the web designer will automatically create a default app for you based on the schema and data of that list.  You can then customize the app to suit your business needs.  These apps will show up as views and can be shared and launched from the SharePoint list. 

By leveraging the functionality of PowerApps to build custom and mobile capable views of your existing lists and sharing them with your team, it further enhances the collaboration aspect of SharePoint.  PowerApps is a cross-platform service and can run on all your devices, including Windows, Android, iOS and web browsers.

Microsoft continues to build upon the collaboration aspect of SharePoint and is integrating many of its services to strengthen collaboration amongst team members.  SharePoint and Office 365 are continuing to become stronger applications with greater versatility and functionality with the integration of PowerApps.