Creating and Sharing an Office 365 Communication Site

In our previous installments, The Basics of the Office 365 Communication Site and The Components of the Office 365 Communication Site, we discussed the fundamental reasons for creating a Communication Site and looked at the components of the Communication Site in greater detail. 

In this installment, we will advance to creating an Office 365 Communication Site.

6 Simple Steps to Creating an Office 365 Communication Site

The following are the six basic steps in creating a new Communication Site.  After creating your Communication Site, the Site can be customized with various web parts.  The six basic steps are:

  1. Sign in to Office 365;
  2. Select the App Launcher icon located in the top left corner of the page.  Next, select the SharePoint tile.  If you do not see the SharePoint tile, then click on the Sites tile.  If SharePoint is not visible, then click All;
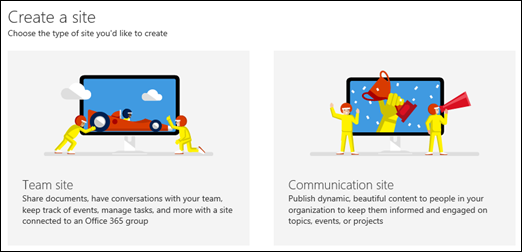
  3. Once on the SharePoint homepage, click on the + Create Site.  Two Site creation options will be available:  Team Site and Communication Site.  Choose the option for Communication Site;

Pick a Modern Site Template

  1. Select one of the Site Designs (Topic, Showcase, or Blank – see Part 2 for details);

Communication Site Design

  1. In the next window, name your new Communication Site in the Site Name box.  In the Site Description box, provide information which conveys to your audience the purpose of your site; and  
  2. Click Finish.  Your Communication Site has now been created.  It will appear on other sites that you are following, but will not inherit permission settings or navigation of other sites.  Note that this Communication Site is not shared with others until you have used the Share command. 

Sharing a Site

Sharing a site is very simple!  By using the Share command, you an invite people in your organization to a site.  After creating a new site, it is a quick way to invite people and to grant permission to the people who you want to use your site. 

One way to build team spirit and collaboration is to take advantage of sharing the site with a Kick-Off! This is a great method to emphasize team collaboration and to announce to the organization the new project that will be taking place. 

To share a site:

  1. On the site that you want to share, click Share;
  2. A Share Dialogue Box will appear.  Type in the names of the invitees from your organization;
  3. Include a message with your invitation; and
  4. Click Share. 

The people from your organization that you have invited will now have access to your site once they accept your invitation.

As you can see, creating an Office 365 Communication Site is very simple, and consists of only 6 steps!  Sharing the Communication Site is also simple.  The next step will be to add, delete, and customize the web parts which delivers the content to your audience.  This is explained in detail in Part 4:  Adding, Deleting and Customizing Web Parts for an Office 365 Communication Site – The Hero Web Part  and Part 5:  Adding, Deleting and Customizing Web Parts for an Office 365 Communication Site – The News, Events, Document and Image Gallery Web Parts.

The Components of the Office 365 Communication Site


In our previous installment, The Basics of the Office 365 Communication Site, we discussed the basics of the Communication Site, including when to use it, the type of content that could be shared, what to expect when creating it, what devices are compatible and the different web parts for inclusion of images, video and such. 

In this installment, we will look at what components comprise the communication site and delve into greater detail of each component.

Ease of Creating the Communication Site

The creation of a Communication Site is simple and straightforward.  There are three site designs that you can choose from as the basis for your Communication Site.  These are:

1. Topic: sharing of information including events, news, launches, and other content;

2. Showcase:  featuring a product, team, or event with the use of photos or images; and

3. Blank:  a blank page allows you the creative space to design and customize your own layout.  

In each site design, you have the ability to add, remove, or reorder web parts.  In addition, if you have permission to edit the site, at the top of the Communication Site is a link to add a new list, page, document library, news post, or web app to the site. 

Preformatted site designs aid in the ease of designing the Communication Site and with three different layout styles, how you want to communicate is made easy.

Site Designs in Detail

1.  Topic

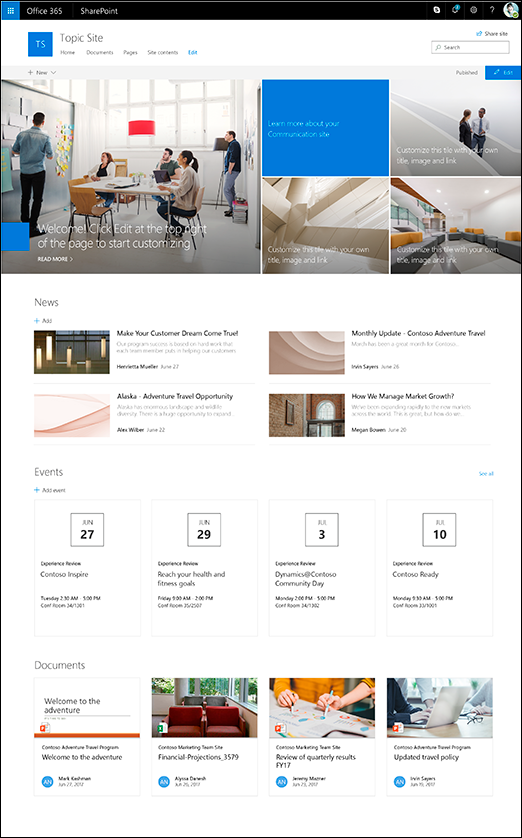
When you want to share with your broad audience information regarding events, news, updates and other content, the Topic design would be the most ideal.  When you create a Communication Site based on the Topic design, your homepage includes several web parts that are highly customizable.  The default web parts included for the Topic design for a Communication Site include the Hero, News, Events, and Documents.

Hero

This web part brings visual interest and focus to your page.  With the ability to display up to five items in the Hero web part, you can draw attention to each by adding compelling images, text, and links. 

Topic SiteThe default layout is five tiles:  one large tile on the left and four smaller tiles forming a square on the right.  The number of tiles can be changed and can range from one tile to five tiles. 

News

With the News web part, you can engage your team with interesting stories and important information. Keep them informed of what is happening with status updates, eye-catching posts, announcements, and people news through graphics and rich formatting.  The News web part has a default layout called Top Story which displays on the left with a large image space, and to the right, in list format, three additional stories.  The second layout style is called Side-By-Side which lists stories in two columns.  The final and third layout style is called the List which shows the news posts in a single column. With the News web part, you have the option of choosing the layout that best suits your needs.

Events

Upcoming events can be displayed in the Events web part. Information regarding the event such as date, time, location and the ability to add it to your calendar are all functions of the Events web part.

Documents

The beauty of Microsoft products is the usability of its products across platforms. In the Documents web part, you can insert documents created from Word, Excel, Visio, and PowerPoint.  The starting page of the document is in a frame and allows the user to scroll through the pages or, if they choose, to download the document.


2.  Showcase

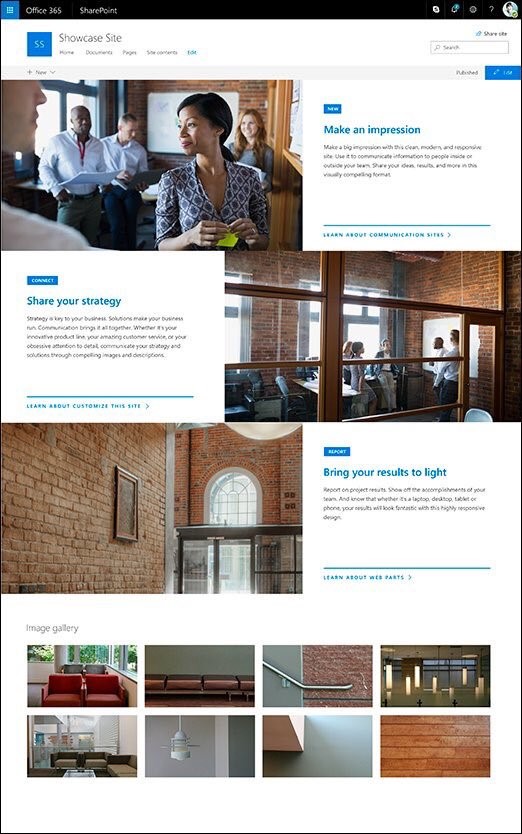
Showcase SiteThe Showcase design is to bring focus and attention to your featured highlights through the use of attention-grabbing graphics. The default web parts included in the Showcase design in conjunction with the Communication Site are Hero and Image Gallery. 

Hero

For the Showcase design, there are two Hero layout options. The first is the Tile layout and the second is the Layer layout.  The default is a vertical layout with three layers but you have the option of changing the number of layers from one to five.  

Image Gallery

A picture says a thousand words, so naturally, an Image Gallery could be used to convey many messages and ideas to your audience.  The Image Gallery web part shares collections of images on a page.  Create your gallery by drag and dropping your selected images, and then ordering them in the sequence that is preferred.  Images can be viewed in a tile layout or as a carousel. 


3.  Blank

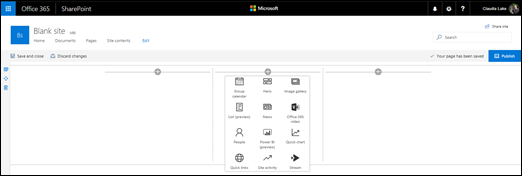
Unlike the previous two site designs, the Blank design allows you to choose your page layout.  After you have chosen your page layout, you then add the web parts that you want. 

The page layout can also be customized by rearranging the web parts, and by adding, removing, or changing columns on the page. 

Blank Site


We have now reviewed each of the individual components that make up the whole of the Office 365 Communication Site. In our previous installment, Part 1: The Basics of the Office 365 Communication Site, the fundamentals for the Communication Site were addressed. In this second installment, we looked closer at the building blocks for the Communication Site. Now that we understand the different types of site designs, web parts and layouts, we are now ready to begin creating the Office 365 Communication Site, which is discussed in Part 3:  Creating and Sharing an Office 365 Communication Site.

Office 365 Communication Site


The Basics of the Office 365 Communication Site

What is a SharePoint Communication Site? 

There are two types of sites that can be created to share information in SharePoint, but these sites target different audiences. As you are already familiar with, the Team Site audience comprises of the members of your team on a specific project.  All or most members of a Team Site can contribute content to the site and this information is limited to the members of the team, members of the project, and specific stakeholders.  The purpose behind Team Sites is for communication for collaboration between team members. 

On the other hand, a SharePoint Communication Site is just that – it is used to communicate to a broader audience including other project teams or the entire organization.  Unlike a Team Site where the majority, or all, of the members can contribute content, a small set of members contribute content to the Communication Site.  The Communication Site is the platform for sharing important information with others, especially those outside of your project team either on weekly or monthly basis; thus, content may include news, reports, statuses, product launches and other information that may be of interest to the broader audience. 

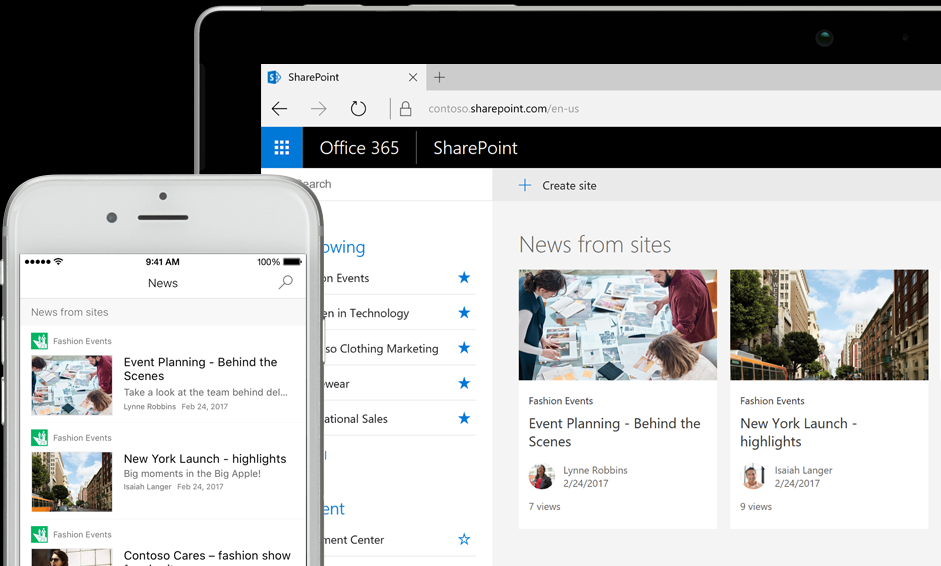
Communication Site content has been adapted to be mobile friendly while dynamically displaying and delivering content in visually compelling formats. Office 365’s Communication Site continues to offer mobile accessibility for SharePoint on the go and with the Cloud. 

Communication Site

Image showing News and Site Cards on Smart Phone and Tablet

Source: https://products.office.com/en-us/sharepoint/collaboration

Is it Easy to Create a Communication Site?

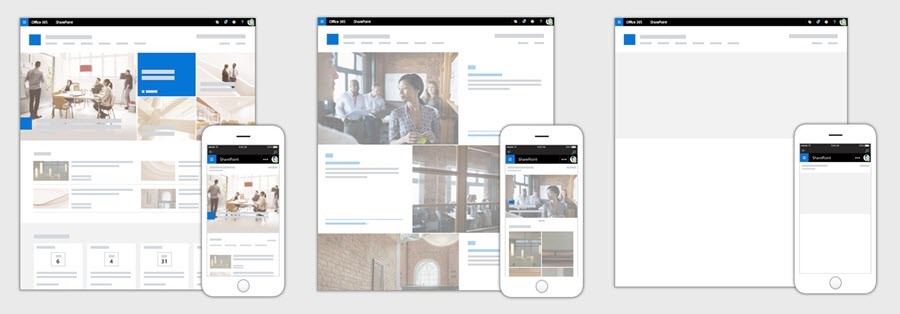
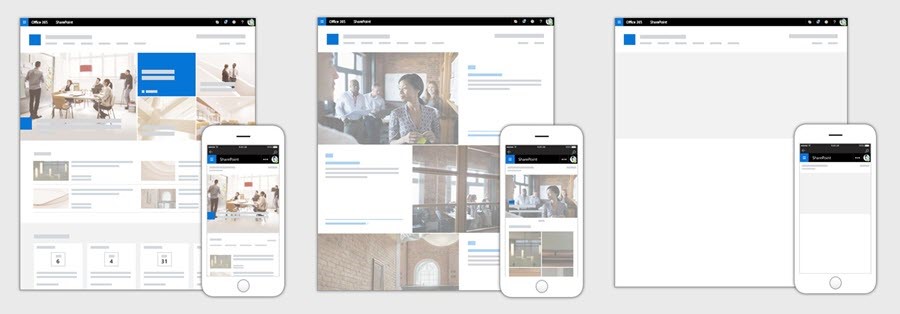
As with all Microsoft products, the development team has maintained its user-friendliness with Office 365 Communication Site creations.  There are three templates for creating new Communication Sites. The three initial site design templates are topic, showcase, and blank. 

Each template is completely configurable and contains pages within each template. These are also configurable. 

The Topic template is the best choice when there is a large amount of information to share. This information may include events, news, and other content.

The Showcase template is used for “showcasing” or featuring a team, product or event through the use of images or photos.

The Blank template can be configured and customized to your specific needs.

Communication Site Designs (left to right):  Topic, Showcase, Blank

Source: http://blogs.office.com

Once you have created your new Communication Site, you can then drag and drop to reorganize web parts on the page to highlight, showcase and announce the news to your broad audience. News and pages allow for multi-column layouts, providing the ability to creatively design and communicate your messages in a meaningful and intuitive fashion.

What Content Can Be Shared?

Feeling a little inundated with update emails?  Communication Sites can alleviate the email jam by allowing you to share your plans and updates in interactive and engaging ways.  By creating a page on a Communication Site, real-time data can be pulled across from Office 365 by embedding documents and videos.  This information can come from SharePoint documents, reports from Power BI, Microsoft Stream videos and discussions taking place on Yammer, all of which provide current, dynamic and rich internal communication.  All members can keep informed and for new members, it is a point from which they can gather information to quickly get up to speed. 

Where Can Office 365 Communication Sites be Connected From?

Not only can you access the Communication Site from your mobile app, but you can access, create content and engage with others from any device.  The full site, news, pages, navigation, search, and additional functionalities are natively viewable, engaging and functional.  From within the mobile SharePoint app, you can engage in a Yammer conversation, create a news article or read a page – all from within the context of the site. 

How Else Does Office 365 Communication Sites Enhance and Encourage Communication?

Communication Sites communicate effectively and efficiently through visually dynamic pages.  Your home page and sub-pages can be customized to meet your needs, but most importantly they can be made to look great!  Full-width layouts, spanning the page left to right, provides the page space to emphasize your most essential information.  With the enhanced title region and customized header image, along with full control over what portion of the image is the most important to highlight, visually presenting your home page, news and subpages with an attention-grabbing header graphic and title will not only look great on your desktop, but also on your mobile device. 

It is not just enough to communicate the recent news to your audience, but it necessary to engage in discussion, thereby, retaining your audience.  With the ability to comment on each news article and page, it allows your audience to provide feedback, which in turn can be used for the improvement of the page, article or project. 

A valuable feature is the ability to share the news via email. Unlike other shared information via email, news shared from a Communication Site will not only provide a blue link, but it will also provide a visual (thumbnail) and an informative preview (title, description) that adds context to the news article and email.  The ability to provide a message from the sender is also available. 

What is Displayed and Where Does the Data Come From?

As mentioned, the data displayed is dynamic and is pulled from either Microsoft Stream (videos or full channels) or Power BI (interactive reports).  Other sources of information and data can be pulled by adding web parts into your articles.  The first type is an Image web part which allows insertion of images and GIFs.  Sometimes there is too much content to be shown within the first view, truncating all other highlighted content. In these cases, selecting the “See All Pages” which proves to be handy.  When chosen, a full-page experience appears, providing a full view of all the content and activity.  The last web part is the “News” which is used to showcase your news by using multiple layouts to highlight what is important.  Layouts include Top story layout, which is the default, or List where you can view news in a list, or Side-By-Side. 

In this installment, we have determined:

1.  Why and when do you use a Team Site versus an Office 365 Communication Site;

2.  The simplicity of creating a new Office 365 Communication Site;

3.  What content is shared on a Communication Site;

4.  Where and what content can be shared from a Communication Site;

5.  Where can an Office 365 Communication Site be connected from;

6.  What devices can connect to a Communication Site;

7.  How is communication enhanced and encouraged by Office 365 Communication Sites; and

8.  What is displayed and where does the data come from.

From these, we now have an understanding of why we would create a Communication Site. With this understanding, we can now proceed to look at the Office 365 Communication Site in greater detail.

SharePoint and Office 365 PowerApps Enhanced


Why use PowerApps?

PowerApps is used to build customized SharePoint forms without the need for writing code or formula, simplifying and transforming the cloud and mobile business process.  Though geared towards power users, any user can use PowerApps to customize default forms to view and edit SharePoint data.  Over 160 data services are accessible, including Office 365, Dynamics, Box, Salesforce, Twilio and Mail Chimp.  Embedded into SharePoint, these forms provide a native and seamless experience for users. At Ignite 2017, Microsoft announced many new and upgraded features to PowerApps that not only will ease the creation of apps but will benefit the end user in the ease of usability. 

In addition to viewing and editing SharePoint data, the ability to upload attachments into a list is incorporated into PowerApps.  Not only will this ease the workflow, but the ability to multi-select items from a list within your customized PowerApps forms provides additional user-friendliness which translates into saved time for the user. 

The Ease of Authoring Apps

Without having to write code for rules and conditions, PowerApps makes it easy for users to start building apps without a single formula.  Add PowerApps Studio, and your work in progress will now be automatically saved. Three key features of PowerApps include:

Rule Builder:  the rule builder allows the user to express conditional logic for actions and formatting by simple point and click.  The rule builder lessens the amount of time required to create sophisticated apps without the need to create advanced formulas.

Auto Save Apps:  apps are automatically saved in the background, allowing the creator to focus on building apps without the fear of losing any work that is in progress.

Guided Configuration:  setting up forms, galleries, data tables and other complex controls in context is simplified with the wizard-like guided configuration tool.

Visibility and Trust for Enterprises

Greater central administration and control for IT teams is available through PowerApps.  Some features include compliance certification, analytics, and a centralized admin centre:

Compliance Certification:  available in the Microsoft Trust Center is the Business Application Platform which includes PowerApps, Microsoft Flow, and Power BI. Compliance certification includes EU Model Clauses, HIPAA/HITEC, ISO 9001, 27001 and 27018, PCI, SOC 1, 2 and 3.

PowerApps Admin Center: provides control to tenant admins the ability to view a list of all apps created in their organization and list all users who are using PowerApps.  Additionally, admins will also be able to:

Update app permissions – add or change users with whom the app is shared with

Delete an existing app – delete an existing app that is not used by any user

View data sources of app – view the data sources used by an app

Update owner of app – update the owner of the app

PowerApps Usage Analytics:  by embedding Power BI reports, app creators and admins can understand application usage from detailed analytics through PowerApps.

Embedding Capabilities

PowerApps will provide app creators the ability to create apps that will have direct interaction with different solutions and websites through its embedding capabilities.  End-users will benefit by having the ability to use the apps in the context of the solution they are using. 

Embed PowerApps as Web Parts in SharePoint: the PowerApps web part enables PowerApps to be embedded in any SharePoint page, including list forms.  With this, users can customize their business processes by using a custom-built app and can take action right from SharePoint.

Embed PowerApps in Power BI Reports:  apps built with PowerApps will be embeddable into Power BI reports, providing business analysts the ability to set filters and data parameters to produce the required data in reports within the app.  Users can then take actions based on the insights they see in Power BI.

Server-Side Business Logic:  rich data bound apps built by PowerApps will be supported in the Common Data Service for relationships and server-side logic in Q1 2018.

Managing the App – PowerApps Admin Centre

1. Click Environments near the left edge of the PowerApps Admin Centre. Select the environment that you want to view the list of apps;

2. On the horizontal navigation bar, select Resources, then Apps.  From the Apps list, select the app that you want to manage or view;

3. View or Manage the app with the following operations:  delete the app, view connection, flows and other details associated with the app, and view and modify users with whom the app is shared with.

PowerApps Analytics – The App Performance Report

The PowerApps Analytics report is accessible by app authors and provides analytical performance data that has been tracked on a specific app for the past 30 days.

Accessing the App Performance Report

To access the PowerApps analytic apps performance report, follow the following steps:

1. Go to web.powerapps.com;

2. On left navigation bar, select Apps;

3. Select Analytics (preview) for the app; and

4. From the drop-down, select Performance.

To download the report, select Export Data by clicking the ellipses in the top right corner of the chart.  The report will be exported in a .cvs file.

PowerApps Analytics – The Dashboard

The following information can be found on the dashboard:

1. Time to first screen – this is the time it takes from clicking the app icon to PowerApps handing control to the app’s first screen.  This is for the 50th, 75th, and 95th percentiles.  Note that this excludes the time to load the app’s first screen.

2. Time to first screen without connection set up – this is the time it takes from clicking the app icon to PowerApps handing control to the app’s first screen. This excludes the time the user spends on the connection setup. Information is for the 50th, 75th, and 95th percentiles.  Note that this excludes the time to load the app’s first screen.

3. Session length – this is the time the users spend on the app after a successful launch of the app. This includes the 50th, 75th, and 95th percentile times.

4. Number of users per session length – provides the user distribution, after a successful launch, over session lengths of < 1 minutes, 1 – 5 minutes, and > 5 minutes.

At Ignite 2017, Microsoft announced many new and upgraded features to PowerApps that not only will ease the creation of apps but will benefit the end user in the ease of usability.   These were only a few of the latest enhancements to PowerApps as there will be more features coming with future releases.

The Enriched Microsoft Flow


At this year’s SharePoint Virtual Summit, Microsoft announced many new and exciting features and enhancements to its suite of applications. These innovative features affect the following applications:

SharePoint – continues to gain momentum with over 100 million monthly active users. SharePoint plays an important role in Office 365 by empowering customers with the ability to share, manage, and create content, knowledge, and apps to weave a more connected workplace.

OneDrive (File Explorer on Windows and Finder on Mac) – Collaboration requires access and sharing of documents between team members, who may either be within your organization or outside of it. With OneDrive, you can securely share your files with a link to anyone inside or outside of your organization with real-time collaboration, whether it be on your desktop, laptop or mobile device.

SharePoint Communication Sites – Collaboration within your team is important, but reaching and engaging a broader audience within your organization is just as important. Providing updates through a beautifully designed dynamic site, the Communication Sites was developed with these special focuses for your audience across your organization via desktop, laptop, and mobile device.

SharePoint Forms with PowerApps – Easily create custom forms that surface in the context of a SharePoint list or library, providing data that users can then create, view and interact by using your custom form. PowerApps is a powerful tool for users as they are empowered to drive the transformation of the team and organizational processes. 

SharePoint and Microsoft Flow– Built-in approval flows allow you to send documents with a custom message and the recipient can approve the request directly from a rich, actionable email message or provide feedback, without leaving their inbox.

Microsoft Graph –Relevant and valuable results are surfaced from content that is sourced from files, sites, news, and from people cards, which includes their skills, interests, and projects, which is all driven from machine knowledge that runs Microsoft Graph.

These are just a few of the new innovations announced at this year’s Summit, but in this article, we are going to focus on the many new aspects of Microsoft Flow and SharePoint.

What is Microsoft Flow?

Microsoft Flow was integrated with SharePoint in 2016 (see my article https://www.maadarani.com/sharepoint-and-flow/). Microsoft Flow is a workflow tool which allows quick delivery of automated information to your audience whether on-prem or in the Cloud. The ability to automate and receive notifications, synchronize files and obtain data between your favorite apps and services provides you the ability to reach out beyond your intranet. Once your audience reacts to the trigger, their action reaches back to Flow which then logs their reaction into a SharePoint List or Excel file.  This data is beneficial for analytics, providing the ability to review and enhance processes by streamlining with recurrent cycles that can be set hourly, daily, weekly or as frequently as minutes. 

Prior to integration, the creation of simple workflows required the use of SharePoint Designer or third-party tools.  Though SharePoint Designer was developed specifically for SharePoint, it did not lend itself easily to creating workflows within SharePoint.  To write the coding for the workflows, one had to learn the syntax, the many quirks of SharePoint Designer, debug and tweak the code for countless hours. 

Now, with Microsoft Flow, creating workflows is much easier. Microsoft Flow employs a graphic user interface and with the many templates in its library.  Microsoft Flows interact with other applications like MailChimp, Twitter, SharePoint, OneDrive, and Dropbox and many other applications. 

Microsoft Flow has advanced even further since its integration in 2016.  Not only can you embed Microsoft Flow within Microsoft’s own products, 20 product partners have now integrated their products to be accessible within Microsoft Flow creating the opportunities for limitless types of workflows.

Partnering with Microsoft Flow – The Possibilities and Outcomes

Building Custom Connectors

Adobe has developed its Creative Cloud connector which has its own set of actions and triggers by leveraging Microsoft Flow’s rich custom connector to build connectivity to their own services directly inside Microsoft Flow. There are two types of triggers that Microsoft Flow supports, polling and webhooks, and both are leveraged in Adobe’s Creative Cloud connector. 

ISV Cloud Embed

Microsoft is offering ISVs to pilot their new ISV Cloud Embed Program. The Cloud Embed Program will be enabled later this year. This program will allow information staff and power users of ISVs the ability to add and customize workflows as part of their applications. If you are an ISV and would like to participate in the pilot program, then apply by completing this simple online form

Connecting with Flic

What is Flic?  Flic is a physical button that uses wireless Bluetooth technology, pairing itself with your Bluetooth wireless device and provides you three clicks that execute three specific commands from a distance.  For example, the first may start your playlist, the second may pause your playlist, the third may skip to the next song. Or, the first can turn on your lights, the second can begin playing your music, the third click can turn on your smart TV.  Continuing to expand its unlimited uses, there is now a beta version of a Flic hub, which allows Flic buttons to be distributed throughout an environment, such as in an exhibition and when a visitor clicks the Flic button, a flow immediately runs in response.  This is only one example of how Microsoft Flow can be partnered and implemented with a third party.

Common Business Automation with Microsoft Flow

Microsoft Flow is being embedded into a range of Microsoft business application products, providing a powerful end-user experience with the capability of creating and implementing the automation of flows at their level.

As of May, Microsoft Flow can be triggered within SharePoint from within Document Libraries, SharePoint Lists or OneDrive for Business folders.  Some added features include the collection of additional data once the flow is run, including request for feedback from the user to the reviewer, assigning a priority (i.e. high/medium/low priority) of a flow document, and the ability to share the flow with others in the organization but withholding permission to edit the flow.

Dynamics 365 for Financials & Operations, Business Edition, will also benefit from the embedding of Microsoft Flow into its application. The user will now be able to manage flows from within the context of Dynamics 365 without having to leave the application. The Dynamics 365 customer will not only benefit from a fast, automated workflow but will also now have a seamless experience.


One of the most exciting announcements is the Microsoft Flow “Bot” – the Microsoft Teams @FlowBot.  This bot brings automation into Teams workspaces, allowing team members to trigger flows right inside of Teams conversations. A team member will have the capability of setting up a flow where a text message is sent to appropriate staff regarding an impending issue and the actions taken can be logged in an Excel spreadsheet. 

Microsoft Flow and Every Level of User

With its simplified workflow automation, Microsoft Flow is user-friendly from beginners to advanced users.  With just a few clicks, a user can easily start automating a flow. 

There are a variety of workflow scenarios with connector supports for many different services.  A user begins by choosing the service that he is interested in and then browses what the connector can do.  Once the user determines which connector is appropriate, he can then use that connector as a jump-off point to build his flow. 

When we think of Flows, we think of complex “if this happens, then that happens” type of scenarios. Sometimes, users only need basic operations to be completed, like adding numbers together, retrieving the correct time, or replacing a string of text. These can be accomplished with Flow’s rich set of actions, which resemble Excel expressions, inside any flow action. For those with Azure Logic app experience, the transition is simple as Microsoft Flow uses the exact same Workflow Definition Language as Azure.  For those unfamiliar with this language, inline help is available to help with building out their flow with each expression. 

Button technology provides faster, richer flows and instant action.  Workflows can be kicked off by the pressing of a button, either digital or physical.  With two rich capabilities, Microsoft Flow button provides flow authors the choice of how new accounts are used in shared buttons. In one instance, authors can ask the person clicking the button to provide their account, or, the author can bake an account directly into the flow.  The second instance allows authors to define the input, such as dropdown lists for the buttons, which restricts the user to choose an option from a pre-defined list.

The tight integration between Microsoft Flow and SharePoint and other software, such as button integration, is essential for Microsoft customers as it provides simple, effective and clear flows at any user level. 

Administrative Control and Life Cycles

Not only are there enhancements in the creation of flows, but within the administrative and life cycles of the flows, administrators are given more granular control along with management capabilities which translates to the effective empowerment of end users with capabilities rich in automation. 

In the Microsoft Flow admin centre, admins can now view and manage all flow inside their organization. Analytics allow admins to download flow usage in their tenant, providing the necessary data to understand exactly where and how flows are being used, how they are tracking against their billing quotas, and based on flow usage, determine which scenarios are being adopted the fastest, and using this information, to identify those most useful to employees.

Managing Lifecycle of Flows

For some companies, it is essential to have the ability to verify their solutions before rolling out across the board. For others, it is necessary for system integrators to build their solution within their environment, export it in a package, and then distribute directly to their customer’s tenants.  The management and control of the life cycle of flows are critically important, and at the SharePoint Virtual Summit, it was recognized.  To meet these types of criteria, solutions built with Microsoft Flow can now be imported and exported with other assets like PowerApps across environments, including from test to production environments. 

In addition, users can now convert Microsoft Flows to Azure Logic apps by saving any flow as a Logic App resource template.  Like any Logic App resource, the template can be managed and deployed through Visual Studio or directly in the Azure portal to a user’s subscription of choice.

As Microsoft continues to innovate and enrich their applications and setting the standard in the industry, many partners strive to match these standards.  As third-party developers combine their application features with those of Microsoft, SharePoint and Office 365 will continue to empower its users with powerful applications that are becoming more user friendly and more specific to user needs by leveraging machine learning building towards a corporate world of collaboration on the go.

SharePoint Modern Team Sites – Part III


Provisioning “Modern” Team Sites

There are four methods of provisioning “modern” team sites. These are: user interface, programmatically, PnP CSOM core component, and PnP PowerShell. 

1.  User Interface

One can provision from a user interface and can be done from:

a.    SharePoint – provision direct from SharePoint Online; or

b.    Office 365 Group – provision from an Office 365 Group from another location such as Outlook, which would then trigger the provisioning

The “modern” team sites in your tenant will have to be enabled by the administrator so that you can create “modern” team sites from the SharePoint home page.  Additionally, you can create an Office 365 Group from Office 365 Outlook.  By choosing the “site” tab of that group, you will be brought to the “modern” team site landing page.  The SharePoint site creation process can be controlled from the SharePoint Online admin settings by choosing “modern” experience or “classic” experience. 

2.  Programmatically

The “modern” team sites can be programmatically created through Microsoft Graph.  When creating an Office 365 group in Microsoft Graph, a “modern” team site is automatically provisioned for the group.  The default structure for the “modern” team site URI is based on the mailNickname parameter of the Office 365 group:  https://[tenant].sharepoint.com/sites/[mailNickname]

3.  PnP CSOM Core Component 

The PnP CSOM Core Component is available as a NuGet Package and has simplified methods for handling “modern” groups.

4.  PnP PowerShell

Creating “modern” sites with PnP PowerShell provides the opportunity to authenticate with Microsoft Graph using Azure Active Directory.  The following is a script that will create a “modern” team site and will return the actual SharePoint site URL for further manipulation.  Through the URL of the created site, one can use either CSOM (with SharePoint PnP Core Component) or SharePoint PnP PowerShell to automate additional operations on the site.  The script is as follows:

# Connect to Azure AD and get back an OAuth 2.0 Access Token
# This command will prompt the sign-in UI to authenticate
Connect-PnPMicrosoftGraph -Scopes "Group.ReadWrite.All","User.Read.All"

# Store the Access Token in a local variable
# This is not really needed for next steps, but is available $accessToken = Get-PnPAccessToken
# Create a new Office 365 Unified Group, together with the corresponding Modern Site in SPO
$group = New-PnPUnifiedGroup -DisplayName "Awesome Group" -Description "Awesome Group" -MailNickname "awesome-group" -Members "admin@contoso.onmicrosoft.com", "dan@contoso.onmicrosoft.com" -IsPrivate -GroupLogoPath .\logo.jpg

# Connect to the modern site using PnP PowerShell SP cmdlets
# Since we are connecting now to SP side, credentials will be asked
Connect-PnPOnline $group.SiteUrl

# Now we have access on the SharePoint site for any operations
$context = Get-PnPContext
$web = Get-PnPWeb
$context.Load($web, $web.WebTemplate)
Execute-PnPQuery
$web.WebTemplate + "#" + $web.Configuration[1]


Additional Considerations

1.  Unlisted Sites in SharePoint Admin UI/Tenant API:  As “modern” team sites are not visible in the SharePoint Admin UI; the list can be accessed from the Office 365 Groups admin user interface (located under Office 365 admin portal).  Only “classic” SharePoint sites are listed on the SharePoint Online admin user interface.  This limitation also applies to the tenant API.  In other words, “modern” team sites cannot be listed by using this API but can be via programmatically by using the Groups endpoint from Microsoft Graph. 

2.  Sub-Sites and “Classic” Templates:  Sub-sites provisioned under the root site of a “modern” site collection will use “classic” templates as there currently are no sub-site templates available for the “modern” sub-sites.  There is the capability of transforming a “classic” sub-site to a “modern” sub-site. This can be achieved by creating a “modern” page on the site.  Finally, updating the welcome page to the newly created page will result in a “modern” experience.

With “modern” team sites, managing, accessing and communicating is simplified, streamlined and productive.  As SharePoint continues to work towards the “modern” experience, we can expect more templates and flexibility towards transferring to the “modern” experience.


[1]Provisioning “modern” team sites programmatically, (2017, March 27).  Retrieved from https://msdn.microsoft.com/en-us/pnp_articles/modern-experience-customizations-provisioning-sites

Modern UI – Part II


Modern document libraries and lists were released in the summer of 2016 for SharePoint Online with the goal of creating better end-user experiences, including faster, better, and intuitive responses in a user-friendly environment.  Not only is it highly recommended that one transitions to the “modern” list and library but customizations be converted to the “modern” experience as there are many benefits to the “modern” experience.  Some of these benefits include the following:

updated user interface: “modern” document libraries are similar to OneDrive, offering intuitive responses such as creating new folders and uploading files in the browser;

–  pinned documents:  pin documents so they are above the fold in any screen view for quick and easy access

copy and move:  unlike old copy and move commands, the “modern” experience is intuitive and allows one to create new folders on they fly as the architecture of your information is displayed

decrease number of copies of document: “modern” document libraries are intelligent.  They remember files that you have used in SharePoint which allows you to import files from other libraries as links rather than data files, thereby, decreasing the amount of storage space and duplicity numerous of files. 

organizing files: “modern” document libraries provide the ability to group files directly on the main page without having to go to a separate admin screen.  In addition to this, there is the capability to click and drag columns to change their size plus sorting, filtering, and grouping can be done from any column header

–  mobile browsers:  whether accessing SharePoint Online with a keyboard, mouse, screen reader or touch, all mobile browsers will now have the same features as a desktop

–  editing metadata:  it is no longer necessary to click through multiple screens to apply an update as metadata can now be edited from the main view on the information panel

–   integration:  by integrating Office Online with SharePoint Online, SharePoint Online now provides a complete document preview at the top of the information panel and is completely navigable.  The information panel displays pertinent metadata including history of recent activities, recipients of the file for sharing and updates to the file

It is important to note that the “classic” experience will not be deprecated but will co-exist with the “modern” experience. 

There is an option available to the Admin to enable SharePoint to automatically detect when certain features are being used.  This auto-detect automatically returns the “modern” experience back to the “classic” experience when certain features are used. 

These features that are compatible to auto-detect include:

1. Navigation Features:  all libraries on sites that have metadata navigation and filtering features enables are shown in “classic” experience;

2.  Column Types:  geolocation columns, external data columns, and publishing columns (including publishing HTML, Publishing Image, Publishing Hyperlink); and

3.  Customizations:  JSLink code on fields, and CustomActions that include ScriptBlock or ScriptSrc properties. 

Auto-detect can be enabled, assuming the “modern” experience was not disabled under the site, web, or list levels, by following these steps:

1.  Choose Admin Centres;

2.  Choose SharePoint;

3.  Choose Settings;

4.  Scroll down to SharePoint Lists and Libraries experience; and

5.  Choose New Experience (auto-detect) (the black should appear in the circle next to this). 

Auto-detect is now enabled. 

Customization Options

Unlike the “classic” lists and libraries, the “modern” list and libraries supports fewer customization options; however, the SharePoint Product Group is continually working towards supporting more options in the future.  In the meantime, supported capabilities include Subset of User Custom Actions, Custom Branding, and PowerApps and Flow Integration. 

Customizations that are not currently supported for “modern” lists and libraries include: JSLink based field and view customizations, custom CSS via AlternateCSSUrl web property, custom JavaScript embedded via User Custom Actions, Custom master pages, customization via InfoPath, Minimal Download Strategy (MDS), and SharePoint Server Publishing.  For embedded Custom JavaScript, there will be controlled methods of embedding JavaScript on the pages through SharePoint Framework, and not only client-side web parts. 


User Custom Actions

Not all user custom actions supported by “classic” mode are supported in “modern” experience mode.  The following is a list of supported custom action locations and how they are surfaced in the “modern” UI:

1. User Custom Action Location:  EditControlBlock will be visible and show up as custom menu items; 

2.  User Custom Action Location:  CommandUI.Ribbon will be visible and show up as toolbar items; and

3.  User Custom Action LocationScriptlink and all other locations will not be visible and will not surface in the “modern” experience

Adding custom links to the context menu can be achieved by using the EditControlBlock as the location for your custom action.  Likewise, to extend the toolbar in the “modern” list and library experiences can be achieved by adding a user custom action targeting the CommandUI.Ribbon location. 

User Custom Action Limitations

It is important to keep in mind the limiting parameters when developing user custom actions. These limitations include the following:

1. Control of User Custom Actions:  one does not have complete control of the order in which the user custom actions show up.  The current API does not account for the sequence attributes;

2. Usage of JavaScript:  user custom actions will not show up if JavaScript is embedded in the command actions as it is not supported;

3. ScriptLink and ScriptBlock:  as ScriptLink is not supported, any user custom action relying on ScriptLink will not run in the “modern” experience; and

4.  Image Maps:  Image maps is not supported but you can specify individual images that are only 16 x 16.

Custom Branding

If your site employs a custom theme, then this custom theme will be respected in the “modern” list and library experience. 


Configuring End User Experience

The “modern” or “classic” list and library experience can be controlled at multiple levels:

1.  Tenant Level Configuration:  Highly suggested for disabling the “modern” experience completely.  In your tenant admin center, go to settings, select “classic” experience;

2.  Site/Web Level Configuration:  For preventing a web or site collection from using the “modern” experience, one can enable/disable features; and

3.  List/Library Configuration:  Control can be found at the library level by going to list settings, advanced settings, and then choose how you want to change the behavior.  Optionally, it can also be done using CSOM. 

As the SharePoint Team continues to add more supported features, it is highly recommended that one transitions to the “modern” list and library to take full advantage of the user-friendly environment which results in a satisfying end-user experience. 


The Modern Experience – Part I


For better end-user usability and additional customization options, SharePoint Online as begun rolling out “modern” experiences.  The modern experiences currently supported include Modern Team Sites, Modern List and Library Experiences, and Modern Site Pages.  Each of these can be controlled at the tenant or site levels. 

Adopting Modern Experiences

There are several recommended steps for preparing and deploying modern experiences, especially for those who have existing customizations that are business critical for your deployment.  The adoption process recommended is as follows:

1. Readiness:  It is important to thoroughly understand and comprehend the “modern” experiences, their features and, especially, which features are not currently available.

2.  Assess:  Assess your current customizations and determine which customizations and features can work within the “modern” experience and those that cannot.  Those that cannot work within the “modern” experience should be updated or be retained in the “classic” format.  For those that can work within the “modern” experience, determine to what extent they will work. 

3Solution Planning:  Analyze, develop and finalize the plan on the requirements needed to prepare your custom solutions and sites to be used with “modern” experiences. 

4Develop and Test:  Develop, apply and test the changes required for your customizations.  Confirm that they will work, and if they do not, then repeat Steps 2, 3 and 4. 

5Deploy:  Roll out the updated changes to your SharePoint environment. 

Existing Sites and Converting to “Modern” Team Sites

Currently, existing collaboration sites cannot be converted to “modern” team sites with an associated Office 365 group. However, “modern” experiences can be used in the “classic” collaboration sites by enabling the capabilities at the tenant level, then, modifying the sites based on functional requirements.

For newly added pages in “classic” SharePoint sites, the default will be a “modern” page with the option of changing the welcome page to a “modern” page. Setting a new “modern” page for a “classic” SharePoint site can be done programmatically in CSOM or REST APIs.  For “modern” lists and library usage, control is available at the tenant, site, web and list/library levels. 

SharePoint On-Prem and “Modern” Experiences

Currently, “modern” experiences for SharePoint On-Prem are not available.  They are planned to become available for SharePoint 2016 in an upcoming feature pack and will be available with a step by step guide. 

“Modern” experiences in SharePoint Online focus on end-user usability and appearances and offers more centralized, easily accessible information from multiple platforms while on the go.  In the next installments, we will discuss Modern UI and Modern Team Sites in greater detail. 


SharePoint and Office 365: Patterns & Practices – Part 2 Contributing, Resources, and Sources


As the community and Microsoft work together to create sample code and guidance, they begin to form the libraries, or repositories, that store this information but before they can be stored, they must meet the PnP support guidelines and recommended techniques. These are then reviewed and approved by SharePoint Engineering.  Once approved, and depending upon their functionality, they are then released through the following channels:

1.   PnP Core Component:  significant functionalities and add-ons to increase developer productivity


2.   PnP PowerShell: maintain shipment deployment on-line or on-prem


3.   PnP Partner Pack:  starter kit for achieving certain functionalities on online shipment


4.   PnP JavaScript Core:  SharePoint library for JavaScript


5.   UI Responsive Package:  components and solutions for SharePoint online and on-prem 


6.   Other components and solutions 

Even though PnP is owned and coordinated by SharePoint Engineering, it is completely driven by the community both internally and externally.  The collaboration, sharing of knowledge and the opportunities provided for learning has and will continue to benefit those in the community.  The program is facilitated by Microsoft, but being community driven, Microsoft has reached out to the community, resulting in the appointments of multiple community members into the PnP Core Team. Microsoft is currently looking to extend the Core Team with more community members. 

Where do I start if I want to become more involved?

As they saying goes, “Sharing is caring”, and one can join the community and share one’s knowledge. The following are highly recommended if you want to become more closely involved:

a.    Wiki:  How to get started and contribute to Office 365 Dev PnP program

b.    Webcast: Office Dev PnP Webcast – How to get started with Office Dev PnP

c.    Video Blog: https://channel9.msdn.com/blogs/OfficeDevPnP


Why and How to Contribute to PnP Initiative

The PnP initiative is an open source community which is comprised of internal and external members of the Microsoft community.  Like all open source communities, the success of the community is driven by the members and their degree of contribution and active engagement.  In PnP, this is no different as every member who contributes is recognized during a monthly public recap of all things being contributed and implanted into the latest version of PnP. 

As a collaborator and member, you have opportunities to help others, whether they are just beginning to consider PnP to those who are advanced, whom you could recommend patterns to.  Being an active member of the PnP initiative provides the opportunities for networking where you will not only find peers who work on similar topics, but you will engage with customers and partners. 

Contributing and participating is made simple through the usage of three platforms.  The first being Yammer, as it is not only a great place to participate in the discussion, but it is the place to help others or to ask your own questions.  You can follow monthly releases and discussions on the latest topics from the second platform, Skype for Business.  In Office Hours, discussions revolving on the topics of needed capabilities within Yammer or Office Hours take place.  In addition to these, opportunities to discuss reporting and fixing issues, contributing new samples, guidance, and documentation feedback.  When there are submissions, they will be reviewed, and if approved, will be meshed with the existing components.

I’m in!  Now what?

The best way to contribute and participate is to become informed, committed and knowledgeable.  As an open source community, there are many members who contribute, teach, review and mentor others within the community.  The beauty of collaboration is that there is no one way of doing things as there are many avenues to reach that end goal, but with many minds on the task, that road becomes wider and more accessible, allowing the team to reach that goal more efficiently, quickly and with great focus. 

Where do I find Key PnP Resources?

At the Microsoft development centre, you can find code samples and guidance documentation.  At  https://dev.office.com, you can access code samples and guidance through the drop down menu under the heading Resources by choosing Patterns and Practices

How to find what is relevant to me in PnP?

As each contributors' needs are different and many times are dependent upon client needs, there are several ways to find what is relevant to your unique situation.  These resources contain many articles for support and how to's for:   

a.    PnP Web Castshttps://aka.ms/OfficeDevPnPVideos (aka Chanel 9)

Key topics that are discussed in consideration of your customization of Office 365 to on-prem include the following:


–      setting up on-prem add-in model infrastructure

–      remote provisioning vs. feature framework usage

–      JavaScript performance considerations with SharePoint

–      provisioning engine and references solution with AngularJS

–      SharePoint Nugent Packages and PnP Core Component

–      throttling mechanisms in SharePoint Online


b.    Blog posthttps://dev.office.com/ 


c.    Documentshttps://docs.com/OfficeDevPnP


Presentations and graphics that you will find here:


–      webcast presentations

–      community call presentations

–      seminar presentations

–      reusable graphics

–      PnP Graphics presentation contains over 100 slides and drawings for reuse


d.    Add-in Model transformation training packageaka.ms/OfficeDevPnPTraining


                     i.        Video, presentations, demos and hands-on demos


                    ii.        10 training modules on specific topics including the following:


1)       Introduction to Transformation

2)       Site Settings and JS embed

3)       Branding with add-in model

4)       Building UX components with add-in model

5)       Remote event receivers and timer jobs

6)       Site and site collection provisioning

7)       User personalization and OneDrive for Business

8)       ECM with add-in model

9)       Search with add-in model

10)    Transformation guidance from FTCs to add-ins

How do I keep up-to-date in PnP?

With the large community that participates in PnP, changes and additions occur at a fast and high rate.  To contribute, participate and keep abreast of new additions, one must keep current.  There are three sites that will help you to keep current and whether you are listening or asking questions, these three resources will prove to be invaluable:

      a. Yammer:  http://aka.ms.OfficeDevPnPYammer

A place where you can participate in the discussion while helping others with questions and answers.

b.  Bi-weekly office hours: http://aka.ms/OfficeDevPnPOfficeHours

Open mic theme for answering all questions with open discussion.

c.  Monthly community calls:   http://aka.ms/OfficeDevnPPCall

Held every second Tuesday on a monthly basis via Skype for Business, the community receives a recap of what has taken place the month before, thus bringing all its members up to date on the latest version.

Can I have a cheat sheet for all the information I will need?

There are four key sources for information, and they are as follows:

1.  Key resources:

https://aka.ms/OfficeDevPnPVideos

https://aka.ms/OfficeDevPnPMSDN

https://aka.ms/OfficeDevPnPYammer

https://aka.ms/OfficeDevPnPCall

2.  Repositories include:

https://github.com/OfficeDev/PnP

https://github.com/OfficeDev/Pnp-Sites-Core

https://github.com/OfficeDev/Pnp-Power-Shell

https://github.com/OfficeDev/Pnp-Tools

https://github.com/OfficeDev/Pnp-Guidance

https://github.com/OfficeDev/Pnp-Transformation

https://github.com/OfficeDev/Pnp-OfficeAdIns

https://github.com/OfficeDev/Pnp-Provisioning-Schema

3.  Presentations: 

https://docs.com/OfficeDevPnP

4.  Starter Kit:

https://aka.ms/OfficeDevPnPPartnerPack

5.  Twitter: @OfficeDevPnP

What are you waiting for?

Now with all the resources at your fingertips, empower yourself and become a participating force in shaping the content and future of Patterns and Practices in SharePoint and Office 365.