Hybrid BCS Part 4 – Connect to on-premises services


Setting a hybrid connection between you SharePoint Online and on-premises required communication trusts between the 2 farms. Refer to this article Configuring Hybrid Infrastructure for more details on how to configure your hybrid infrastructure.

Validate external access to reverse proxy

At this point in deploying the BCS hybrid scenario, you should confirm that you can access your on-premises SharePoint 2013 farm that has been configured to receive hybrid calls from SharePoint Online.

To confirm access to external URL:

  1. Copy the certificate to your extranet computer, and then click the certificate. You will be prompted for the certificate password. This adds the certificate to your personal certificate store.
  2. Open a web browser and browse to the externally published URL of your on-premises farm. You should be prompted for credentials. If not, check your browser settings and make sure that your logged on credentials are not being automatically passed.
  3. Provide the credentials of the federated user. This log on must succeed and you should see the published site. If this does not work, contact the administrators who set up your hybrid infrastructure. Do not proceed any further with the BCS hybrid scenario until this issue is resolved.

Prepare your tenant environment

In order to allow your SharePoint Online tenant to connect to your on-premises tenant, you will need to configure your security to allow accepting connection to your services. The following steps are an example of what you need to establish a trust between your Online and on-premises tenants.

  1. Click a service account that will access the OData service endpoint that you have previously configured; this procedure will be called ODataAccount
  2. Create a global security group for your OData service endpoint; this procedure will be called ODataGroup
  3. Add the service account to the global security group

Configure Secure Store target application

  1. Go to your on-premises tenant SharePoint Central Administration
  2. Navigate to Application Management > Manage service applications
  3. Click the Secure StoreI
  4. if you have never used your Secure Store, you will need to generate a new key first
  5. Click on Generate New Key
  6. Enter your Passphrase then click OK
  7. Click on New under Manage Target Applications
  8. Enter the name of your application, the display name, and your email address
  9. Select Group in the Target Application Type
  10. Click Next
  11. Accept the defaults values in the Create New Secure Store Target Application page
  12. Click Next
  13. Enter the Farm Administrator account in the Target Application Administrators, and enter the group name you created for you OData Service Endpoint in the Members section
  14. Click OK
  15. Click OK

Important:

A pass phrase string must be at least eight characters and must have at least three of the following four elements:

  1. Uppercase characters
  2. Lowercase characters
  3. Numerals
  4. Any of the following special characters
    "! " # $ % & ' ( ) * + , – . / : ; < = > ? @ [ \ ] ^ _ ` { | } ~

Important:

The pass phrase that you enter is not stored. Make sure that you write this down and store it in a safe place. You must have it to refresh the key, such as when you add a new application server to the server farm.

For security precautions or as part of regular maintenance you may decide to generate a new encryption key and force the Secure Store Service to be re-encrypted based on the new key. You can use this same procedure to do this.

Caution:

You should back up the database of the Secure Store Service application before generating a new key.

Set Permissions on your Online BCS

Setting your permissions on your Online BDC Metadata store is different than the on-premises tenant.

    1. Open your SharePoint Online administration page
    2. Click on bcs
    3. Click on Manage BDC Models and External Content Types
    4. Under Permissions, click on Set Metadata Store Permissions
    5. Select All users then set the Execute
    6. Select the checkbox to Propagate permissions to all BDC Model
    7. Click OK

Connect your O365 BCS to your on-premises

Unlike BCS in SharePoint 2013, BCS in SharePoint Online requires that you configure a connection settings object (CSO), which contains additional information to establish the connection to the external system and the OData source you have created.

When you create a CSO in your SharePoint Online tenant, you must provide a URL for your on-premises farm (the external URL you have configured in your reverse proxy to connect to your internal SharePoint services). Your SharePoint Online tenant will try to reach out to that endpoint in order to invoke your on-premises BCS and connect to your data source.

Whatever URL you may choose to publish, your CSO must have /_vti_bin/client.svc at the end of the URL in order to work properly.

Before you begin this procedure, make sure you have the following:

  1. Install configuration tools on an on-premises web server.
  2. The ID of the Secure Store target application that you configured.
  3. The Internet-facing URL that Office 365 uses to connect to the service address and that was published by the reverse proxy
  4. The ID of the Secure Store target application for the Secure Channel certificate in Office 365.

To create a CSO to your on-premises tenant:

  1. Open your SharePoint Online administration page
  2. Click on bcs
  3. Click Manage connections to on-premises services
  4. Click Add
  5. Enter the Title and the OData Service Address URL
  6. Under Authentication, select Use credentials stored in SharePoint on-premises
  7. Enter the Secure Store Target Application ID
  8. Under Authentication Mode, select Impersonate Window’s Identity
  9. Enter the internet facing URL you have configured under the reverse proxy; make sure you include /_vti_bin/client.svc at the end of the URL
  10. Click Create

Since your model will be using your Connection Settings object that you create in your SharePoint Online in order to connect to the on-premises data, there are some changes you need to make to it; if you do not do this then your model will not be able to connect to the on-premises data source:

  1. Make a copy of the ECT file that you'll be importing so you don't break the version you have with your OData project
  2. Delete the ODataServiceMetadataUrl and ODataServiceMetadataAuthenticationMode properties from the LobSystem property list in the ECT file
  3. Delete the ODataServiceUrl and ODataServiceAuthenticationMode properties from the LobSystemInstance property list in the ECT file
  4. Add this property to the list of properties for both the LobSystem and LobSystemInstance:  <Property Name="ODataConnectionSettingsId" Type="System.String">yourConnectionSettingsObjectName</Property>

Import your ECT file to SharePoint Online

Similar to the steps for your on-premises tenant, you need to import your new ECT file you have modified in the previous section to your SharePoint Online BCS tenant.

  1. Open your SharePoint Online administration page
  2. Click on bcs
  3. Click on Manage your BDC Models and External Content Types
  4. Click on Import
  5. Navigate to your ECT file locations and import each ECT file; as an alternative solution, you can develop a PowerShell script to import all the files
  6. Click OK

Once your model is uploaded successfully you can create a new External List in SharePoint Online and use that to work with your on-premises LOB data.

Follow this article to create an External List.
 

<< Previous – Part 3 – External Content Type Configuration 

>> Next – Part 5 – Validation

Configuring Hybrid Infrastructure


Setting up SharePoint on-premises requires that you meet basic SSO deployment requirements and then configure SharePoint 2013 services and inbound requests.

When you set up and enable SSO, users in your organization are able to use their corporate credentials to access the Office 365 service offerings. This removes the burden of managing multiple logon identities and passwords. Without SSO, an Office 365 user would have to maintain separate user names and passwords. For an even better end-user experience, you can create and deploy smart links, which can help speed user sign-in requests by reducing the number of redirects necessary for authentication.

In addition to user advantages, administrators and the organization can also benefit from SSO. For example, configuring SSO helps to enforce the organization’s password policies and account restrictions in both the on-premises directory and the Office 365 directory.

To prepare, you must make sure the environment meets the requirements for SSO and verify that the Active Directory and Azure Active Directory tenant is set up in a way that is compatible with single sign-on requirements. Also, Active Directory must be deployed and running in Windows Server 2003 R2, Windows Server 2008, Windows Server 2008 R2, Windows Server 2012, or Windows Server 2012 R2 with a functional level of mixed or native mode. If you plan to use AD FS as your STS, you will need to do one of the following:

  1. Download, install, and deploy AD FS 2.0 on a Windows Server 2008 or Windows Server 2008 R2 server.
  2. Deploy an AD FS 2.0 proxy, if users will be connecting from outside the company network.
  3. Install the AD FS role service on a Windows Server 2012 or Windows Server 2012 R2 server.

In addition, Active Directory must have certain settings configured to work properly with single sign-on. In particular, the UPN, or the user logon name, must be set up in a specific way for each user.


Configure SharePoint 2013 services

You need to configure the User Profile Service to synchronize user and group profiles from the on-premises Active Directory domain. When federated users access resources in a hybrid environment, the STS makes calls to the User Profile Service to obtain user account metadata, such as the UPN and email property values. This metadata is used by the STS to construct security tokens during the authentication process.

SharePoint Online presents claims to the on-premises SharePoint farm by using the Simple Mail Transfer Protocol (SMTP). To support this, you need to ensure that the SharePoint user profiles for all federated users are populated with the user’s email address by using the correct UPN.

This means that the work email field in the on-premises SharePoint User Profile Store needs to contain the user’s federated email address. For example, if a federated user logs on to the on-premises domain as contoso\karenb and the public domain for the hybrid environment is contoso.com, her federated email address is karenb@contoso.com.

You must verify that the App Management and Microsoft SharePoint Foundation Subscription Settings services are started and configured. These services must be enabled to support certain configuration procedures, and to help register SharePoint Online as a high-trust application in SharePoint 2013.


Configure SharePoint 2013 for inbound requests

If the hybrid environment is configured for an inbound authentication topology, you must ensure that a single on-premises web application is configured to receive requests from SharePoint Online. This web application is referred to as the primary web application for the hybrid environment, and it accepts requests from the external endpoint URL. No specific web application configuration is required to support a one-way outbound authentication topology.

In a SharePoint Server 2013 hybrid environment, outbound connections can be made from any on-premises web application. A single SharePoint Server 2013 web application must be configured for inbound connections; it is used as the primary web application for accepting inbound connections and configuring services and connection objects for the hybrid features you deploy. You can either create a new web application and site collection or configure an existing web application for this purpose.


Configure SharePoint Online

Setting up SharePoint Online requires that you choose an application authentication topology and make additional configuration choices for the service.


Choose authentication topology

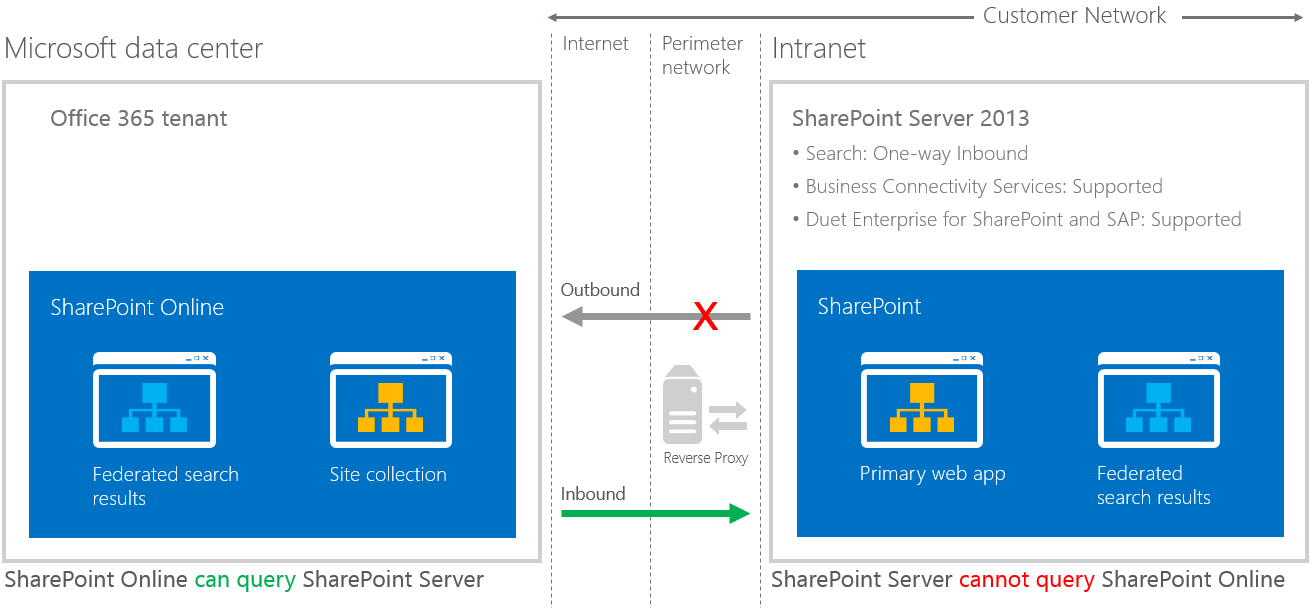
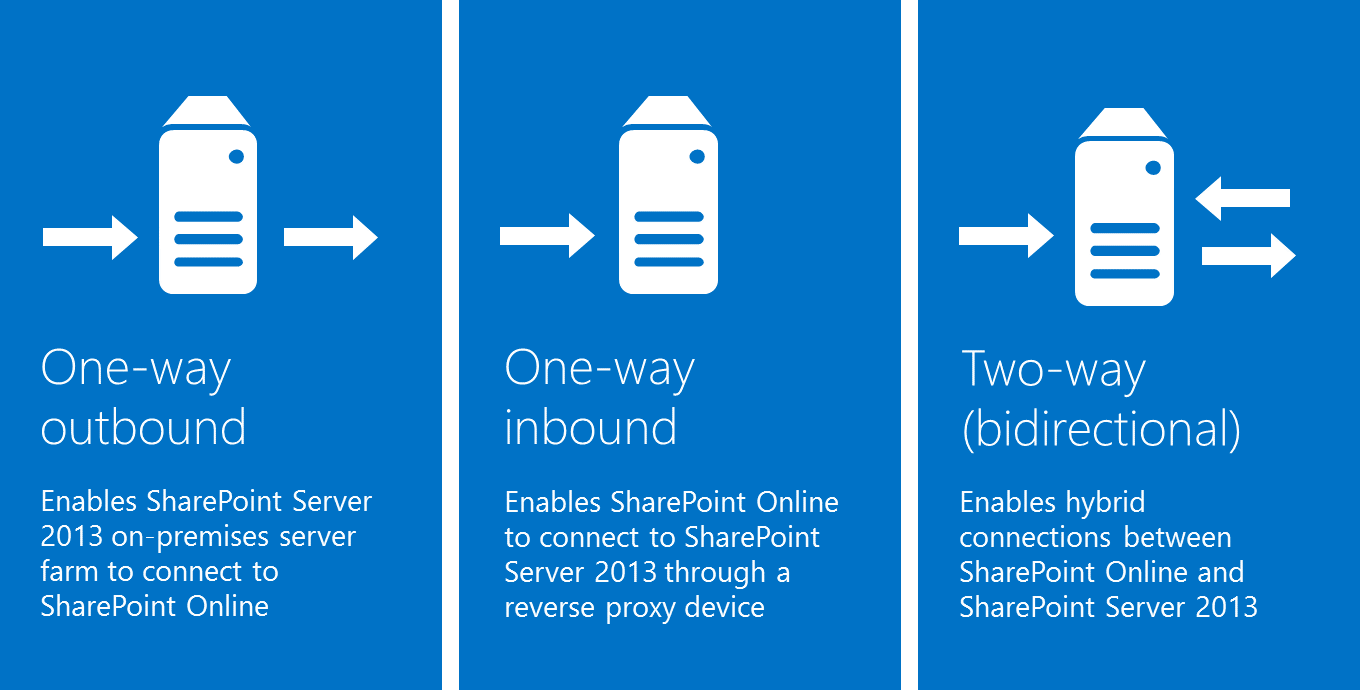
As shown in Figure 1, your choice of an authentication topology determines how certificates are configured and what capabilities are present in the hybrid solution.

Configuring Hybrid Infrastructure

Figure 1: Application authentication topologies

One-way outbound topology

One-way outbound topology is not supported with hybrid BCS. Only one-way inbound and two-way (bidirectional) topologies.

One-way inbound topology

A one-way inbound hybrid topology enables SharePoint Online to connect to SharePoint Server 2013 through a reverse proxy device (Figure 2). For example, users of a SharePoint Online Search portal can see both local and remote search results, but only local results are available in the SharePoint Server 2013 Search portal.

SharePoint Hybrid One Way Trust

Figure 2: One-way inbound topology

A one-way inbound topology can be configured to let users access on-premises SharePoint search results from the Internet, as long as they have access to the intranet through a virtual private network or DirectAccess.

  1. On-premises SharePoint Server 2013 Enterprise Search portal: Local search results are available
  2. SharePoint Online Search portal: Local and remote search results are available
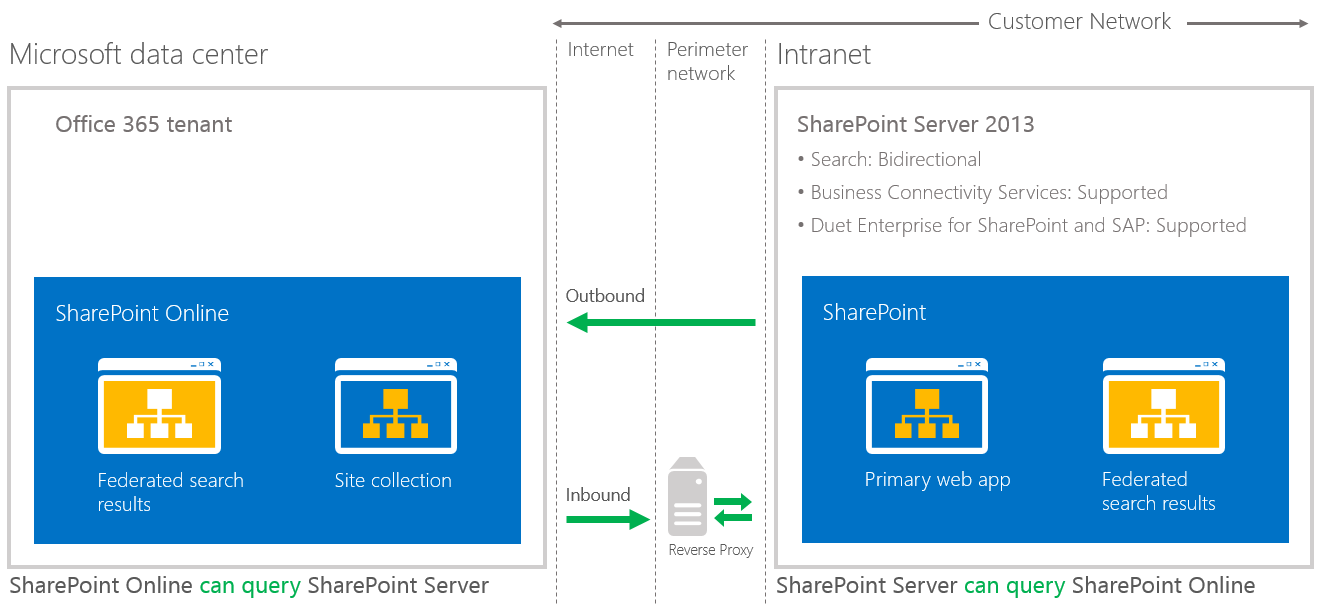
Two-way (bidirectional) topology

A two-way topology enables bidirectional hybrid service integration between the on-premises SharePoint Server 2013 farm environment and the Office 365 tenant (Figure 3). For example, search can be configured to allow federated users to see both local and remote search results in either SharePoint Server 2013 or SharePoint Online Search portals.

SharePoint Hybrid Two Way Trust

Figure 3: Two-way (bidirectional) topology

A two-way topology can be configured to let users access on-premises SharePoint search results from the Internet, as long as they have access to the intranet through a virtual private network or DirectAccess.

  1. On-premises SharePoint Server 2013 Enterprise Search portal and SharePoint Online Search portal: Local and remote search results are available.
  2. If extranet authentication services are configured, extranet users can log on remotely through an on-premises Active Directory account and use all available hybrid functionality.


Refer to these articles to configure your reverse proxy server and how to establish a secure connection between your Online and on-premises tenants.

Link to procedure Description of procedure
Configure a one-way inbound hybrid topology Learn how to configure the infrastructure for SharePoint 2013 hybrid environments that use a one-way inbound authentication topology.
Configure a two-way bidirectional hybrid topology Learn how to configure the infrastructure for SharePoint 2013 hybrid environments using a two-way authentication topology.


Hybrid BCS Part 3 – External Content Type Configuration


Next, you will need to create an External Content Type (ECT) based on the OData source. We need to reiterate here that Hybrid BCS implementation only work with OData source based ECT. The ECT can only be created with Visual Studio and not with SharePoint Designer.

To create an ECT, you need the following requirements:

  1. SharePoint Server 2013
  2. Visual Studio 2013
  3. Office Developer Tool for Visual Studio 2013
  4. OData service that can be accessed from the internet

Create new SharePoint App

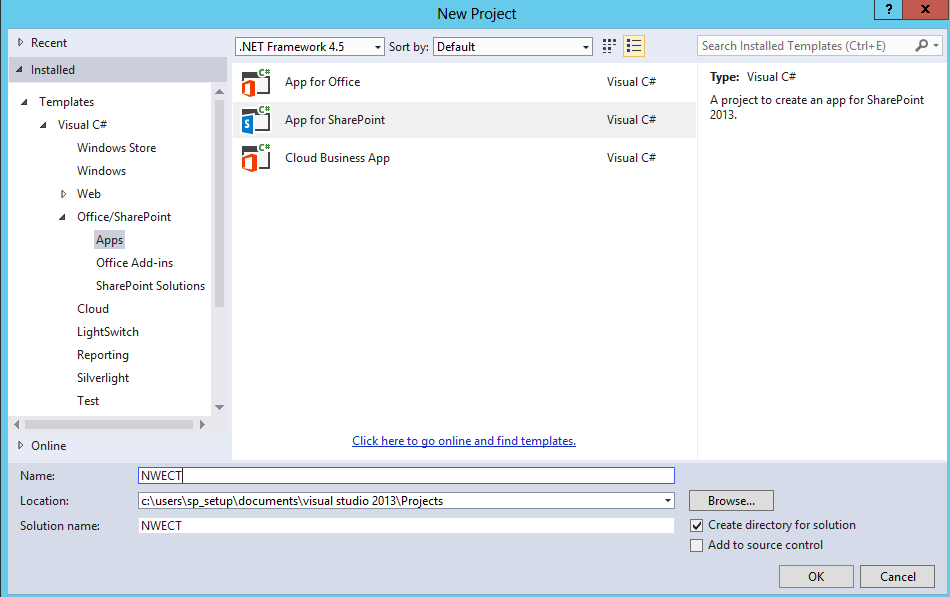
Using Visual Studio 2013, create a new SharePoint App:

  1. Under the Office/SharePoint templates, select App for SharePoint to create a new projectNew SharePoint App
  2. Name your project and click OK
  3. Select your local on-premises SharePoint URL to debug your project
  4. Select SharePoint-hosted
    Note:
    SharePoint-hosted apps, or apps where all components are hosted on either an on-premises or Office 365 SharePoint farm. SharePoint-hosted apps are installed on a SharePoint 2013 website, called the host web.
  5. Click Finish
  6. In the Solution Explorer, click on Add à Content Types for an External Data Source
  7. Enter the URL of your OData service you have published in the previous Section and choose a Name for it
  8. Click Next
  9. Select the one or more data entity
  10. Click Finish

This process will create the External Content Type for each of the entity you have selected.

Once you have created your External Content Type, you want to add the ECT to your Business Data Catalog (BDC) catalog so you can use it in your site collections.

In the previous section, we explain how you create an ECT, where each entity in the OData source represents a single ECT. However, the entities use a shared name in the ECT file, which will prevent you from uploading more than one entity to the BDC catalog. In order to fix this issue, you need to follow these steps to be able to use the entities in SharePoint:

  1. From Visual Studio, right click on the ECT file, and select Open with. Each entity will have its own .ect file located under “External Content Types\<folder name>”.
  2. Select XML (Text) Editor and click OK
  3. In the top of the document, within the Model element, you will see a Name attribute. This Name attribute is the name you have selected when you connected to the OData source. For example it can look like NorthwindCustomersModel. The value of this Name is the same in all of the ECT files created from the entities, but it has to be unique in order to use it in SharePoint. You will need to change the name based on the ECT you are using. For example, it will be something like Categories Table or Employees Table, etc…
  4. Change the name in each of the ECT file
  5. Change the name of the Namespace in the Entity element (optional)
  6. Save the ECT file

Upload ECT to the BDC Model

Once you have made the changes to all of your ECT files, you can upload all your entities to your BDC model. To do so:

  1. Go to your SharePoint Central Administration
  2. Navigate to Application Management à Manage service applications
  3. Click on your BDC Model
  4. Click on Import
  5. Navigate to your ECT file locations and import each ECT file; as an alternative solution, you can develop a PowerShell script to import all the files
  6. Click OK
  7. Repeat the above steps for all your models
  8. Once you have imported the BDC models, you will need to grant permissions for users to use them
  9. On each of the model, click on the dropdown menu and select Set Permissions
  10. Select the right permission you need to give for each group

<< Previous – Part 2 – Create an OData Source 

>> Next – Part 4 – Connect to on-premises services

Introduction to Hybrid BCS Architecture – Part 1


In the past few months, I have been asked many times to architect and design a Hybrid BCS Architecture between SharePoint Online and on-premises, and lately I was asked if I can document it. Given the high demand of such topic, and the fact that the information to implement it is scattered in multiple places, I thought it will be great to share it with the community, and have my blog is a one stop place to follow instructions on how to implement a BCS Hybrid Architecture.

So here it is, this will be a series of blog articles divided by major topic to help you follow and implement Hybrid BCS.

Introduction to hybrid computing

Today’s organizations face significant challenges, including driving IT efficiency and business value in the face of increased pressure to comply with regulations. The goal of any hybridization—or the combining of two related but dissimilar entities—is to gain leverage from the strengths of both parts, while minimizing the components’ weaknesses.

Hybrid computing is based on a computing model that allows organizations to use a combination of traditional and cloud computing environments to achieve a higher degree of flexibility, rather than forcing a choice between either an on-premises or cloud model.

Why hybrid SharePoint?

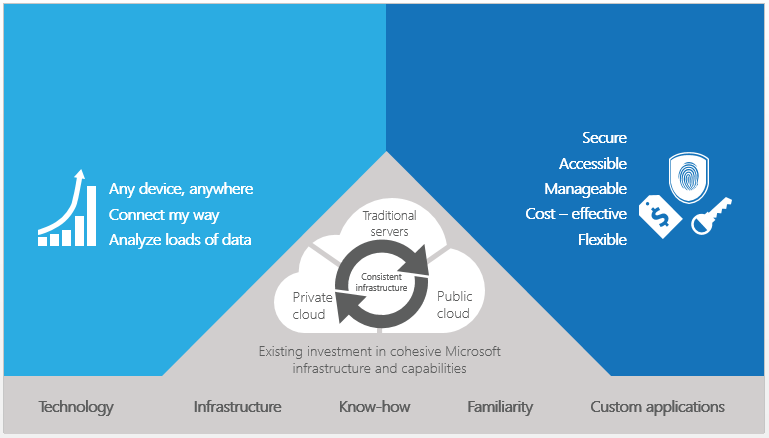
Organizations can use Microsoft SharePoint Online and SharePoint on-premises to achieve a hybrid computing model. With hybrid SharePoint, these organizations can start to realize the benefits associated with the use of cloud computing—coupled with the flexibility to customize the environment and govern data as tightly as in an on-premises system—while delivering a consistent experience to users. Figure 1 shows some of the most immediate benefits, including:

  1. Maintain consistency across clouds with familiar tools and resources.
  2. Extend your data center with a consistent management toolset and familiar development and identity solutions.
  3. Provide enterprise-grade performance and security in the data center and in the cloud.
  4. Meet changing business needs with greater flexibility.
  5. Deliver capacity on demand.

Benefits of Hybrid Environment
Figure 1: Benefits of a hybrid SharePoint environment

How do SharePoint Online and SharePoint on-premises coexist?

Hybrid environments can be helpful when it is not possible for an organization to migrate to the cloud immediately or in full due to business, technical, or other reasons. Cloud services such as SharePoint Online in Microsoft Office 365 can be an attractive alternative to on-premises SharePoint business solutions, but you might find that you need to deploy only specific solutions in the cloud while still maintaining your on-premises SharePoint farm. New functionality in Microsoft SharePoint Server 2013 and SharePoint Online enables you to integrate services like Search, Business Connectivity Services (BCS), and Duet Enterprise Online across the on-premises/cloud boundary.

Introduction to Business Connectivity Service

The Business Connectivity Service (BCS) is a centralized infrastructure in SharePoint 2013 and Office 2013 that supports integrated data solutions. With Business Connectivity Services, you can use SharePoint 2013 and Office 2013 clients as interfaces into data that doesn’t live in SharePoint 2013 itself. For example, this external data may be in a database and it is accessed by using the out-of-the-box Business Connectivity Services connector for that database. Business Connectivity Services can also connect to data that is available through a web service, or data that is published as an OData source or many other types of external data. Business Connectivity Services does this through out-of-the box or custom connectors. The connectors, as the name implies, are the communication bridge between SharePoint 2013 and the external system that hosts the external data.

At the most fundamental level, every Business Connectivity Services configuration is driven by the location of the Business Connectivity Services infrastructure and the location of the external system that hosts the external data. There are only three ways that the Business Connectivity Services infrastructure and the external system can relate to one another. The Business Connectivity Services infrastructure and the external system can be on your corporate network (all-on-premises), or both the Business Connectivity Services infrastructure and the external system are in the cloud (cloud only).

An on-premises solution is one where the SharePoint 2013 farm and the external system are both behind a company’s firewall and live in company-controlled data centers and users will have to be on the company’s network to access it.

With a cloud-only configuration, Business Connectivity Services in a SharePoint Online tenancy can access data from various cloud services. For example, SharePoint Online can access data from a third-party stock quotes service or from the Windows Azure Marketplace Data Market by using the Business Connectivity Services web service connector. Because this type of solution doesn’t include any customer-maintained SharePoint 2013 farms and hardware and consists of only cloud-based services, it is called a cloud-only solution.

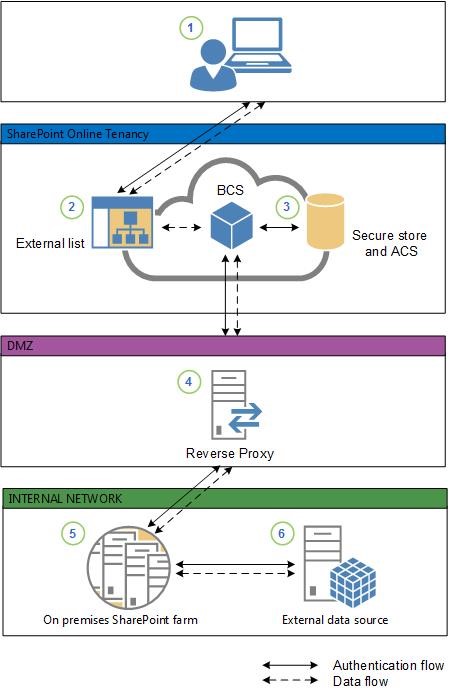
A BCS hybrid solution makes use of SharePoint Online and SharePoint 2013 on-premises. It integrates data from an on-premises OData service endpoint into a SharePoint Online tenancy.

The BCS hybrid solution looks as shown in the following diagram.

Hybrid BCS

>> Next – Part 2 – Create an OData Source

Hybrid BCS – Part 2 – Create an OData Source


The BCS hybrid scenario supports connecting only to an Open Data protocol (Odata) source. If your external data already has an OData service endpoint, then you can skip the creation of an OData service endpoint portions of this procedure.

Using Visual Studio 2013, create an empty ASP.NET web application calling it NorthwindWeb, and follow these steps:

Add an ADO.NET Entity Data Model


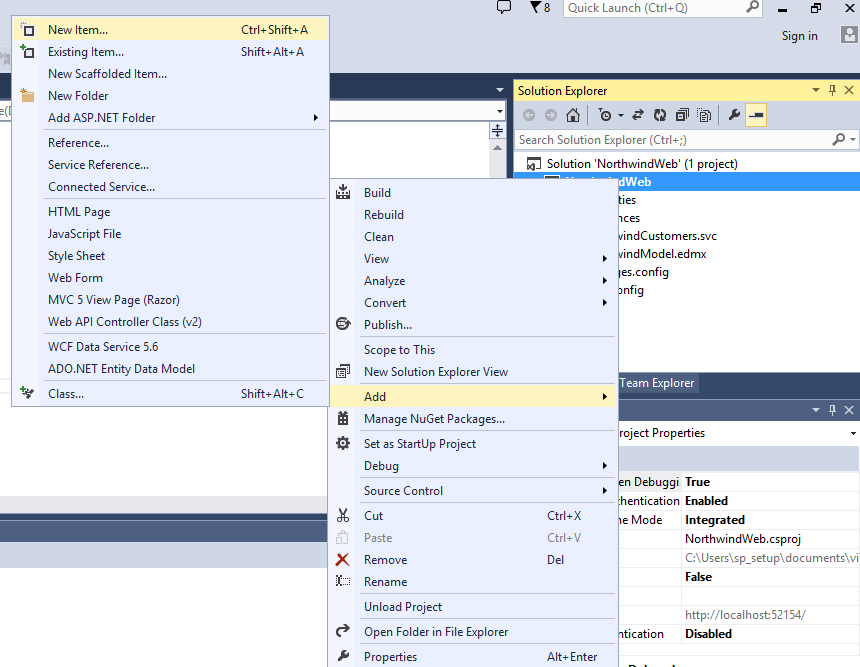
  1. Right click on the project and choose Add >> New Item
  2. Select Data under Visual C#
  3. Select ADO.NET Entity Data Model
  4. Call it NorthwindModel.edmx
  5. Click Add
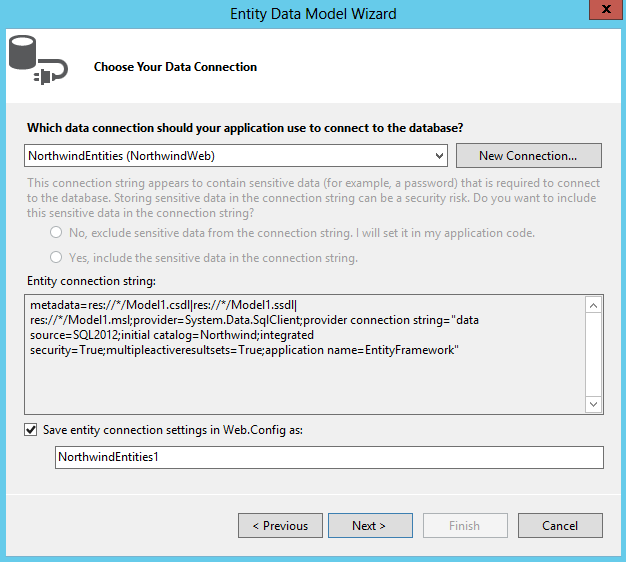
  6. Select Generate from database in the Entity Data Model Wizard
  7. Click Next
  8. Choose New Connection if you do not have an existing connection, or connect to an existing one
  9. Click Next
  10. Select Entity Framework 5.0
  11. Select all the tables
  12. Click Finish
  13. Compile the project.

Add a WCF Data Service

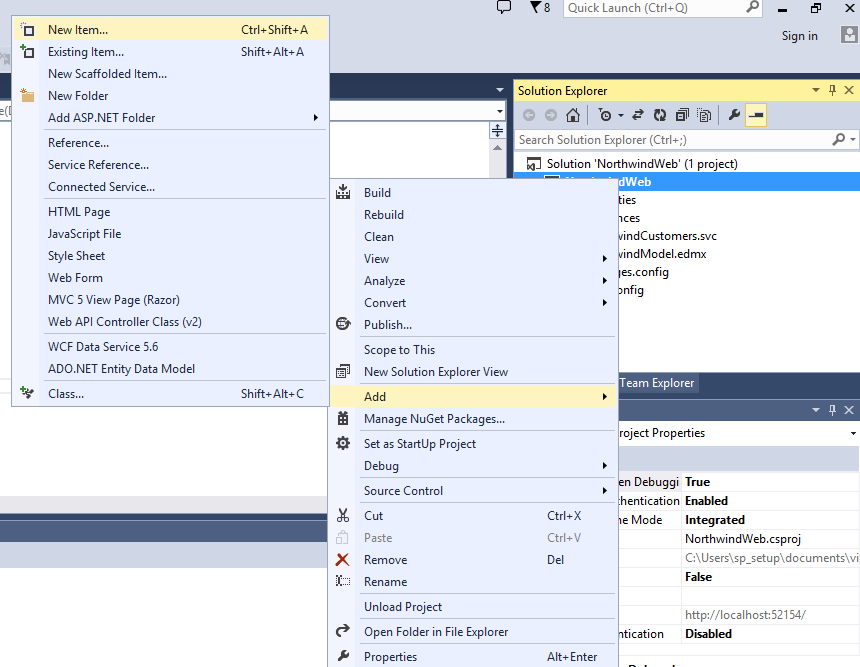
  1. Right click on the project and choose Add >> New Item
  2. From the Web node choose the WCF Data Service 5.6 item
  3. In the Name text box, enter Northwind
  4. Click on Add
  5. Edit the code for Northwind to update the following: 


    1. public class NorthwindCustomers : DataService <NorthwindEntities>
    2. Replace the comments in the InitializeService event handler with the following: config.SetEntitySetAccessRule(“*”, EntitySetRights.All);
  6. Compile the project.

This should be for creating an OData Source.

<< Prevoius – Part 1 – Introduction to Hybrid BCS Architecture

>> Next – Part 3 – External Content Type Configuration

SharePoint 2016 Release is Q2 of 2016


Last week, the Microsoft Office Team announced the general availability date of the SharePoint 2016 server to be in Q2 2016, and the beta version should be available later in Q4 2015. This is a change of a previous anticipated date of the RTM in Q4 2015, however the product team hints about the new features of the SharePoint 2016 servers and what the product will offer in the vNext.

Just to be clear here, that Q2 2016 is the calendar 2016 year and not Microsoft’s 2016 fiscal year that starts July 1st, 2015.

We can have many predictions or assumptions why this push of the release date to the spring of 2016, but all we know that the product team has given us some high level headlines of what’s coming up next year:

  1. Improved User Experiences to enhance:
    1. Mobile Experiences;
    2. Personalized Insights; and
    3. People-Centric File Storage and Collaboration.
  2. Cloud-Inspired Infrastructure that includes:
    1. Improved Performance and Reliability;
    2. Hybrid Cloud with Global Reach; and
    3. Support and Monitoring Tools.
  3. Compliance and Reporting to offer:
    1. New Data Protection and Migration Tools;
    2. Improved Reporting and Analytics; and
    3. Trusted Platform.

You can refer to the product team blog for a brief explanation of the new and enhanced experiences with SharePoint 2016.

Also, there is a Technology Adoption Program (TAP), available for organization to get enrolled in. The TAP program allows companies to have early access to the SharePoint product that gives partners number of advantages, such as providing input and feedback for future releases of SharePoint; developing a close relationship with the product teams; and receiving Pre-Release information about SharePoint.

We should know more about the SharePoint 2016 server at the Microsoft Ignite conference in Chicago from May 02-08, 2015.

More info to share in the upcoming weeks.


SharePoint Online drops Public Website

​Last month, Microsoft announced a distinctive change one of the SharePoint Online features. The publishing site in Office 365 will be deprecated as of January 2015.

In a a KB Article (3027254) released December 23, 2014, that the Public Website feature of SharePoint Online will soon be dropped. Public Websites is a publishing site feature intended to give clients the ability to put up public web sites quickly using the Web Content Management features of SharePoint.

Existing customers will be notified this month that the service will be completely shut down in 2 years, and new clients will not have access to this feature.

Microsoft's reason that it has always promised the clients to deliver the upmost value to their clients, and the decision is to partner in the future with 3rd party software to deliver public facing websites. The announcement of the partnership should be revealed this month, so we will have to wait and see who is the next big player with Microsoft in the WCM world.

Although, this decision has been a difficult for the product team, I personally think that it is a smart move by Microsoft. There are few 3rd part solutions that offer great WCM capabilities and it is only smart to partner with them to provide the best solution in SharePoint Online.

If I want to take a guess who would be the 3rd party vendor to provide WCM solutions within SharePoint Online, it would be Sitecore. Earlier this year, Microsoft and Sitecore announced a strategic alliance to work together in delivering solutions to their client base.

Time will tell, but I would definitely bet that Microsoft will start offering Public Website features with SharePoint Online using Sitecore services.

Missing Content Search Web Part

In SharePoint 2013, all the content can now be surfaced using search.  The Search driven  web parts have their own Querying Builder user Interface which makes it very easy to select, filter and display the data that you want. However, content Search Web Part is only available in SharePoint 2013 Enterprise Edition. If you are using the Enterprise CALs, then you should see the search driven web part in your web part gallery.

But, this is not always the case if you have played around with the licensing in the farm. SharePoint 2013 provides a new feature called SharePoint User License Enforcement (SPULE) that a lot of people may not be aware of.  SPULE means that we can have a mix of different licenses in a single farm.  What this means, is that Enterprise features can be made available to those who need it, and Standard features to others.  This can save an organization a substantial amount related to cost of Client Access Licenses.

If for some reason you ran this command line: Set-SPUserLicensing, this will actually disable all your search driven web parts. Note that by default, the SPULE is not enabled.

To get an overview of the SPULE in your farm, run this command: Get-SPUserLicensing. If true is returned, this means that the SPULE has been enabled on your farm.

What you need to do is to disable the SPULE, and the Search driven web parts will appear again. Run this command Disable-SPUserLicensing, and voila! Your web parts are back in the gallery!

Note: You can set the SPULE based on different AD groups, and you can set it for different type of licenses. This TechNet article will explain to you how you can manipulate different SPULE in your farm.

SharePoint 2013 vs. 2010 – Part 7 – Composite

SharePoint 2013 and Office 15 considerably improve the capabilities for Composite solution development and further empower power users to solve many of their business problems on their own. Here are some of the new and enhance features: New features Enhanced features  

  1. Access Apps: robust way to create and combine a Composite solution and a SharePoint app without code and without even using Visual Studio. By contrast, Access 15 uses SQL Server to store data. This significantly improves the manageability and scalability of Access applications.
  2. Workflow: The new SharePoint 2013 workflow features enable more advanced, robust no-code solutions and include the following:

    1. A redesigned Workflow architecture that supports legacy workflows.
    2. Workflow Stages that enable more complex logic.
    3. Authoring workflows in SharePoint15 declaratively or visually.
    4. Integration of data from SOAP Web Services into workflows.
  3. Business Connectivity Services: Changes in Business Connectivity Services for the SharePoint 2013 expose more of Business Connectivity Services to the power user, and include the following:

    1. Enhancements to external lists
    2. Ability to export to Excel
    3. Workflows and subscriptions
    4. Support for OData sources