SharePoint: Modern List Column Formatting
Column formatting provides the ability to customize how columns or fields are displayed to the end users and is available within SharePoint List and Libraries. It provides fast, informative, and visual information to the end user. To achieve this, a JSON object describes the elements that are displayed when a field is included in the list view, and it also specifies the styles to be applied to those elements. Column formatting will not affect the data in the list item or file. The column formatting only changes how this data is presented to the users who browse the list. Those who have permission to create and manage views in a list can access column formatting to configure how the view fields are displayed.
The following on the left is an example of a List without any column formatting:

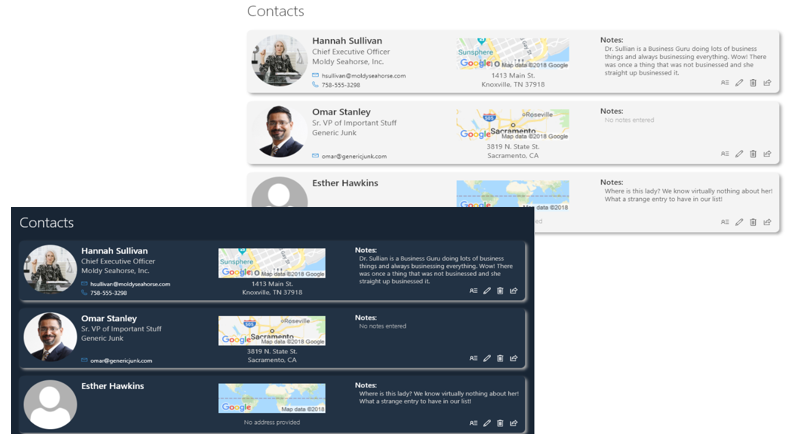
However, if fields are customized with column formatting, then the appearances of the fields Effort, Assigned To, and Status can convey the information graphically and quickly, as shown in the graphic on the right.
The GitHub repository (link: GitHub repository), dedicated to open-sourced column formatting definitions, provides numerous examples and samples. Column formatting can be simple like the one above, or it can become quite complex whereby each field is customized, including colour themes as shown in the graphics below.
How to Apply Column Formatting
There are three opportunities to apply column formatting. You can apply column formatting to:
1. A Site Column. This then provides the flexibility to apply the same column formatting to multiple lists which use the site column or content type;
2. An existing column. Select the Column drop-down. Choose Column Settings and then Format this Column; and
3. A new column. When creating a column, apply the column formatting by editing the properties of the column.
Column Formatting versus Field Customizer
It is important to note that column formatting is not the same as the Field Customizer. Though both provide the ability to customize how fields in SharePoint lists are displayed, their applications are different.
The Field Customizer is more powerful than column formatting as it allows you to write code to control how a field is displayed. This includes dynamic action links, such as active hyperlinks that invoke custom scripts when clicked on, as well as arbitrary data visualizations.
Column formatting is less flexible as it does not allow custom code. Instead, it allows for predefined elements and attributes, which makes it much easier for users who are not JSON experts. Data visualizations supported are simple and these can be expressed using HTML and CSS. Action links, such as active hyperlinks, are not supported. There is only support for static hyperlinks that do not launch a script.
Column formatting is much easier and quicker and is the suggested method of customizing column fields. For advanced scenarios where column formatting does not provide support, then one could use the Field Customizer.
Column Formatting
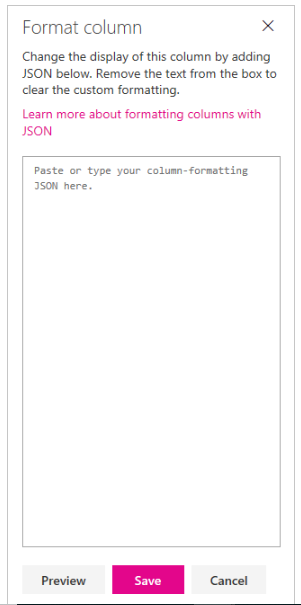
- Open the column formatting pane;
- Click on the drop-down menu under Column. Choose Column Settings and then Format this column;
- In the box, enter the column formatting JSON.
If a field has no specified formatting, then the default rendering will be applied.
Unless you are experienced in JSON, it is suggested that for the column formatting, you go the SharePoint GitHub repository and find an example or sample that closely resembles what you want the column to look like. Once you find the sample, copy the JSON column formatting. Paste this into the box.
Edit the lines to customize to your needs.
This is simpler and quicker than writing the code from scratch; - You can Preview your formatting before Saving your changes;
- Once you are satisfied with the column formatting, choose Save to save your column formatting.
Once saved, users who view the list will see the customization that you applied.
What can you do with Column Formatting?
With column formatting, you can do the following:
- Display basic field values;
- Apply conditional formatting;
- Apply advanced conditional formatting that is based on the value in a choice field or text;
- Apply formatting based on date ranges;
- Format items based on arbitrary dates;
- Compare a date/time field against another date constant;
- Create clickable actions:
a. Turn field values into hyperlinks;
b. Add an action button to a field; - Create simple data visualizations:
a. Format a number column as a data bar;
b. Show trending up/trending down icons; and - Create a button to launch a Flow.
Because not all column types are supported for column formatting, it is important to remember which ones are. The supported columns include single line of text, number, choice, person or group, yes/no, hyperlink, picture, data/time, lookup, and title (in Lists). Column types that are not supported include managed metadata, filename (in Document Libraries), calculated, retention label, and currency.
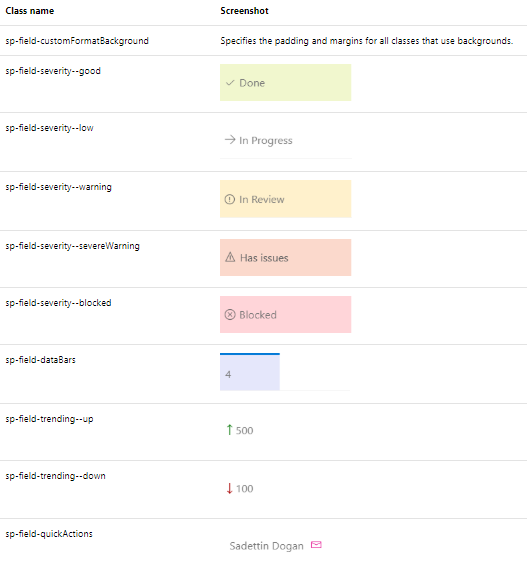
To simplify things further, predefined classes exist in the style guidelines. The predefined classes are explained in the adjacent graphic.
Note that the icons for the sp-field-severity classes are not a part of the predefined class. These can be added by using the iconName attribute. Only the background colour is included for these classes. Alternately, you can use predefined icons from Office UI Fabric.
What if I Want to Write My Own JSON?
Whether you are an expert with JSON or you are new to it but have an understanding of its schema, you can create and write your own custom JSON.
Creating your own custom JSON for column formatting has been made simple by following these steps:
- Download Visual Studio Code (it is free!);
- Create a New File;
- Save the empty file with the extension .json;
- Copy and paste the following lines of code into your empty file:
{ “$schema”: “https://developer.microsoft.com/json-schemas/sp/column-formatting.schema.json” }
This provides validation and autocomplete to create your JSON. You can now start adding your JSON after the first line that defines the schema location. Visual Studio Code will offer suggestions for properties and values. Simply select Ctrl + Space at any point.
With the versatility and flexibility of column formatting, you can visually communicate relevant information to the users. It is simple, quick, and with the help of the GitHub repository, one can access hundreds of samples and examples of various JSON objects to achieve the field customization that one wants. And for those who are well versed with JSON, you also have the option of writing your own to customize the column formatted fields.
 Saturday, December 15, 2018
By : Mike Maadarani
Saturday, December 15, 2018
By : Mike Maadarani
 0 comment