List Template Duplicate Field


Many of us have saved custom lists as templates in SharePoint Online or on-premises, to be re-purposed in the future, as an easy way to re-create the same list, with the same content types, metadata and structure. This is a an easy way for developers to give the end user a prepackaged custom list, rather than developing a provisioning tool to create a unique list. This added benefit to this method is the ability to allow the end-user to quickly create their own list based on a specific template, without the need to ask IT to do it for them.

In some rare cases, if you are trying to created a list from a custom list template, you may end up getting an error of a duplicate field name. The exact error will be "A duplicate field name was found". The list template has been created in the same site collection and you cannot find why and where is the other duplicate field name.
 

Cause

There are 2 possible causes to your issue:

  1. Your list template is referencing the same field twice
  2. Your list template is referencing a field tat already exist in the site collection but with a different GUID

Resolution

In my case, the second cause was my issue. The resolution for both issues is similar. Here are the steps:

Step 1 – Editing your template

  1. Save your template.tsp to your desktop
  2. Rename your template.tsp to template.cab
  3. Extract your template.cab to a specific location
  4. Edit the manifest.xml
  5. Look for the duplicate field name and delete the node.

This will do it for there are 2 nodes for the same field name. If this is not the case, then the GUID is your issue, and you will need to change the GUID in your template with the right GUID from your site collection. Remember that when you create a list from a custom template, if the any column already exist in the site collection, the GUID of the list template must match the GUID of the site column in the site collection.

Proceed with the following steps to resolve your issue:

Step 1.1

  1. Run the following PowerShell command to find the GUID of your site column
    $web = Get-SPWeb http://portal
    $columnName = "Your column name"
    write-host $web.Fields[$columnName].Title -nonewLine
    write-host " " $web.Fields[$columnName].Id
    $web.dispose
  2. Replace the GUID in the list with the GUID from the PowerShell. In most cases the GUID exists in 2 places in the list template
  3. Save the manifest.xml
     

Step 2

Now this is the fun/tricky part. You will need to assemble your manifest as a cab again. Run the following steps:

  1. Run command prompt and browse to the folder where your manifest.xml is
  2. Run the following command: makecab manifest.xml templatename.cab
  3. Rename your templatename.cab to templatename.stp
  4. Upload your new stp file to your list templates library

Problem solved!


Search Web Parts – Collab365 Global Conference


Have you heard about the virtual Collab365 Global Conference 2017 that’s streaming online November 1st – 2nd?

Join me and 120 other speakers from around the world who will be bringing you the very latest content around SharePoint, Office 365, Flow, PowerApps, Azure, OneDrive for Business and of course the increasingly popular Microsoft Teams. The event is produced by the Collab365 Community and is entirely free to attend.

Places are limited to 5000 so be quick and register now.

During the conference I'd love you to watch my session which is called : 'Search Web Parts'

Content Search Web Part (CSWP) is one of the great web parts in O365 and on-premises. In this session, Mike will demo how to configure a​nd use the CSWP, and build a dynamic O365 branded portal with CSWP only. In this session, we will review: 1.Creating Queries using Keyword Query Language (KQL) 2.Building dynamic queries 3.Creating and customizing HTML Display Templates​​.​

If you join me, you will learn:

  1. Creating Queries using Keyword Query Language (KQL)
  2. Building dynamic queries
  3. Creating and customizing HTML Display Templates
  4. Building Search Driven Portals

Topic(s):

  1. Office365
  2. SharePoint

Audience :

  1. IT Pro

Time (in UTC) :

  1. Thursday, November 2 2017 5:00 PM

How to attend :

  1. Register here.
  2. At the time listed above go here to watch my session. (you can also add me to your own personal planner from the agenda.
  3. Be ready to take notes!

SharePoint and Office 365: Patterns & Practices – Part 1: The Basics


What is SharePoint Patterns & Practices (PnP)?

SharePoint Patterns & Practices (PnP) is an initiative that was launched in 2013 with the vision to simplify development by providing an open source, reusable components, and solutions that have been built collaboratively between the community and Microsoft. Through sharing of knowledge of implementation practices in SharePoint and Office 365, Microsoft and the community collaboratively create the starting points for PnP guidance and code samples. 

How does it look like?

There are three levels of engagement.  Imagine a target with 3 concentric circles with the centre of the target being the Core Team.  Encircling the Core Team is the second layer comprised of the Special Interest Groups (SIGs) while the final outer third layer is the Community. 

1.   Core Team:  As the title implies, the Core Team has the greatest direct involvement with the PnP library of code samples and guidance documentation.  Comprised of a small group of individuals from Microsoft and the community, they have been granted permission and direct access to the PnP library to merge approved changes in the PnP library.  By keeping the Core Team small, control can be maintained to ensure proper and appropriate value is added to the PnP library.  


2.   Special Interest Groups (SIGs):  Special Interest Groups are being brought together and are currently being piloted with SharePoint client side development to develop the JavaScript Library.   SIGs meet weekly to exchange thought, processes, and code to build the JavaScript Library.  SIGs do not have access to the PnP library though what they produce will have an impact on the PnP Library.


3.   Community: With the least access to the PnP Library, this group is comprised of both the internal and external community.  Their involvement is through either of the following methods: 


a.    Bi-weekly office hours: hosted by members of the PnP initiative, they review and explain what the Core Team is doing, what they plan to do, and they provide suggestions as to the various areas or topics that could use community contribution.  At the end of the session is an open mic where the community is provided the opportunity to voice suggestions as to what they would like to contribute to the initiative.  These are then pitched to the Core Team, who is then tasked to render the final decisions.    

b.    Monthly Community Calls:   a unidirectional communication informing the community what changes have been proposed, names of members who have been contributing, and names of those who have been doing demos or presentations for the bi-weekly office hours.  Recognition during these calls improves the exposure of members who participate, which in turn, provide endless networking opportunities.  These Monthly Community Calls are held the first Friday of every month.  On every second Tuesday of every month, the community is provided the latest changes in the PnP Library.


What benefits do I receive from PnP?

By becoming an active member and recipient of PnP, not only will you gain a community of peers and experts, but you will also have access to useful libraries and an unfathomable amount of code.  Some of the libraries include the PnP Core Library, which is a NuGet ready to go package, PnP Components, Samples and Solutions, PnP Provisioning Engine, and PnP PowerShell. These are just a few examples of the libraries that you will gain access to.  Under one umbrella, there will be an establishment of common architectural patterns and standardize guidance that is available upon immediate publication of the code.  For those who would like more detailed instructions, there are webcasts available as well as on-line training material.  The best part of joining and participating in the PnP Initiative is that all materials, including videos, presentations, webcasts, are not only available for your viewing, but they are free for re-use in any way that you want! 


How am I supported in the PnP Initiative?

Being an open source community program, there are no sales level agreements (SLAs) for Microsoft support.  As PnP is not a product like Word or MS Office, it is not supported through Premier Support or other official support channels.  Instead, support can be accessed through the SharePoint Developer Group in the Microsoft Tech Community to provide input and/or to ask any questions regarding existing material. 

Microsoft and the community work collaboratively to provide open source code samples with standardized guidance documentation.  Both the code samples and guidance adhere to the PnP guidelines for support and recommended techniques.  These materials are maintained by Microsoft while all PnP implementations are reviewed and approved by SharePoint Engineering.  Most importantly, PnP retains its uniqueness by being supported from within the community by the community.

SharePoint 2016 – User Profile Service and Microsoft Identity Management


User Profile Service – The New User Profile Service Application

The User Profile Service Application, ForeFront Identity Management (FIM), in SharePoint 2010 and 2013, will be replaced with a new User Profile Service in SharePoint 2016. The new User Profile Service will provide two methods for profile synchronization:

1.  Active Directory Import (ADI) – User Profile Service Instance is the simplest and most direct route to Active Directory;

2.  External Identity Manager (EIM) – use of an external FIM or custom coding provides possibilities to connect external systems to the Active Directory. 

ADI is included with SharePoint 2016; therefore, it will not need a separate server installation. As a separate server installation is not required, the fastest way to get up and running with profile import is by using User Profile Service Instance with Active Directory Import (ADI). It is one of two User Profile Sync application options, where Microsoft Identity Manager (MIM) is the second option. 

Active Directory Import

Active Directory Import is the most heavily used sync engine for SharePoint and is used by Office 365 to import profile data from the intermediary directory that is synced to SharePoint’s profile store. This fact alone should remove any doubts regarding its capability of handling large volumes of data for large enterprises.     

ADI assumes one source of identification in the corporation and imports from one system, making it very easy and smooth for administrators. Unlike the old 2010/2013 User Profile Synchronization Service with FIM, importing with ADI is one directional, allowing it to be super fast and efficient. This means you cannot export or update your AD from SharePoint profiles using ADI. Importing capabilities support secondary accounts, custom property mappings, account mappings for Windows, FBA, and Trusted Identity Providers. However, there are some limitations of ADI where support for the following are either lacking or insufficient: cross-forest contact resolution, mapping to SharePoint System properties, augmenting profiles with data from BDC, mapping multi-value to single or vice versa, and mapping two different AD attributes to the same SharePoint property.

Microsoft Identity Management

As Microsoft transitions to mobile cloud computing, many features in SharePoint are being revisited and either removed or replaced. For Microsoft, the importance of security, whether it be data loss prevention, control of user profile information, or enterprise security through management access, is a top priority. 

One such feature that has been revisited and replaced is the ForeFront Identity Management (FIM) technology that was first introduced in SharePoint 2010 and 2013. FIM was built years ago, and although it was great back in the days, it is too much to re-build or extend to meet today’s needs. Microsoft Identity Manager (MIM) is the successor to FIM. It is important to note that MIM is not built into SharePoint 2016; therefore, it requires a separate server installation.  

Unlike its predecessors, MIM provides an identity and access management system that begins on ground with on-prem environments and reaches up to the sky with cloud environments. It is a vast system that provides identity management, user provisioning, device registration, application access control, data loss protection and federation. 

Corporations can easily secure their modern hybrid infrastructure through the combination of MIM with Windows Server Active Directory and Microsoft Azure Active Directory. Multiple on-prem authentication stores, such as Active Directory, LDAP, and Oracle, are bridged seamlessly with MIM through Identity and Access Management (IAM) solutions. The result is consistent experiences for on-prem LOB applications and SaaS solutions. 

There are three notable features of MIM:

1. Cloud-ready identities: provides standardized Active Directory attributes and values, partitioned identities for cloud synchronization, reporting connected to Azure Active Directory and preparation of user profiles for Office 365;

2.  User Self-Service: password resets with Multi-Factor Authentication, account unlock, REST-based APIs for AuthN/AuthZ, certificate management support for multi-forest and modern applications;

3.  Enhanced Security: privileged user and account discovery, management of workflow with elevated administrator access, reporting, and auditing specific to privileged access management, Windows PowerShell support, and REST-based API.

What MIM has that ADI Doesn’t

Since MIM is not built into SharePoint 2016, being external has its advantages. The main advantage is that MIM can be customized for bidirectional data flow which provides a great advantage over the unidirectional data flow for ADI.  In addition to this, MIM is flexible and allows for customized import. In fact, it automatically imports user profile photos. MIM also supports non-active directory LDAP and multi-forest scenarios. 

Not only does MIM offer customizable solutions to the SharePoint farm, it is a sound financial choice, being cost effective as it uses existing MIM expertise, infrastructure, and investment. 

With the future of SharePoint heading straight for the cloud, enterprise security has become even more important than it has been in the past. In response, SharePoint now has two options of syncing User Profiles: Active Directory Import and Microsoft Identity Manager. Depending upon the needs of your enterprise, ADI and MIM provide unique capabilities in managing global security.       

Introduction to SharePoint Framework: The Nuts and Bolts


What is SharePoint Framework?

SharePoint Framework is a new page and web part model that provides full support for client-side SharePoint development with easy integration of SharePoint data and Microsoft Graph through open source tooling which enables the building of SharePoint customizations for mobile, on-prem, online and OneDrive for Business. With SharePoint Framework, modern web technologies and tools provide a development environment to build experiences and apps that are ready and mobile-ready from the start.

In the next 3 blog articles, I will be shedding some lights on the new Framework and how you can start preparing to adopt the new development platform.

SharePoint Framework is written in JavaScript which allows developers, both inside and outside of Microsoft, to use their preferred web developer tools to develop SharePoint and customized solutions. This is an incredible leap as this allows developers on any platform to extend SharePoint’s standard capabilities. In addition, SharePoint Framework accompanies the new SharePoint UX, which is designed for the world’s mobile-first, cloud-first communication era. By moving towards open source resources, not only has a new door for developers has been opened, but it is also creating a new relationship between developers and SharePoint, resulting in a complete win for the client.

By moving to open source, will SharePoint Framework solutions work on classic sites? The answer is simply this: eventually, on existing team sites, it will and on new modern team sites, yes it will. However, classic solutions will not work on the new modern team sites. Moving forward, it is highly advisable to become familiar with SharePoint Framework and the tools to prepare yourself when SharePoint Framework is released.

Let's talk Framework, Development and Scaffolding tools in my next article!

Cloud Search Service Application


One of the great enhancements in SharePoint 2016 and in the SharePoint 2013 August 2015 CU, is the Hybrid Search using Cloud Search Service Application (CSSA). The new CSSA will allow organizations to take advantage of the new hybrid capabilities, in order to create a unique search experience with one index, with crawled content from Office 365 and On-Premises data. Having one Index is huge step to better enhance the end user experience and making it easier to find results from different sources.


In this article, I will be showing step-by-step how to set up your CSSA . It is a pretty simple process if you follow the steps in order.

First of all, let's review how the CSSA indexing and crawling works. Picture 1 shows that crawling is initiated from on-premises, but the index is stored on your Office 365 tenant.
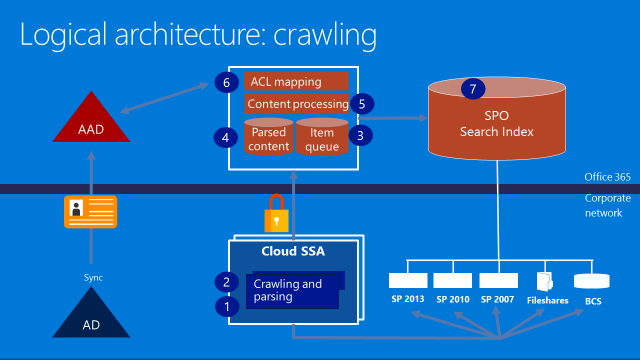
CSSA Logical Architecture
Picture 1

Picture 2 describes the flow of the search queries and the possibilities to send a query from the cloud or on-premises.
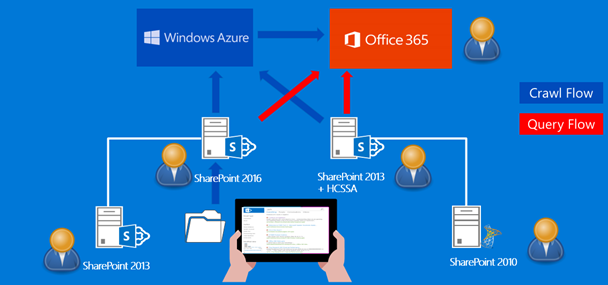
Hybrid Search
Picture 2

Mandatory Requirements

The following are mandatory requirements to get your CSSA working:

1.       SP2013 with August 2015 CU or SP 2016

2.       O365 Subscription

3.       Azure Subscription

4.       Synchronize users and groups from on-premises to Office365 Azure Active Directory (DirSync, AADSync, or AADConnect)   

5.       Create cloud Search service application   

6.       Install onboarding pre-requisites

7.       Execute onboarding script

Azure AD (AAD) requirements

  1. Need Azure Subscription (or trial subscription) or Office 365 paid license
  2. Verified domain; xxx.onmicrosoft.com is not enough
  3. On-premises:

    1. AD Server must be 2003 or later
    2. If you want to use password writeback, then you must have Windows Server 2008 with latest SP and KB2386717; otherwise use Windows Server 2008 R2+
    3. Azure AD Connect can be installed on AD or any server part of the domain
    4. If you plan password synchronization is required, then server must be 2008 R2 SP1 or later
    5. .NET 4.5.1 or later
    6. PowerShell 3.0
    7. If you are using ADFS, then SSL is needed x.509 (self-signed is OK in test lab

Step 1 – Synchronize AAD

First you must synchronize your On-Premises AD with AAD. Follow these steps to install and configure your AAD Connect: https://azure.microsoft.com/en-us/documentation/articles/active-directory-aadconnect/

Step 2 – Create your CSSA

You can either use Central Admin or PowerShell. If you are using Central Admin, then you will see a new checkbox for the cloud search option. You must check it to make sure you are creating a CSSA and not a regular SSA. If you are like me, who prefers to use PowerShell, then you will make a small change to your existing script. If you don’t have one, you can download any SSA script, but make sure you add the following variables to the New-SPEnterpriseSearchServiceApplication:

New-SPEnterpriseSearchServiceApplication -Name $SearchServiceAppName -ApplicationPool $appPool -DatabaseServer $DatabaseServerName -CloudIndex $true             

Then you need to set your SSA Property to true by executing this command: $Searchapp.SetProperty(“IsHybrid”,1), before you set your Search Topology.

Your Powershell Script should like similar to this:

SSADB = "SharePoint_Demo_Search"

$SSAName = "Search Service Application SPS Baltimore"

$SVCAcct = "<search Service account>"

$SSI = get-spenterprisesearchserviceinstance -local

#1. Start the search services for SSI

Start-SPEnterpriseSearchServiceInstance -Identity $SSI

#2. Create the Application Pool

$AppPool = new-SPServiceApplicationPool -name $SSAName"-AppPool" -account $SVCAcct

#3. Create the search application and set it to a variable

$SearchApp = New-SPEnterpriseSearchServiceApplication -Name $SSAName -applicationpool $AppPool -databaseserver SQL2012 -databasename $SSADB –CloudIndex $true

#4. Create search service application proxy

$SSAProxy = new-SPEnterpriseSearchServiceApplicationProxy -name $SSAName" Application Proxy" -Uri $SearchApp.Uri.AbsoluteURI

#5. Provision Search Admin Component

Set-SPEnterpriseSearchAdministrationComponent -searchapplication $SearchApp -searchserviceinstance $SSI

#6. Create the topology

$Topology = New-SPEnterpriseSearchTopology -SearchApplication $SearchApp

#7. Assign server(s) to the topology

$hostApp1 = Get-SPEnterpriseSearchServiceInstance -Identity "SPWFE“

$Searchapp.SetProperty(“IsHybrid”,1)

New-SPEnterpriseSearchAdminComponent -SearchTopology $Topology -SearchServiceInstance $hostApp1

New-SPEnterpriseSearchCrawlComponent -SearchTopology $Topology -SearchServiceInstance $hostApp1

New-SPEnterpriseSearchContentProcessingComponent -SearchTopology $Topology -SearchServiceInstance $hostApp1

New-SPEnterpriseSearchAnalyticsProcessingComponent -SearchTopology $Topology -SearchServiceInstance $hostApp1

New-SPEnterpriseSearchQueryProcessingComponent -SearchTopology $Topology -SearchServiceInstance $hostApp1

New-SPEnterpriseSearchIndexComponent -SearchTopology $Topology -SearchServiceInstance $hostApp1 –IndexPartition 0

#8. Create the topology

$Topology | Set-SPEnterpriseSearchTopology

Step 3 – Validate your CSSA

Run the following PowerShell script to validate that your SSA is cloud based.

Add-PSSnapin Microsoft.SharePoint.Powershell

$ssa = Get-SPEnterpriseSearchServiceApplication     

Get-SPEnterpriseSearchTopology -Active -SearchApplication $ssa     

Get-SPEnterpriseSearchStatus -SearchApplication $ssa -Text |ft Name, state,Partition,Host -AutoSize

$ssa.CloudIndex
 

This should return True.

Step 4 – Install On-Boarding Pre-requisites

You must install the following, in order, before you proceed with the On-Boarding script:

1.       Microsoft Online Services Sign-In Assistant: https://www.microsoft.com/en-ca/download/details.aspx?id=28177

2.       Reboot the Server

3.       Microsoft Azure AD PowerShell: http://go.microsoft.com/fwlink/p/?linkid=236297

If you do not install the above, then the next step will not work as it is needed to establish the trust between your Farm/CSSA and your Online tenant.

Step 5- Run On-Boarding Script

The On-Boarding script is a PowerShell, provided by Microsoft, that you must run as your last step to complete your CSSA configuration. You can download the On-Boarding script from GitHub. When you run this script, you will be asked to enter your O365 tenant credentials. The user must be a tenant admin account to be able to execute the script.   

Crawl your content

Once you have completed, you can start adding you content sources to your CSSA. Your content sources can be any SharePoint portal (2010, 2013, 2016, etc.), any folders, exchange, etc. Basically, it is the same content sources you used to crawl with a regular SSA.

When you are completed, then you can navigate to your SharePoint Online, search for a keyword and results should appear from Online and On-Premises.

SharePoint Framework: Prepare Yourself!


The shift from Microsoft’s proprietary framework to the open source SharePoint Framework will require learning and adopting of new technologies on the part of developers. Luckily, what knowledge the developer has gained will still be useful since the new API will not replace any of the existing models. In my previous installment SharePoint Framework: The Nuts and Bolts, an overview of what SharePoint Framework consists of and how it works was explained. In this installment, the focus is on how to prepare for the release of SharePoint Framework.

Understanding how SharePoint Framework is built is the key to determining which new technologies to learn. For each Microsoft tool, there is an equivalent web stack. The following table outlines the comparable of each web stack for each Microsoft tool:

Web Stack

Microsoft Tool

Node.js

.NET framework

npm

NuGet

Yeoman

Visual Studio Project

TypeScript

C#

Gulp.js

MSBuild

Each webstack, just like each Microsoft tool, has a specific role in SharePoint Framework. We can break the web stack down into frameworks and user and application interfaces. Each tool can be found in the open source community, and in the community, many developers have contributed their own customized tools that are made available for others to use. The open source community is very collaborative, supportive and innovative.

Frameworks for Developing Web Apps:

Node.js is a runtime environment used for cross-platform development of applications and it uses the Google Chrome V8 JavaScript engine to interpret JavaScript. It uses an event driven, non-blocking I/O model rendering it lightweight and efficient for data-intensive, real-time applications that run across multiple devices.

npm is a node package manager developed for Node.js and is used to install node programs. It also simplifies the process of specifying and linking dependencies. npm is the largest ecosystem of open source libraries in the world. Developers can either build their own packages or use ones that are already available in the community.

Yeoman is the SharePoint Framework template engine which runs on top of Node.js. The templates used by the framework are downloaded from GitHub. The project structure with all the files and folders are created in Yeoman.

TypeScript is an open source language which was created by Microsoft and it is maintained by Microsoft. TypeScript is a typed superset of JavaScript. In Node.js, it compiles to plain JavaScript on any browser, host, operating system and in any JavaScript engine that supports ECMAScript 3 or newer. TypeScript is suitable for either client side or server side applications. For developers coming from C#, concepts like classes and objects are available in TypeScript, which makes it the easiest way to start developing with script languages. Other JavaScript libraries like jQuery will also work with the SharePoint framework, but importing them into the project is required.

Gulp is a task runner to automate processes built on Node.js. It keeps complex tasks manageable and simple and can be used to compile TypeScript or Less files, build web parts or uploading to the CDN.

User and Application Interfaces

React is a JavaScript library. It is used for creating user interfaces and expresses how your app, at any given point in time, should look. It automatically manages all UI updates when underlying data changes. As data changes, React conceptually hits the "refresh" button and updates the changed parts. React is about building reusable components and these components make code re-use, testing and separation of concerns simpler and streamlined.

ReST API (Representational State Transfer) is an interface that is provided by SharePoint. ReST API allows the performance of basic operations including creating, deleting, reading and updating through the exposure of all of the SharePoint entities and operations that are available in other SharePoint client APIs.

Office UI Fabric is the front-end toolkit that blends add-ins or apps seamlessly into Office including all web components, icons, fonts and styles used by Microsoft SharePoint and other Office applications. It is important to note that Office UI Fabric is not directly related to the SharePoint framework and it is not mandatory to use this to build the web parts. The advantage of implementing Office UI Fabric is the provision of familiarity to the end user – the Microsoft style of layout and application components.

As SharePoint continues to move in the direction of mobile, cloud based collaborative communication, the move to open source JavaScript in SharePoint Framework enables developers to extend SharePoint capabilities with creative, innovative and customizable solutions on the client side that is mobile ready and readily available across various devices and operating systems. In this position, SharePoint has created the opportunities for developers to share, create, innovate and sculpt the look and feel of SharePoint Framework.

SharePoint Framework: Developer and Scaffolding Tools


SharePoint Framework leverages commonly used developer tools and it does not dictate which JavaScript framework should be used to build the solutions. In the past, development of solutions was reserved to Visual Studio on Windows and developers primarily used C#. Communicating with SharePoint was done using SharePoint’s server API, or most recently, CSOM, JSOM or REST. The shift from a proprietary model requiring a significant amount of knowledge to a flexible and highly customizable framework was driven by huge customer demand for the need to customize SharePoint on-prem, online and in the Cloud. In addition, traditional farm based solution is incompatible with cloud based tools and technology. In order to continue moving forward with cloud based applications, a major change had to take place.

SharePoint Framework is highly customizable as it is entirely based on open source JavaScript. Its framework was developed in React as Microsoft chose to develop Delve and the new document library in React. Design and build is executed in the superset of JavaScript – TypeScript. TypeScript is then transpiled into JavaScript making development work more routine-based thus reducing coding errors. Though it is not mandatory that developers use TypeScript, though the investment of learning it will pay off in the long run, it should be noted that it is highly recommended that development of solutions should be done with TypeScript to ensure that customized solutions will be mobile friendly and looking great across all platforms during build and final release.

SharePoint Framework allows you to extend your existing tools and solutions while taking full advantage of exciting open source tools such as Yeoman, Gulp, Workbench, Node.js, GitHub and Angular while still maintaining the option to use Visual Studio, Visual Studio Code and Visual Studio Team Services.

Many open source tools have been available in the open source community for a number of years, but these tools are "new" in SharePoint Framework. Most notably are three products that are an integral part of SharePoint Framework and they each support the framework in the following capacities:

Yeoman is the scaffolding tool for web applications. With Yeoman, developers can create project structures that facilitate the use of custom functionality. This in turn allows developers to work faster.

Gulp makes development efficient through the leveraging of a wide variety of plug-ins to perform repetitive development tasks, automate minification and perform compression.

Workbench allows the developer to test new web parts and apps before migrating them to production environments by replicating SharePoint as a local and offline environment.

SharePoint Page Experience

As a core component, the modern SharePoint Page has a notably developer friendly page structure. Pages can be constructed by using any client-side JavaScript templating framework and can be technologically independent. This page structure provides the ability to host web parts, add-ins and new opportunities.

The framework provides a page layout that is responsive and mobile-ready. Each page has a "Chrome" structure that surrounds the page body. This section contains the out of the box logic supplied by Microsoft plus additional developer logic that has been built on top of it. Simply put, it contains your business context. This Chrome layer manages the presentation of the page so that it displays appropriately on the device whether it be desktop, tablet or smartphone.

The Page Body becomes the canvas where web parts, apps, files, Delve components and other elements can be placed and arranged according to business needs. By layering this on top of the Chrome layer, there is no need to worry about proper display presentation on different devices. The Page Body is where the developer mostly lives, interacting with anything that has been built and placed here. The developer, regardless of skill level, is able to customize SharePoint pages by adding any build that has been placed on the canvas by clicking on a plus sign, selecting and placing the components.

Through this process, developers will be able to extend the capabilities of SharePoint more efficiently, reliably and quickly, and best of all, if you follow the rules, it will be mobile ready and responsive right from the start.

As SharePoint Framework has not yet been released, the question of how do we prepare for it begs to be asked. Stay tuned as I answer this question in the second installment of The New SharePoint Framework: Prepare Yourself!

SharePoint and Flow


Technology has advanced in leaps and bounds in recent years, but one of the issues has been how do we get all these different apps to talk to each other across different platforms? Is there a product that can be the seamless handshake between these apps? Absolutely! This is where Microsoft Flow steps in.

The integration of Flow with SharePoint addresses the issues of cross application action-reaction events, or IF this, then that scenarios. There is no need to write a single line of code to achieve this as Flow has templates integrated within it so creating and managing your flows are simple while saving you precious time to focus on more important tasks.

By integrating Flow as a workflow tool into SharePoint Online lists and libraries, Microsoft has achieved a powerhouse which is able to quickly deliver automated information with ease to your audiences on-prem or in the Cloud. The ability to automate and receive notifications, synchronize files and obtain data between your favorite apps and services provides you the ability to reach out beyond your intranet.

The templates that are currently included in Flow allow you to create workflows with 43 services, including Office 365, SharePoint, Facebook, Twitter, YouTube, Mail Chimp, One Drive, Dynamics CRM, Google Drive, Slack, Dropbox, Salesforce, SQL, GitHub, Wunderlist and Instagram. Microsoft has indicated that they will continue to add more services and templates as they continue to work with the integration of the two programs. One key feature, as with most Microsoft products, there is the option for community members to contribute their flow for other members to use.


Unlike SharePoint Designer, Flow does not require lists and items to be in one site. With Flow, it will search for your items no matter where they are stored in SharePoint, even if the site resides in different site collections or a different tenant. This provides the power to initiate and generate notifications based on events across your corporation to your targeted audience.

Not only does Flow and SharePoint reach out to your audience, your audiences’ actions reaches back to Flow. Every event that you have indicated as a trigger, whether it be the project name, a hashtag, or a person’s name, each generated notification is logged into a SharePoint list or an Excel file and each time your audience uses these triggers, it logs this information. The data can then be analyzed at a later time. Not only is this beneficial for analytics, but the ability to add a recurrent step for delivery of this data is built into Flow. The recurrence can be set to occur weekly, daily, hourly or as frequently as minutes and seconds.

Microsoft continues to integrate their products so there is more cohesion between their various applications and third party ware. In this case, the integration of Flow with SharePoint has provided greater accessibility for users and better analytics for the corporation all the while increasing productivity and lessening the workload.